Thanks to both of you I’ll certainly be looking at the stuff you’ve linked too and thanks for all the advice.
Cheers👍
Thanks to both of you I’ll certainly be looking at the stuff you’ve linked too and thanks for all the advice.
Cheers👍
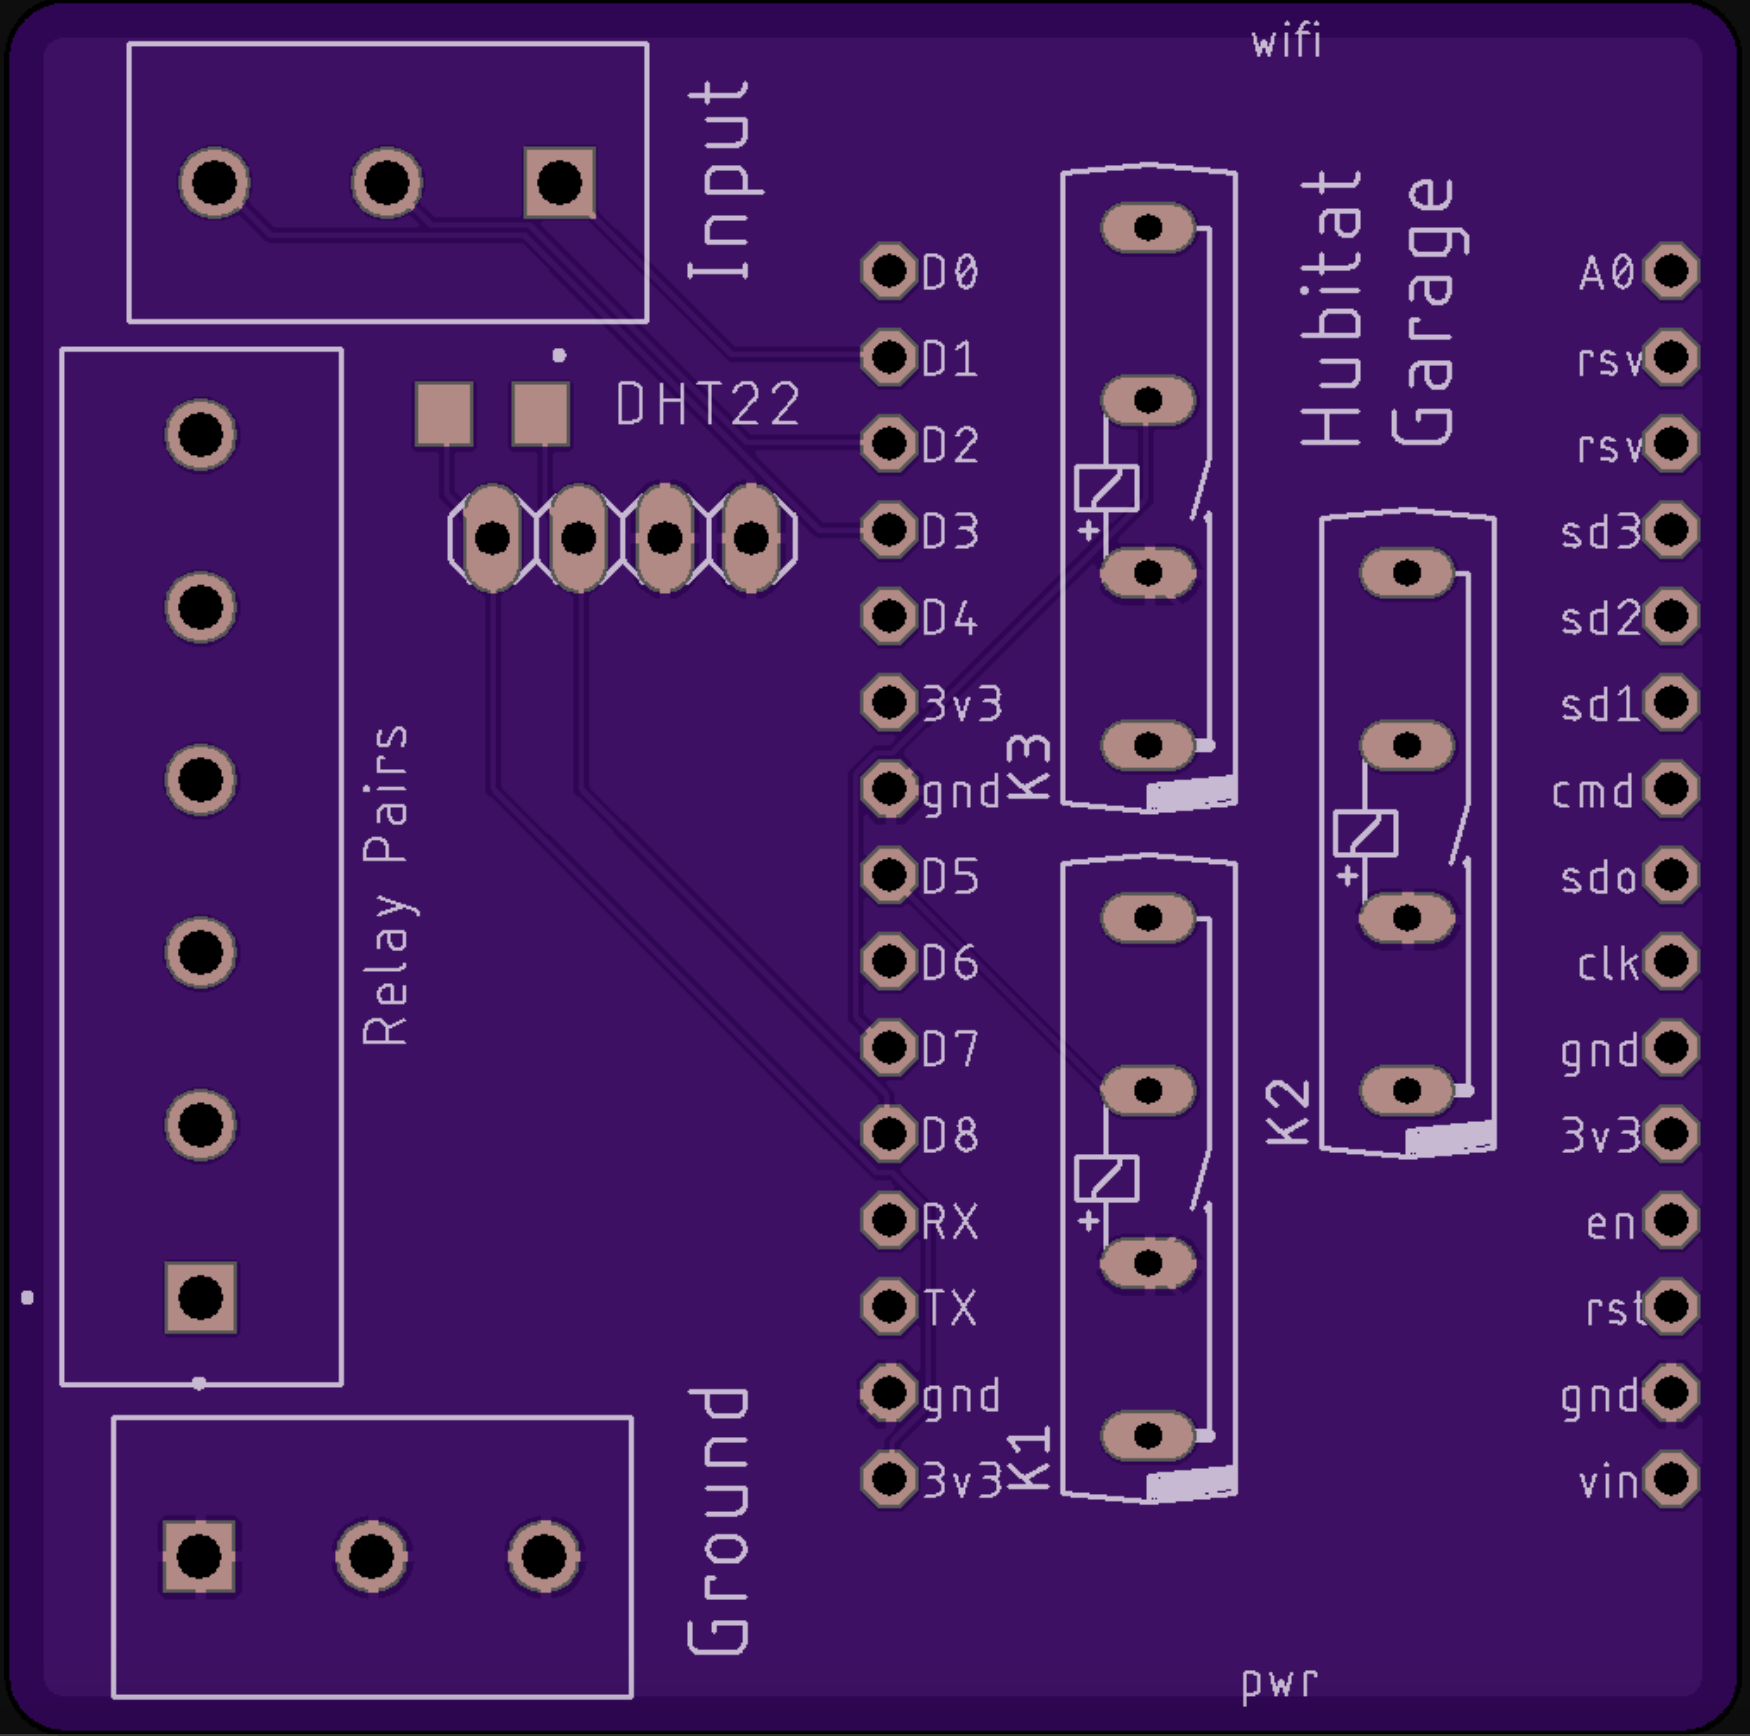
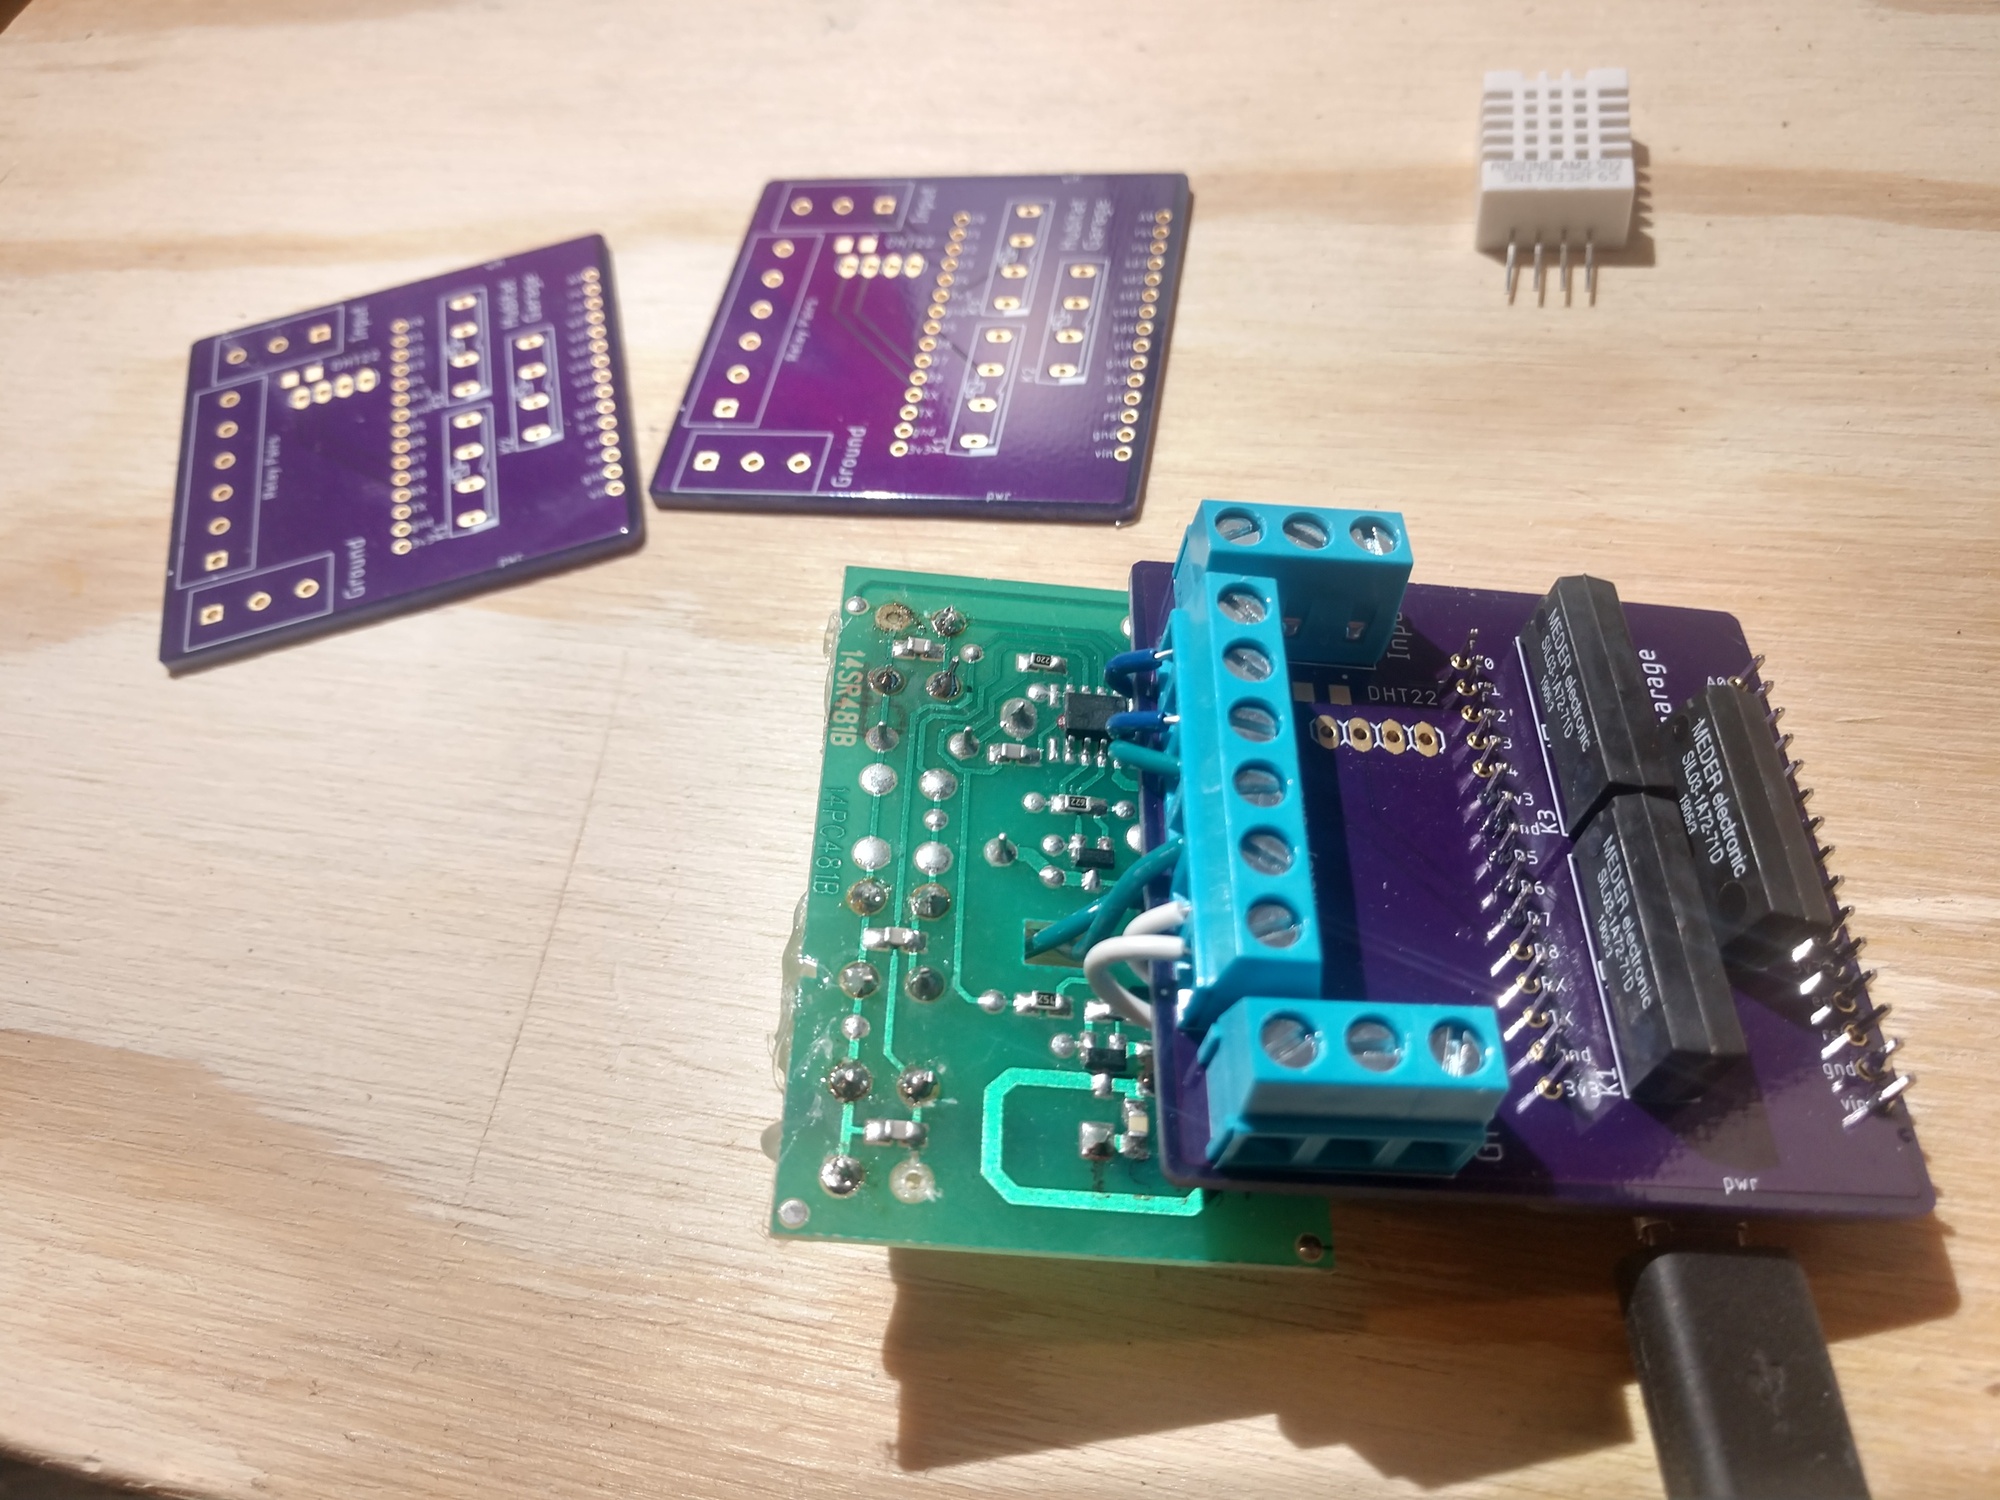
Just made this and ordered from OSH park this morning... 3 contacts, 3 momentary relays, and had space for a dht22. 
That's a NODEMCU (esp8266) on the right if you couldn't tell. And the reed relays are 3.3V, but for whatever reason the flyback diode on 3.3v is hooked up opposite polarity from most 5V relays I've used. Luckily with those you could always turn them 180 degrees anyway.
this will clean up my old rats nest wiring for sure!
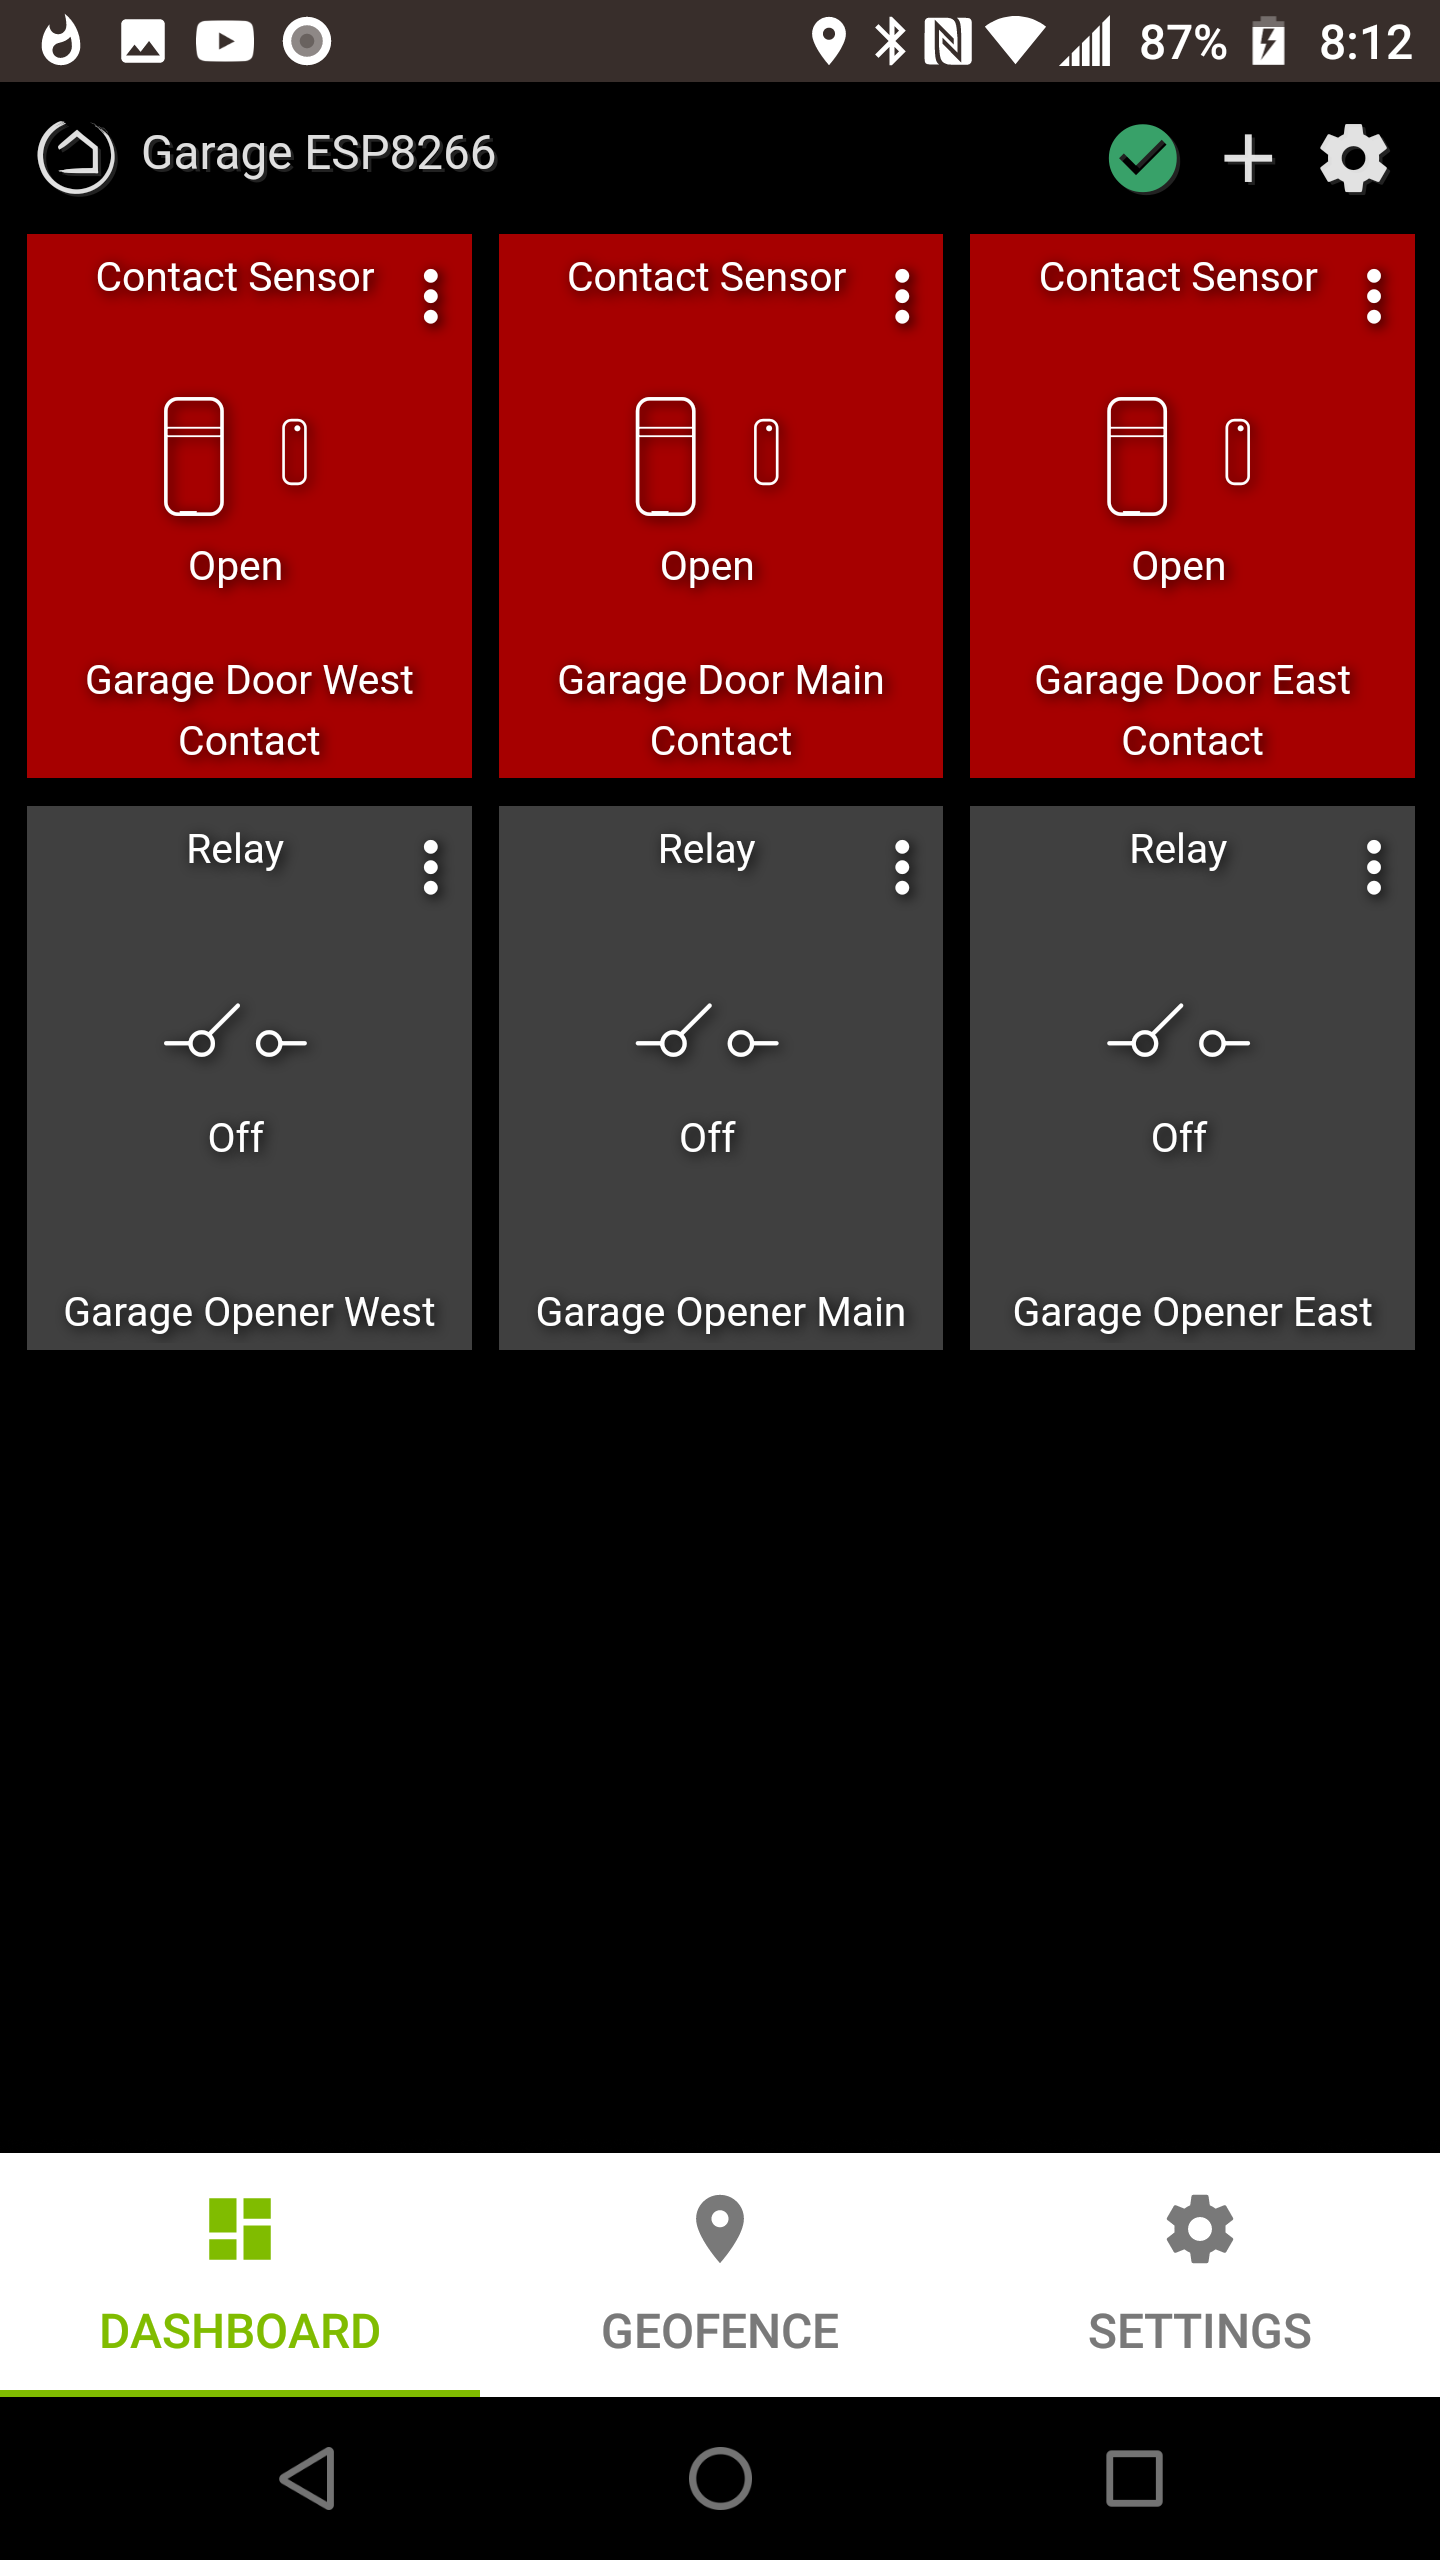
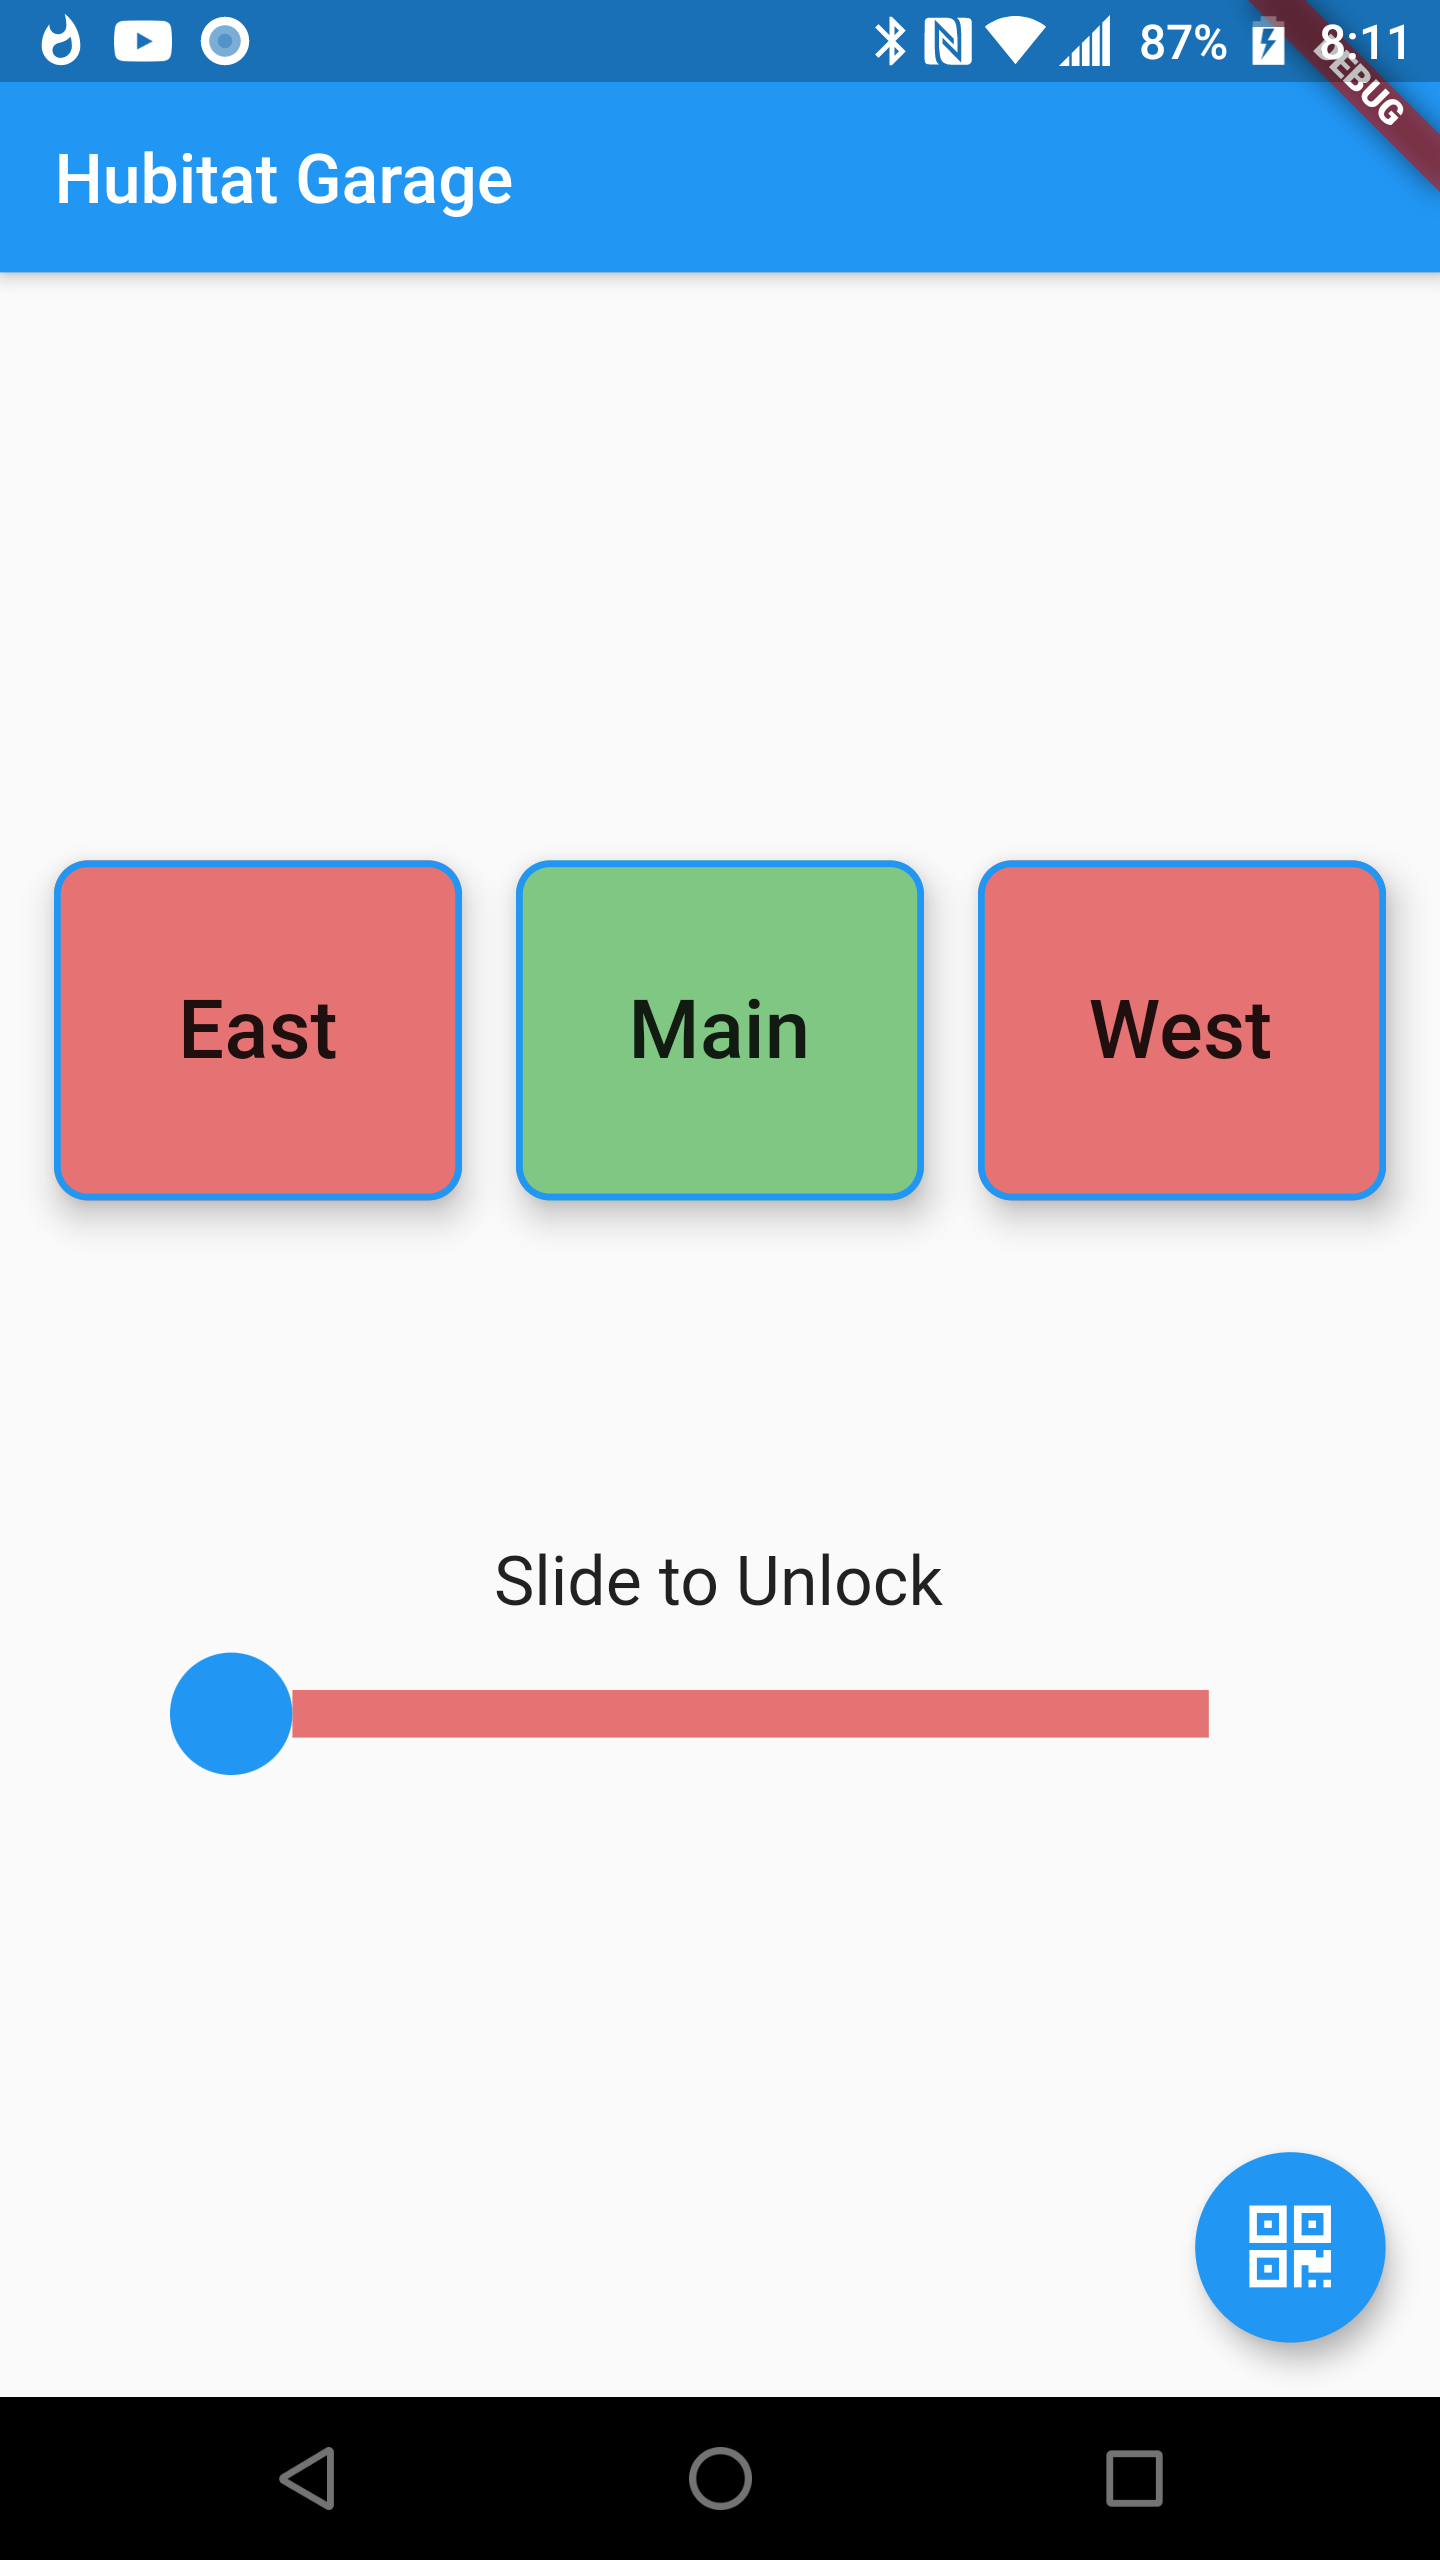
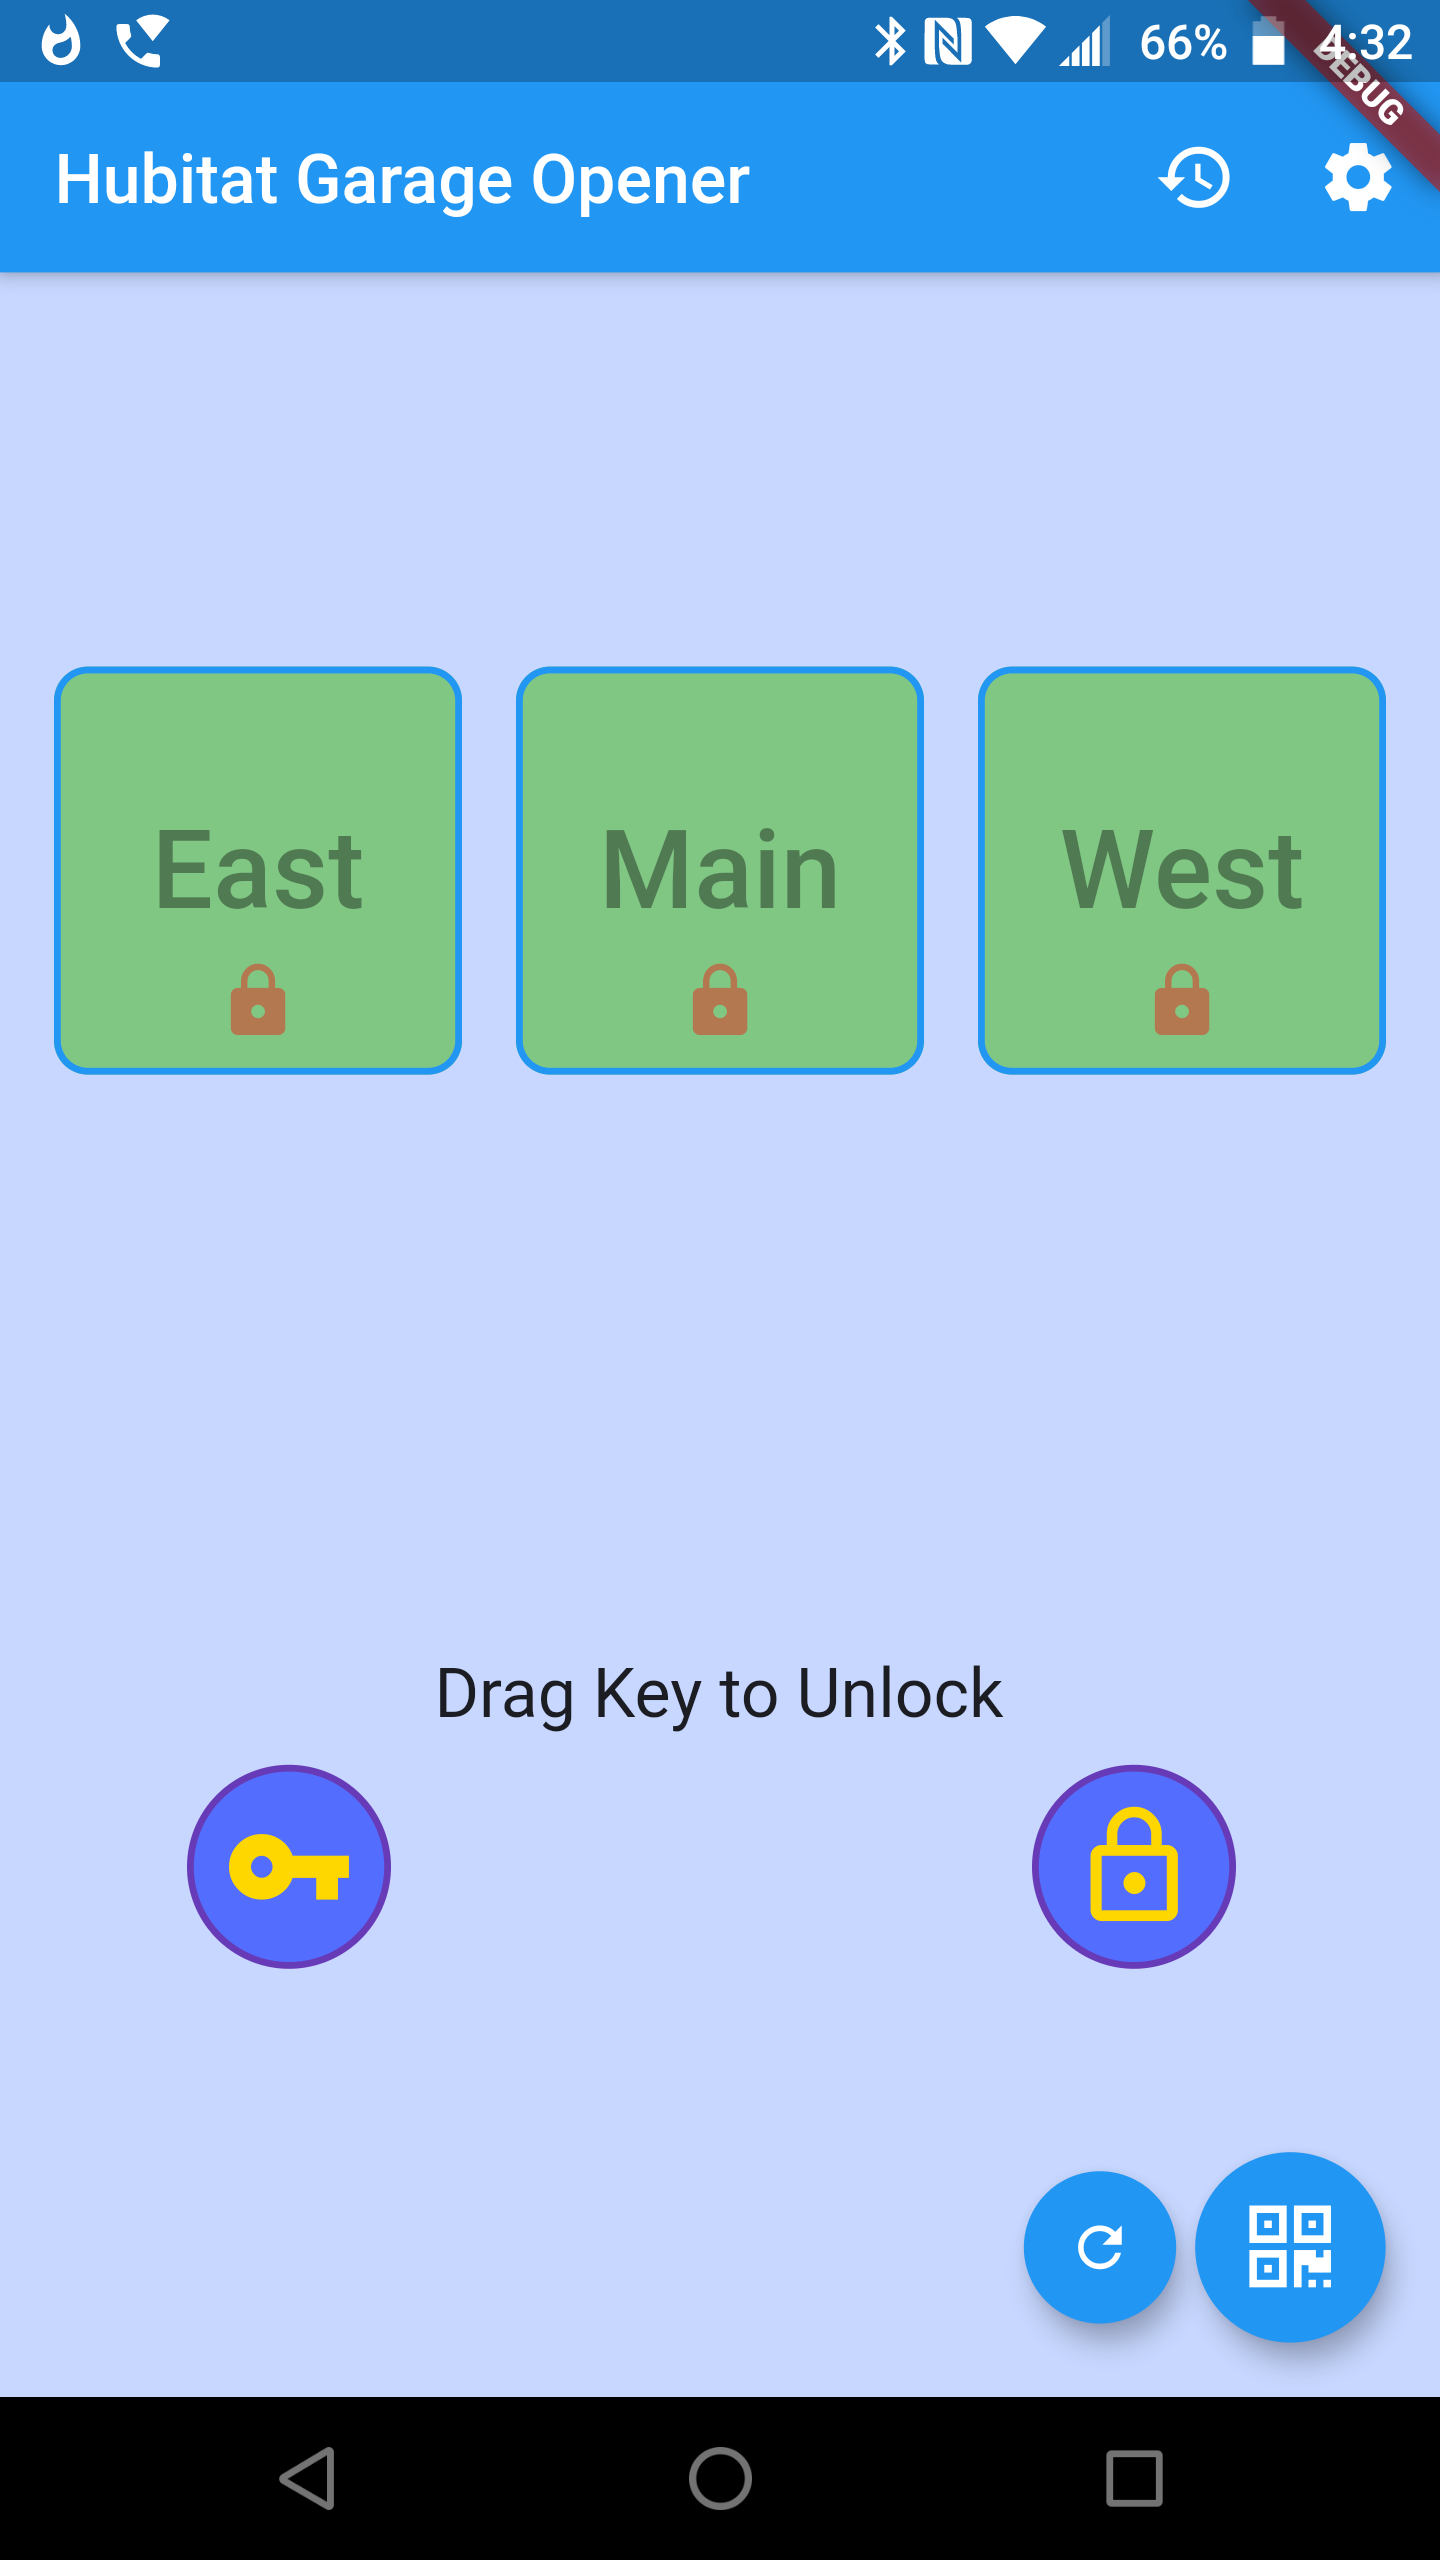
I just learned about the Maker API, which is perfect for something like the garage door. I tried Google Home, but it's just too slow, as is the standard Hubitat App. I want something I can just open up, slide a "lock" slider to prevent accidental taps to open, and send down the REST command to open up the door. I'll post here when I have it built. I use Flutter.
BTW, the 3.3V reed relays are SIL03-1A72-71D
Now instead of this (takes a while to load for me etc):
I'll use something like this:
Totally just slapped that together so not very pretty. But you get the idea.
Dan,
For my next project, I need your input. Please comment.
Recently I have installed a new hood range in our kitchen. The power, speed and light are controlled through touch screen buttons (total 4 buttons) with a controller circuit.
I would like to add ST_Anything to this appliance as parallel controlling mechanism with existing one.
So, I have two options:
Digital Option: Use I2C to communicate controller of the touch screen and send and receive the data as needed. (My knowledge in I2C is not good) but can carry out the suggestions and guide. I am not sure if I can use I2C capabilities of ST_Anything or not. I might ask the IC manufacturer for library. In this case, this appliance will be slave and ST_Anything will be master. But need to sure, this option is doable.
Analog Option: Using analog simulation of the touch screen pad by grounding the touch plate through NO relay contacts with 2pf capacitor in series. (2pf was suggested by the touch controller designer of this unit). Planning to use ST_Anything switch in this case. To confirm the function status, voltage across the status LED indicator will be used.
Please comment which is the best and simple option based on your experience.
Thanks
Tito
I realize I am not Dan (never will be  ) and not asked to comment but the first thing I would do is find out the cost of the replacement parts should anything go wrong, however unlikely that might be.
Thanks Zarthan for sharing your idea. I think Dan will appreciate any comment from the community. I too.
The risk factor is low. Replacement Cost of the board is ~$50. As this design will not handle large power directly, damage due failure would not be high.
Thanks again
Wow! I have never heard of anyone trying to hack a touchscreen hood range. I am not sure that I would even know where to start with a project like this.
For Option 1...
Are you suggesting putting the microcontroller in between the touchscreen and the rest of the electronics? Sort of a man-in-the-middle scenario? That might be fairly complicated to accomplish, as the microcontroller would need to emulate the touchscreen, and be able to emulate the rest of the electronics. ![]() Interesting idea.
Interesting idea.
Option 2 sounds somewhat simpler... But I really don't know.
Thanks Dan for your comments. The touch screen controller is using Holtek BS83B08A-3 which has built-in I2C and I am planning to use ESP-8266 or ESP-32 and directly communicate with BS83B08A. So, no additional hardware needed other than wires.
The 2nd option is doable because I am confident I can do it. I did similar project few days back. Just to compare two options.
@ogiewon Hi, curious if there is any way to control a WS2812B with your work here on an ESP8266. The led's are driven with a one wire bus and can be cascaded. There are libraries out there already to do all this, but I was curious if your device driver for RGB or RGBW could work for this?
Those are NeoPixels, correct? HubDuino only supports analog RGB or RGBW LED strips. Others have attempted to integrate NeoPixels without too much success. Sorry.
Ok thanks @ogiewon! I'll try maybe analog RGB
Got my pcbs today. I don't need he other two. Anyone interested? PM me and we can figure something out.
Ok, I had an old board laying around that I had put one Neopixel on and was able to start with the EX_RGB_Dim.cpp and .h files to work with one Neopixel. Its not a whole strip with colors for each individual light (does Hubitat/HubDuino have examples of the concept of a "strip" of anything?) but it works great with the all the settings on the dashboard. You could of course expand the number of leds on a strip and just set them all to the same color quite easily (just add a loop). I'll clean it up and send you a pull request soon.
It's on the ToDo list... If anyone wants to help, I am always willing to accept! ![]()
Ok, issued the pull request @ogiewon. I noticed that using the standard hubitat UI sometimes gets laggy over time? Not sure what that is yet. But when I use the Maker API (which I used above in the garage door app for example) everything was silky smooth fast as much as I tried.
I'm planning on making another color picker app now for some signage with this.
Thanks again for this super awesome set of tools/code to build off of. I can't even start to explain how happy I am with Hubitat and the community work here!
(Oh sorry if I messed up any spacing btw, I'm a spaces guy, can't stand tabs.  )
)
@ogiewon So now that I'm doing my second hubuino I need a bit of advice/help. How do I get two Hubduino parents, with two different IP addresses into my hubitat? (I think I was seeing some odd behaviour with two nodeMCU's both trying to use the same IP address. )
You need to change the Hubduino code for the second board to use a different IP address. Upload that code to the second board. You then create a new virtual device and choose the Hubduino driver. Fill in the second IP address.
There is alternate code in the sketches to use a DHCP address. I have used that for boards where there are several identical. The problem I found with that is that the boards hang on to the first address and I like to do DHCP reservations. You then need to reflash them to clear out the WiFi information after you have made the reservation.
Thanks @zarthan good to know. I'm fine with static IP's. I just had already forgotten how I had originally setup my first HPE. Doh. Makes sense now.
I feel like I'm having an issue when I use the "contact" example of the esp8266. Like it's firing continuosly when the level is low. I have REED switches for contact closure and they are closed when the magnet (door) is closed. But when I hook them up, my HPE seems to go out to lunch. How are contact closures working in HPE? are they edge or level interrupt triggered, and if level, do they go infinite loop on me if the level is met? Sorry, just confused at the moment why hooking up my reed switches makes everything break when it was fine without those on there.
Download the Hubitat app