Hi All, has anyone here built anything similar to this ultrasonic parking sensor using HubDuino? If so i'd be interested to hear about it.
EDIT: I did some more searching and found this which is using the LED RGB ring which would be great as I wouldn't need the buzz or mains voltage coming into it either.
I did one a while ago. It was surprisingly easy to use and quite accurate. The problem I ran into was mounting it. I don't park close to the wall in my garage. I have a one car garage and the door to the house is in-line with the way the car parks. I tried to figure out some way to mount it on a board or something in the middle of the garage but after struggling to figure something out I just gave up. I also got a new car that has all-around cameras (front and back) and all around sonar as well. So, made my battles to get something worked out for this kinda moot. But they are really, REALLY accurate at short distances, less than 2 feet.
The one thing I did which wasn't done of this video was a "too close" with the color blue, to know if I had gotten too close and had to back up. I also didn't use the flashing part but that looks much better than what I did.
Very cool did you use HubDuino or just built standalone? can you share the sketch if you still have it?
Yeah fair enough. I think for me it would work well as I have a shelving unit that the car rolls right up to (see pic) which is why I thought this would work pretty well given its bumper height and plenty of power behind and places to run the cable neatly around etc. I like your idea on the colour blue that's awesome.
I just did a standalone since I didn't want the lag of reporting it to my Hub (ST at the time). Yeah, you have the EXACT type of layout that this type of sensor would work perfect for. you even have a great place to mount it and the light. I have my sketch but it is very, VERY basic. I would suspect that the one from the video you showed is much, MUCH better. Also, I ran this off an Adruino mini pro since I didn't need the wifi requirement on the ESP8266 but you could use one of those just as easily. I powered it through a smartplug though so i could shut it off when the garage door was closed. I figured I wouldn't be moving the car without the door open. That way, it wasn't out there flashing all the time when i didn't need it to be.
Here is what I use. Might not help you, as I'm not sure it is sold outside the US. I strongly suspect if I cracked it open it is probably an arduino or esp board inside. lol.
Not sure if this question should be for @ogiewon or @bravenel or both or someone else. I have an ESP8266 Hubduino device that uses a DHT22 to report temp and humidity and a BME280 to report atmospheric pressure. My problem is with the pressure part and my question is if PressureMeasurement is one of the capablities listed in the Driver Capability List - Hubitat Documentation, why is there no type of Pressure Device listed in Link to Hub? I am not able to send the pressure readings through Link to Hub because there is no category showing that covers a pressure device.
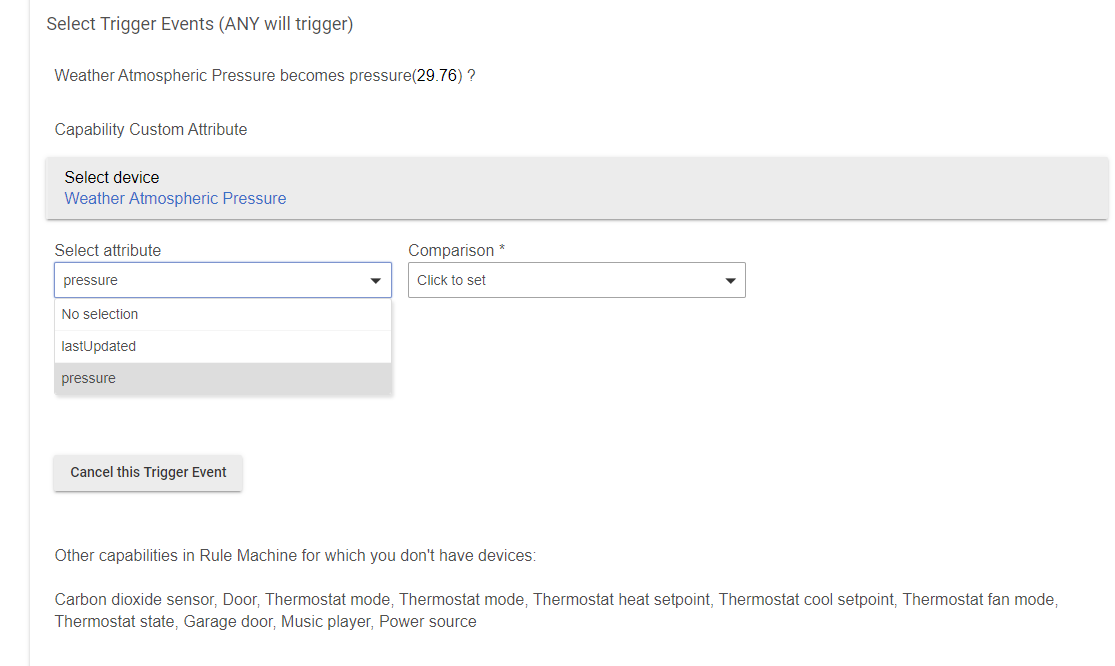
Also, I cannot find a pressure capability in the list in RM either but I can find a pressure attribute for the device under Custom Attribute. The picture from RM below shows pressure listed as a selection under Custom Attribute with the wording at the bottom suggesting (as I read it) that I don't have an actual PressureMeasurement device.
I do not believe the wording at the bottom is implying you don’t have a device that supports Pressure Measurement. It is stating that those other capabilities are ones you don’t have any devices for, yet.
In general, Pressure Measurement is relatively new and not a wildly popular capability. Therefore, I am guessing not all Apps support it, yet.
Ok...Thank you for clarifying that @ogiewon. The sentence is a bit vague to me then in whether it means including this one or not. I took it to mean including this one since it started with the word "Other" as in "This one and Other-----". It would have been more clear if that word was left out and simply stated "Capabilities in Rule Machine for which you don't have devices". Something @bravenel should think about changing for clarity sake.
When you use Custom Attributes, that can sweep in all sorts of things that RM has no a priori awareness of, as these are defined by the driver, not the platform. So, there is no way to list those in the "Other capabilities... " list. Pressure Measurement is not a capability that RM is aware of.
I just want to understand this correctly @bravenel and I am honestly not trying to be argumentative. I think I understand that Custom Attributes are something a driver might define that RM may not recognize as supported by the Plaform. Outside of this though, are you saying that just because the Hubitat Driver Capabilities document shows driver support for the PressureMeasurement capability (or any other), that does not mean RM will show this capability in the list if there is a device installed for it? My assumption was that if the Hubitat Platform supported certain capabilities in the drivers, these capabilities would show up and be usable along with any other capability anywhere else in Hubitat like RM or Link to Hub. Am I wrong here and am I misunderstanding what Platform or supported means?
Each app supports what it supports, not necessarily every capability of the platform. RM does not support every capability, and this is one reason that Custom Attribute was introduced.
@ogiewon While waiting for a couple of MAX31855 thermocouples, I thought I would try using a MAX6675 thermocouple board that I already have. I don't think they use the same libraries as the 31855. What modifications would I need to make to add the 6675 library?
Just to expand on what Bruce has pointed out....."supported" on the platform level means that you do not need to define the attributes and commands for that capability when developing a driver. For example, if you define a driver as supporting the switch capability, you don't have to also list commands for on and off or the attribute "switch". You can just skip over that and define the methods for on and off. If you add switch level capability, the driver doesn't have to list the command setLevel or the attribute "level" under it's metadata, you can just use the method setLevel and the attribute "level" in your driver because they come from the capability Switch Level.
And from an app perspective, if you pick a device that supports the switchLevel capability, you can assume that the device supports the setLevel command, because that is part of that capability.
If we didn't have the switchLevel capability, can you imagine how hard it would be to write an app for the platform? If every developer got to choose what commands to use for different things it would be chaos. You would never be able to do anything if you always had to check to see what command that driver used to set the level.
A capability is just a shorthand that includes a bunch of commands and attributes. And "support" for that capability from the platform level means that those commands and attributes have been defined in the platform. Nothing more. Every app has it's own set of limitations as far as supported commands, capabilities and attributes and nothing says that an app has to support all the capabilities the platform does. Nor would we want them to.
Also Pressure isn't the only capability that isn't listed in Rule Machine. There are several others. But they are all so esoteric that, IMHO, they don't warrant the time to integrate them, especially now that custom attribute triggers allow you to trigger off of literally anything, even attributes that are not part of a supported capability. The custom attributes give you more flexibility than just limiting the app to supported capabilities. I'm sure if more folks start using barometric pressure as a trigger and everyone start clamoring for it, Bruce would revisit that choice. But you are literally the first person I've seen try and use barometric pressure as a trigger in a rule. You're the Jackie Robinson of Barometric Pressure Rules!
I very much appreciate your response @Ryan780. It helps me to understand things a lot better. Knowing all this now, I've probably confused things a bit. I was using RM capabilities as an example, albeit I now see a bad one, thinking the capability should show in all places if it showed in one. I mentioned the built in app Link to Hub also and that is really what I wanted to do with this. I wanted to send this info to my other hub but I see I'm not going to be able to do this. I can still reprogram and move this device to the other hub and do what I need that way I think. I am running the InfluxDB Logger (that has support for pressure devices) on my second hub to send data to Influxdb. I have no devices connected directly to this hub.
Edit: Just to explain better what I'm doing, this device is essentially a little weather station I have out on the front of my shed. It provides temperature, humidity, barometric pressure and illuminance data that I have on a dashboard. So far I'm only using illuminance to trigger anything. When I got to experimenting with InfluxDB and Grafana, I wanted to chart this data but the device is on my primary hub. The pressure data is the only part I can't push to the second hub with Link to Hub that is running the InfluxDB Logger app.
Hi @zarthan. In order to add support for a different thermocouple board, I would recommend you start with a copy of the PS_AdafruitThermocouple.h and .cpp files. Rename the copies to include the MAX6675 name. Then, within both files, change everything to use the MAX6675 name as well. Include the correct Adafruit library for the MAX6675, and change any calls to use that new library's calls.
This is basically how I add support for any new device. Start with something that is close to the new device, copy its .h and .cpp files, then hack away to make the new files work for the new device.
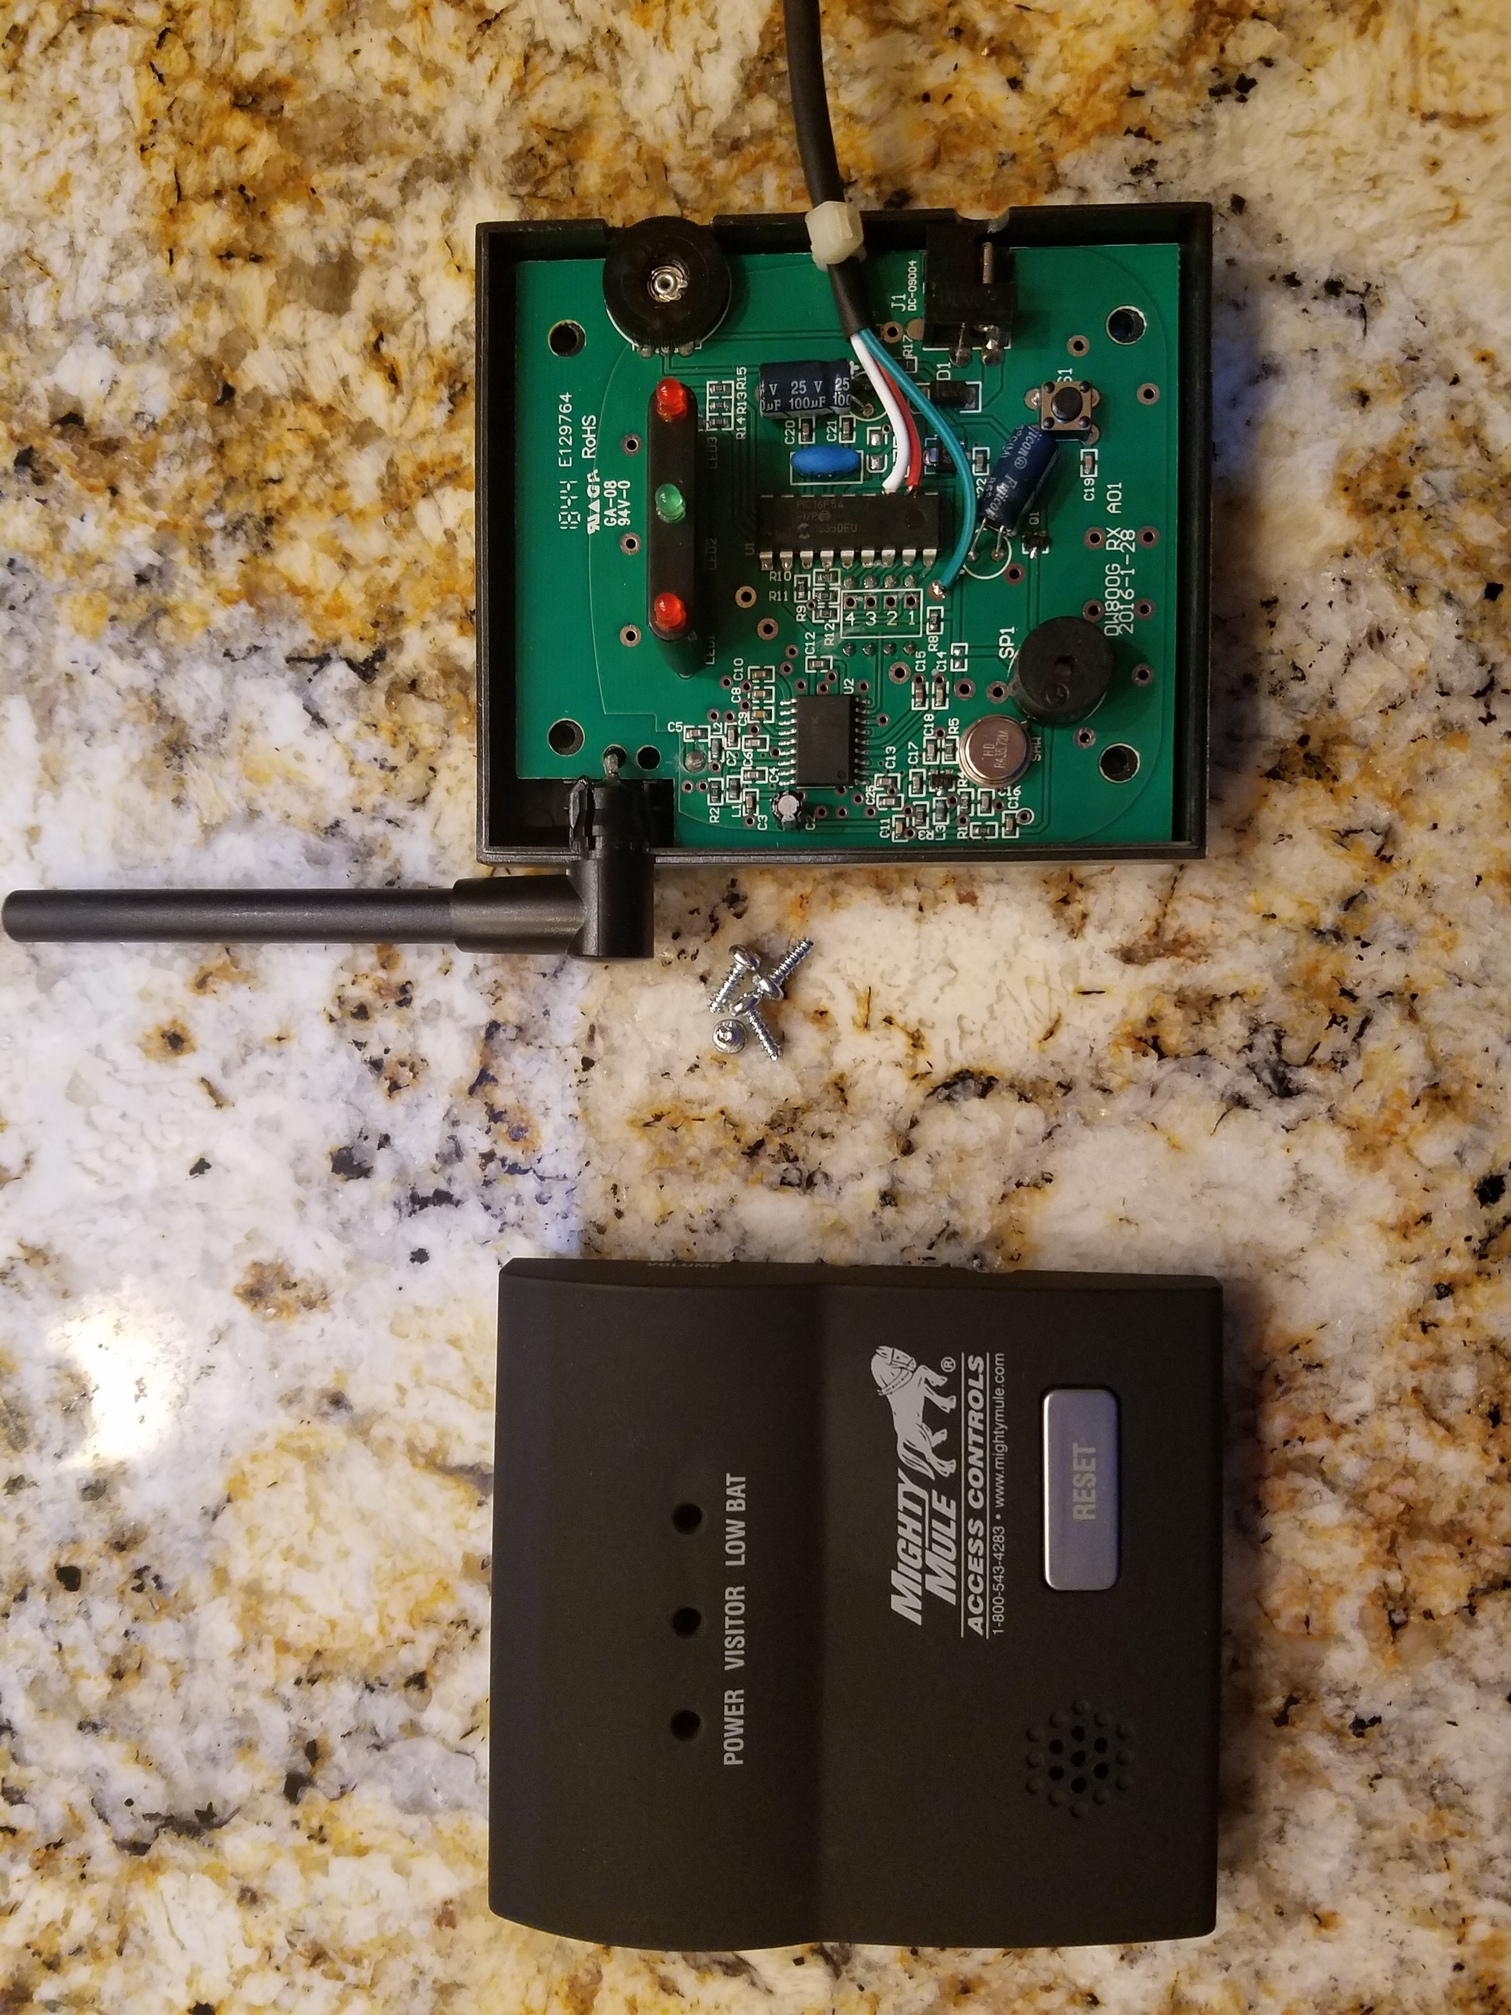
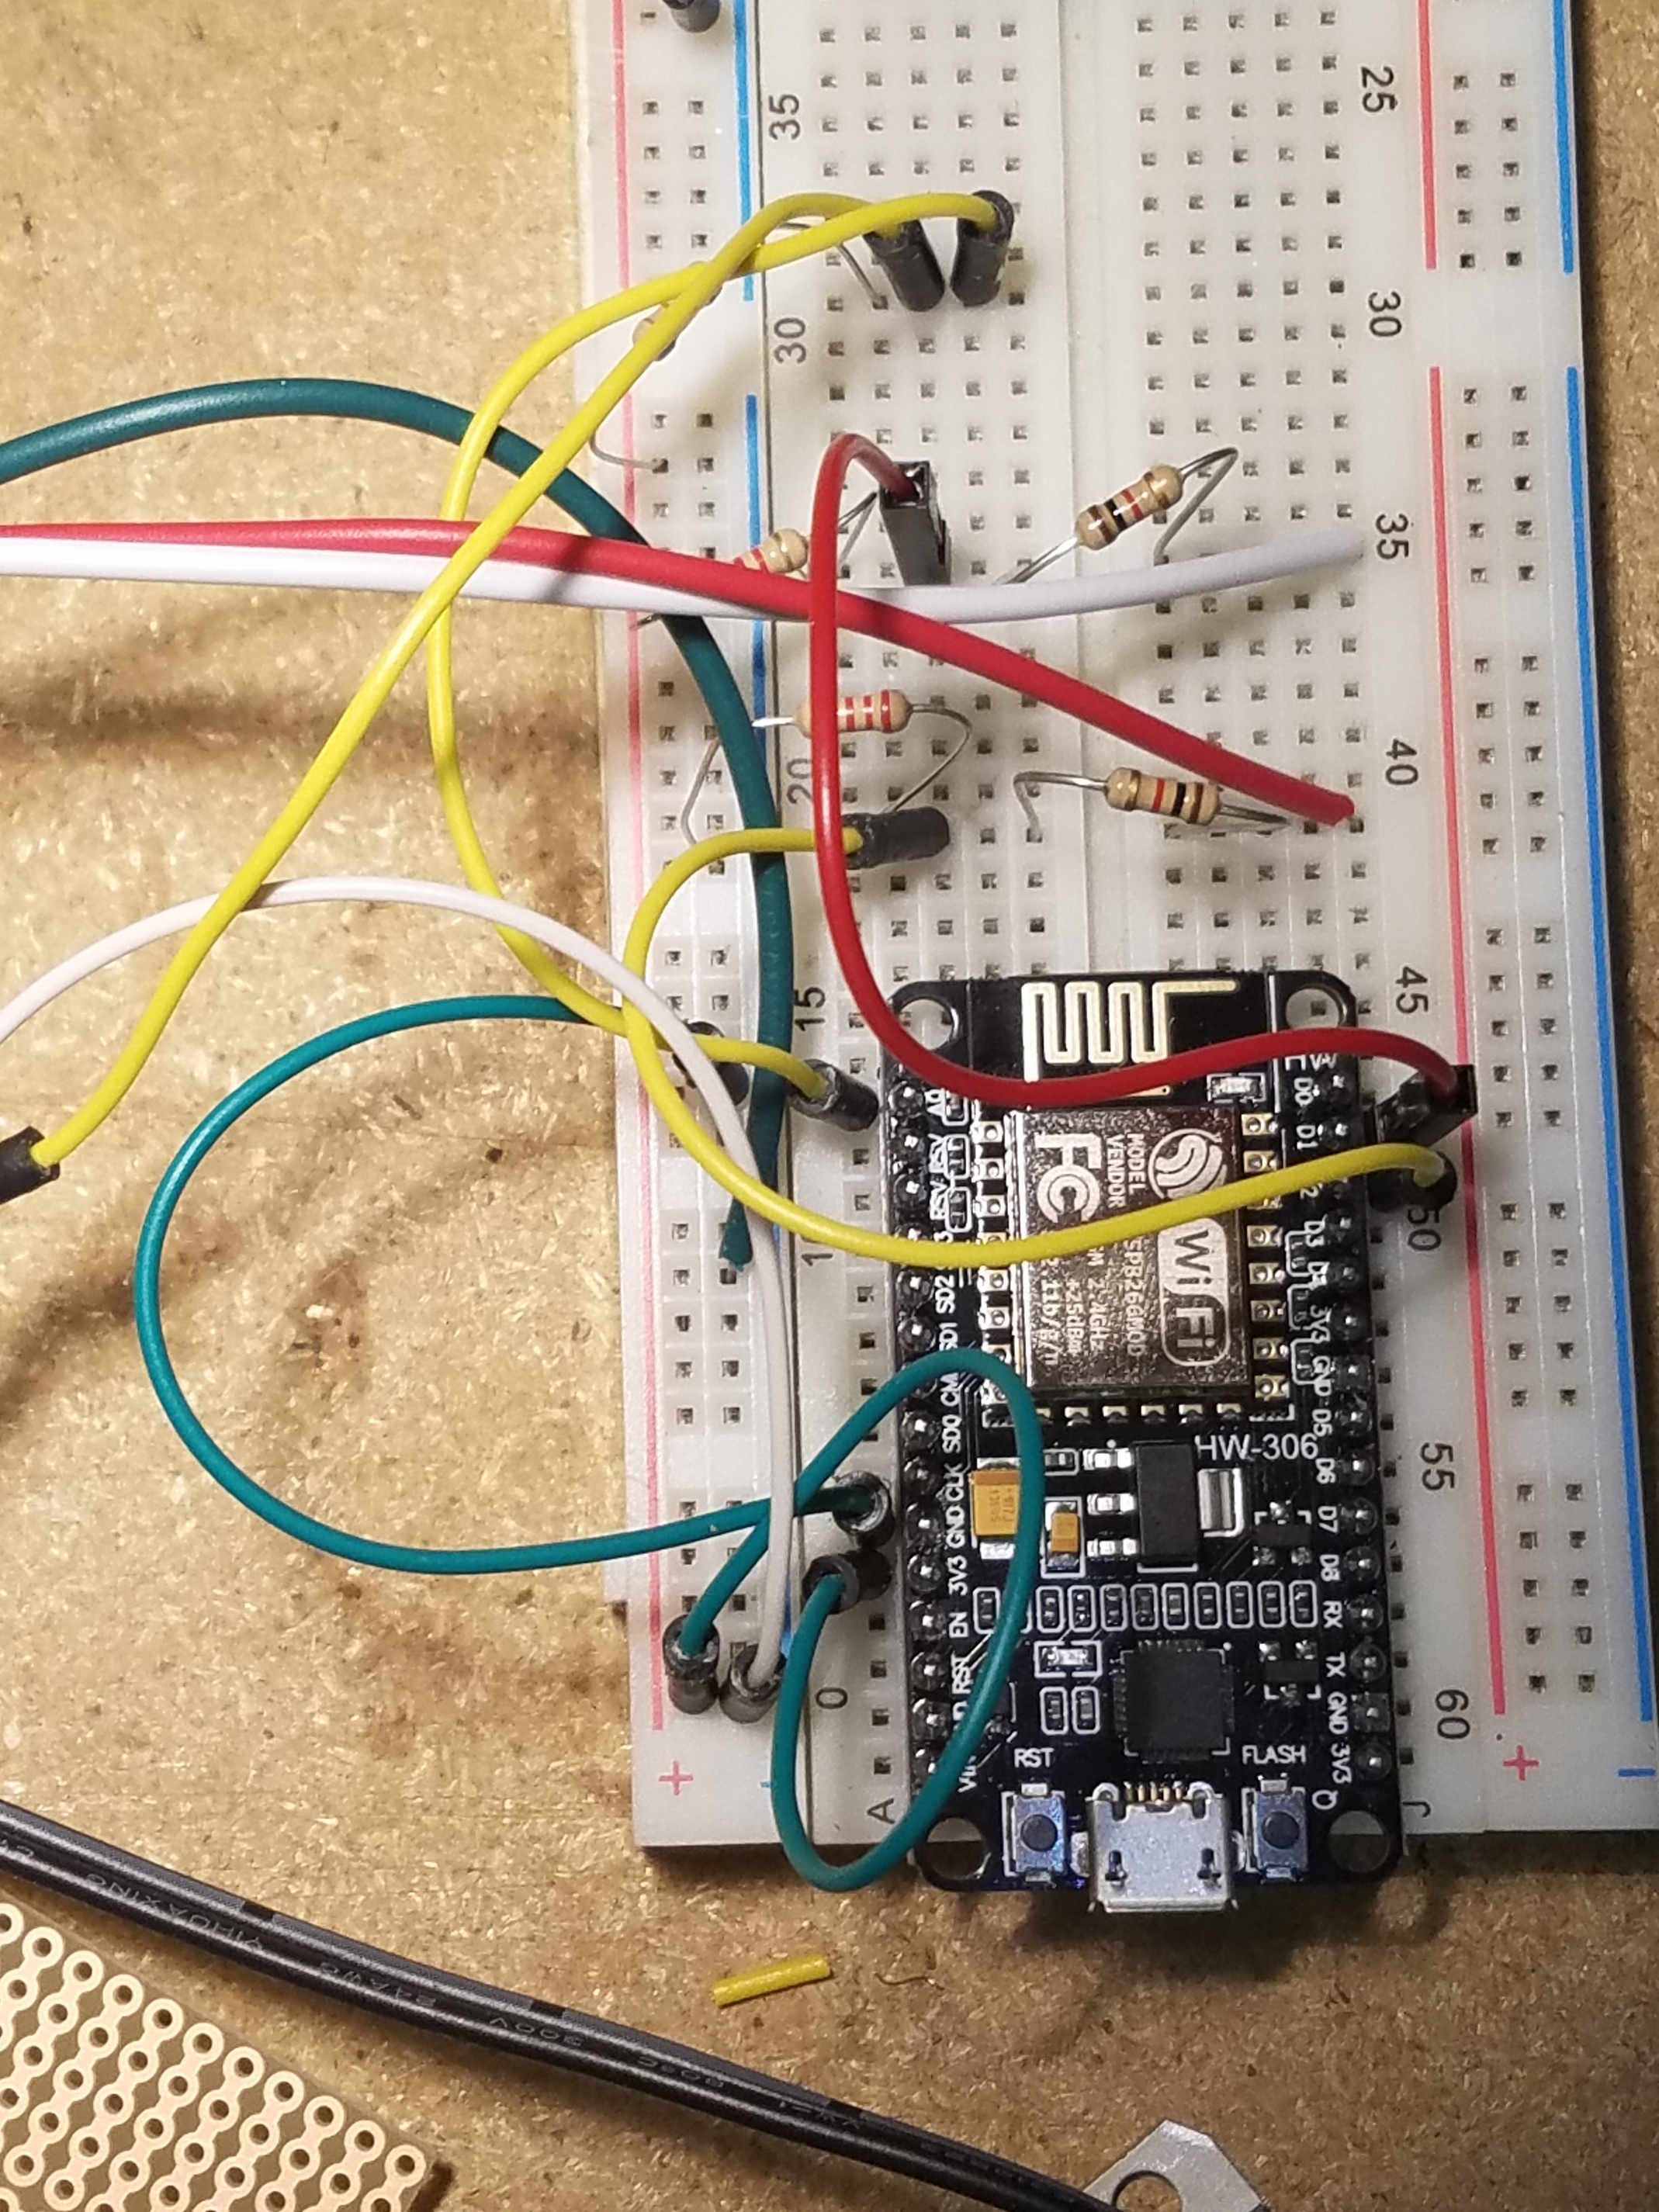
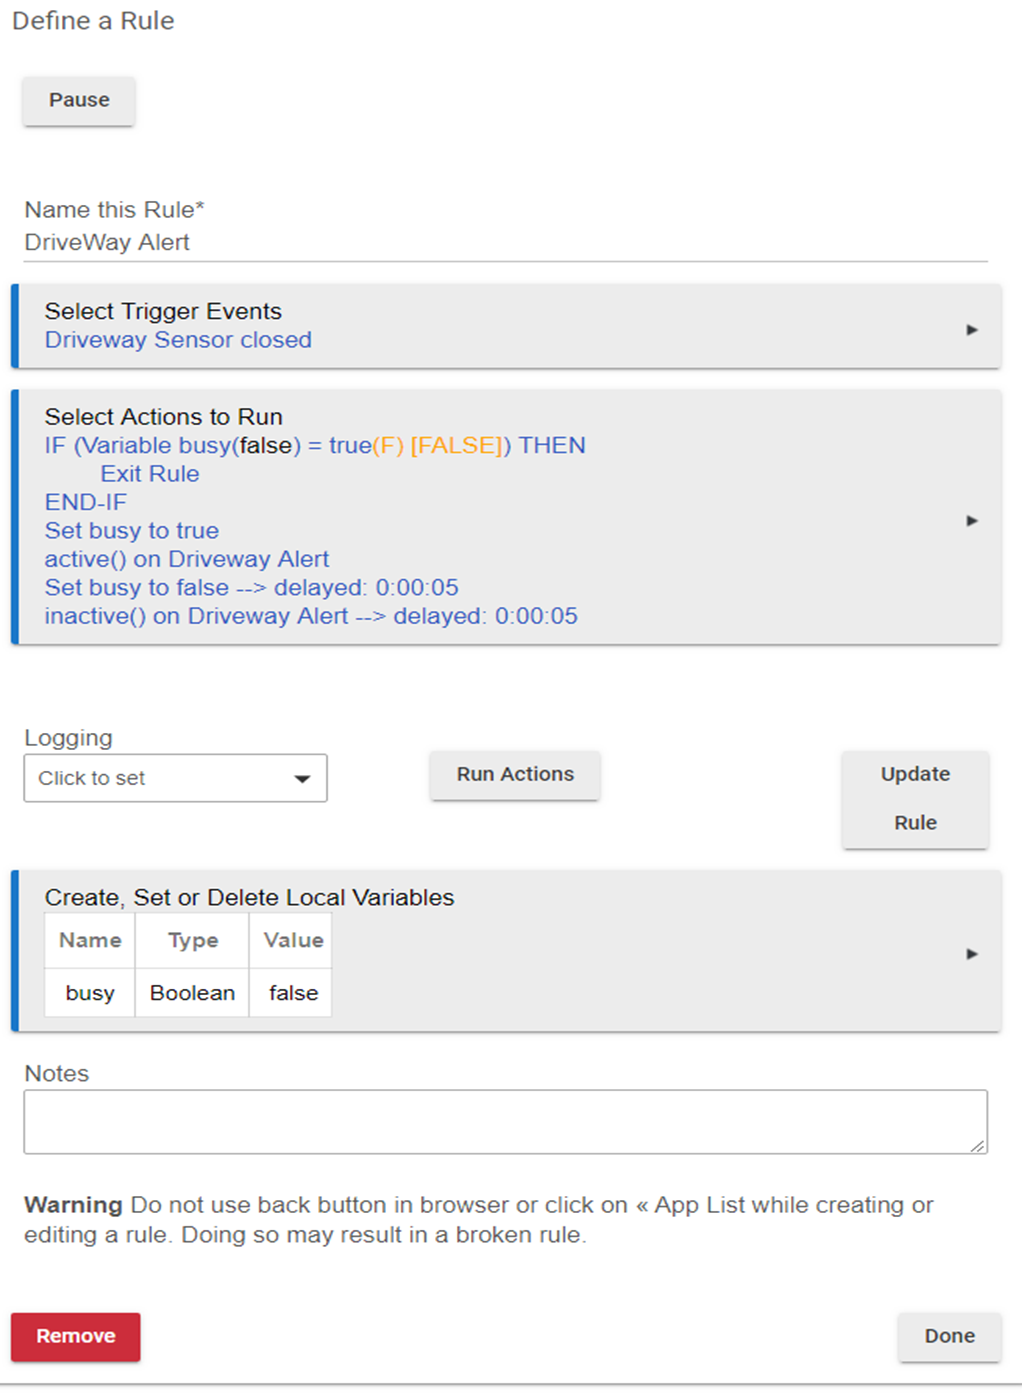
Wanted to share my recent project with HubDuino! I have a Mighty Mule driveway alert, but needed to integrate it into HE. Searched the forums and found this:
After watching that vid, I opened mine up and did some testing. Found that pin 11 is for the battery low indicator, and pin 12 is for Visitor. It is TTL output (5v). I soldered on a 3-pin plug and drilled a small hole in the case to pass out the side.
I've been recommending someone do this forever! Glad to see it actually works. Now I'll have something to link when the question comes up again. Nice job!!!
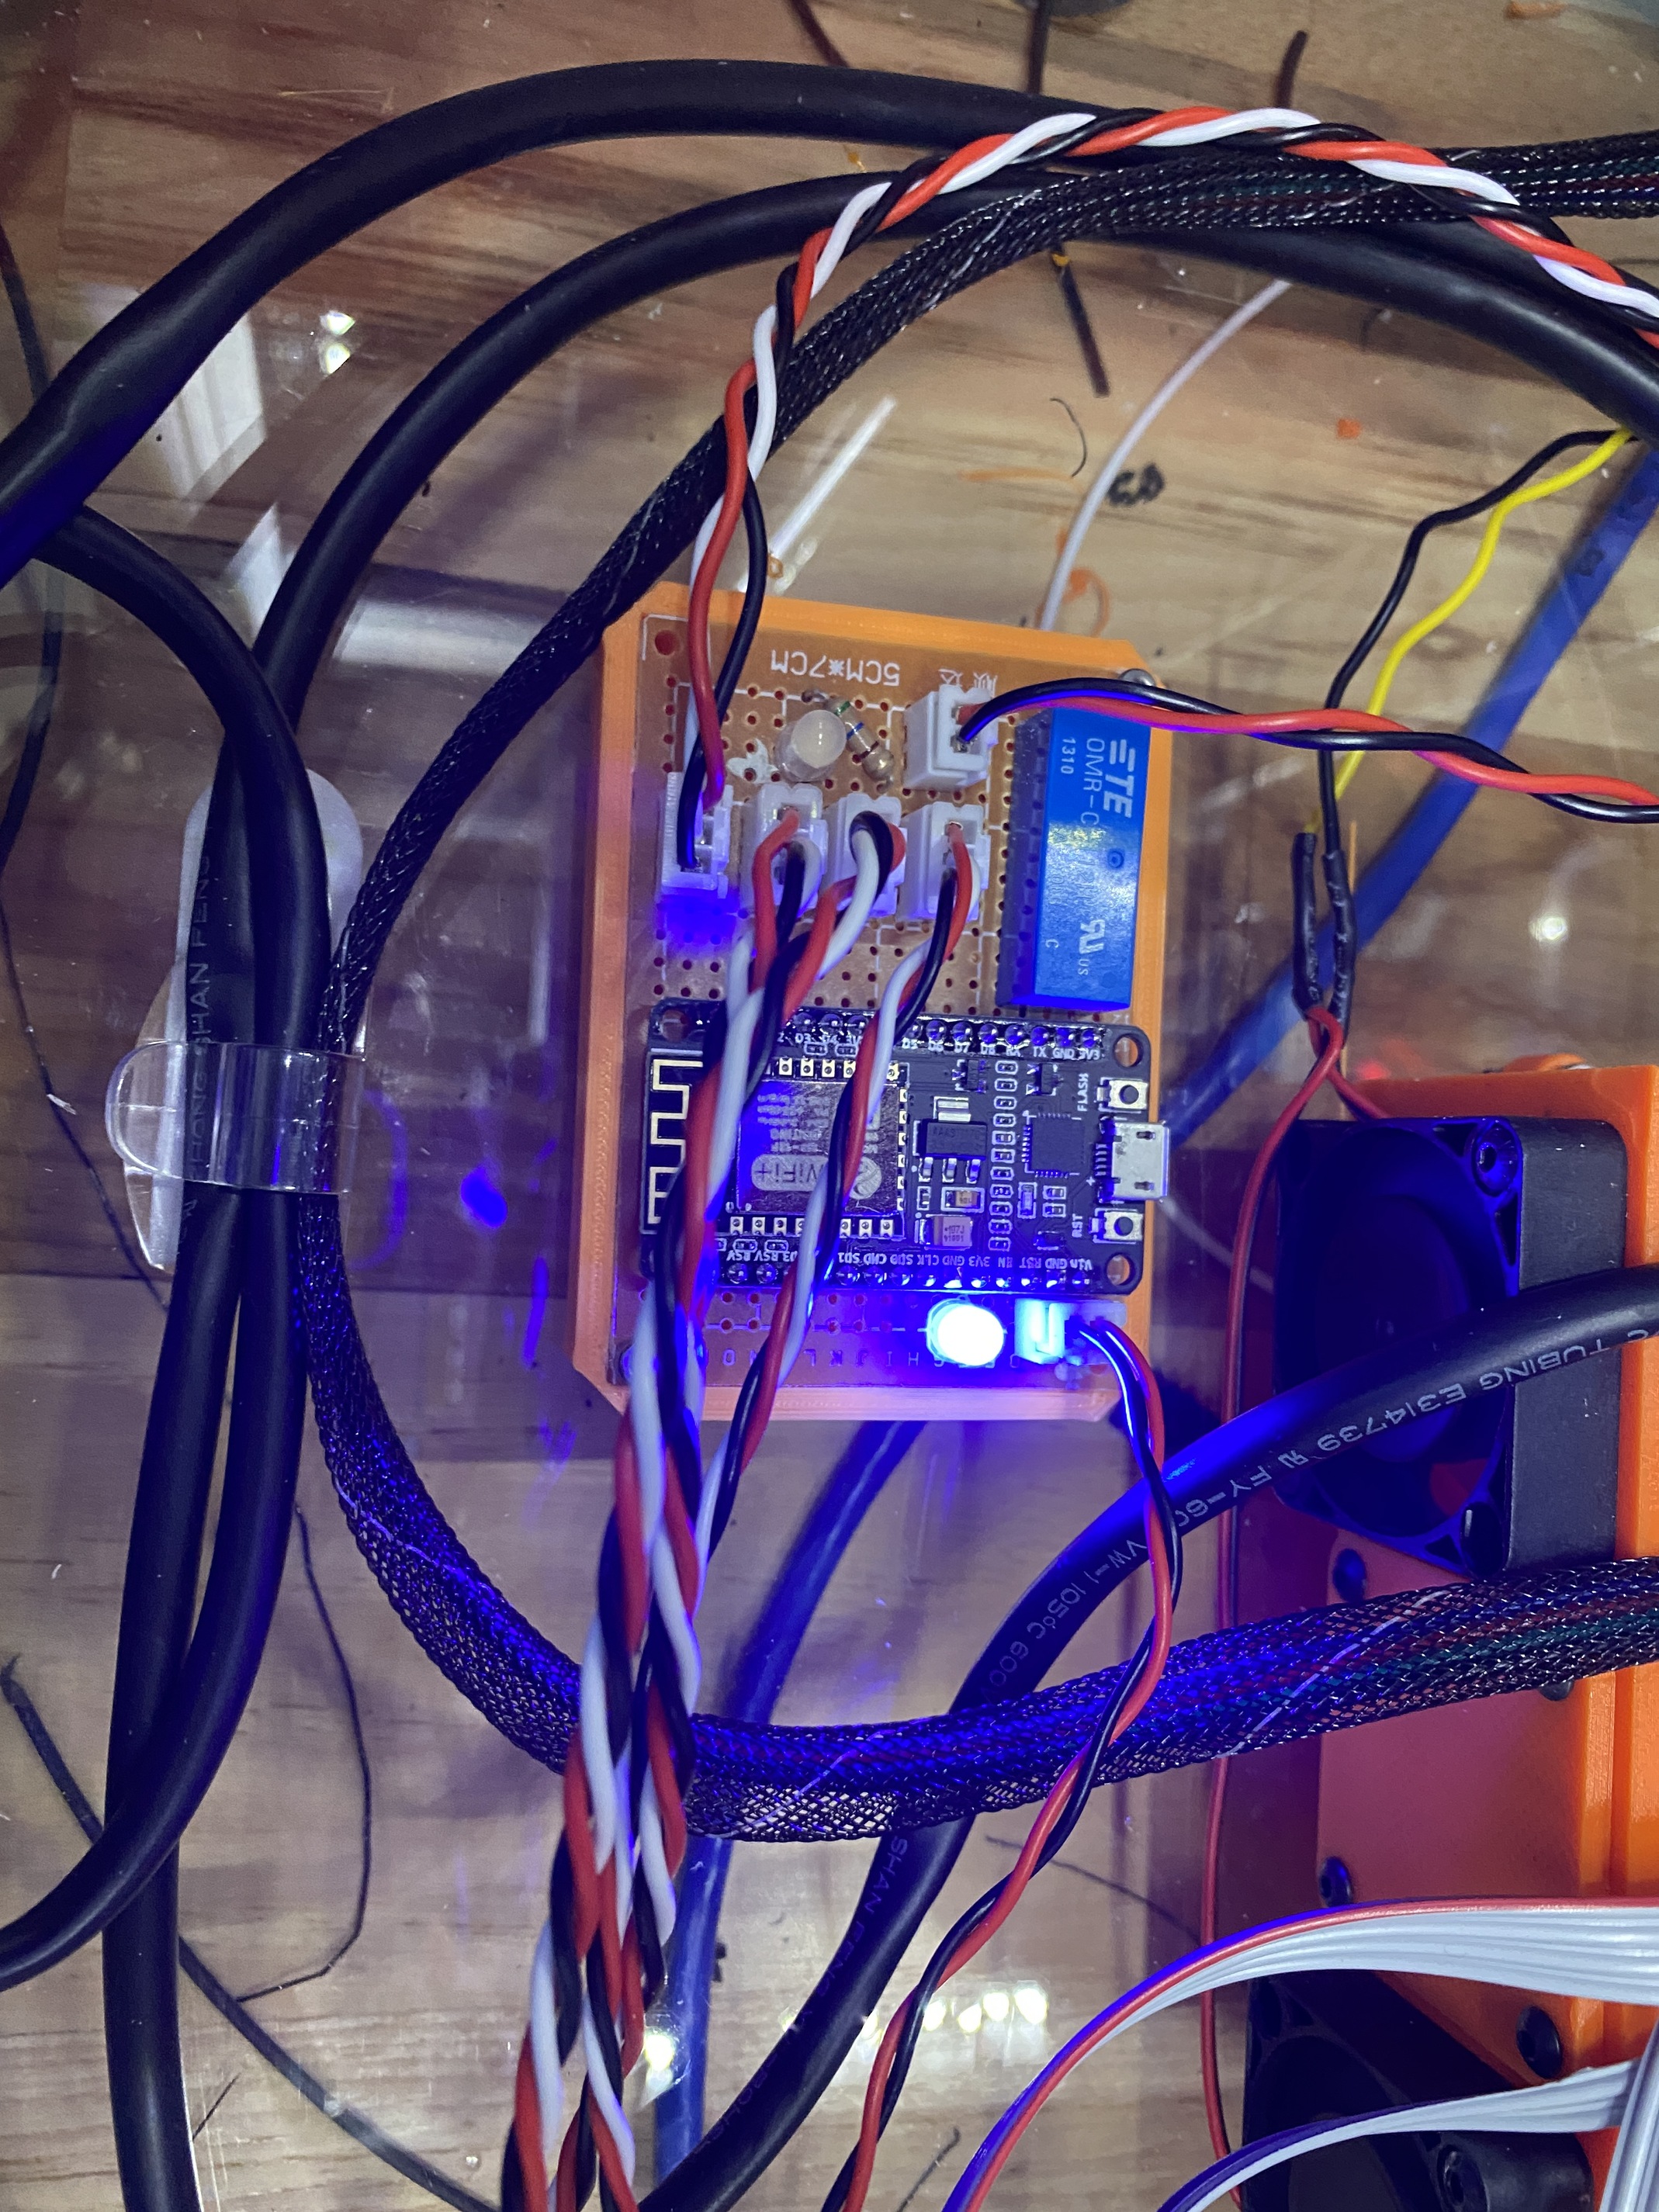
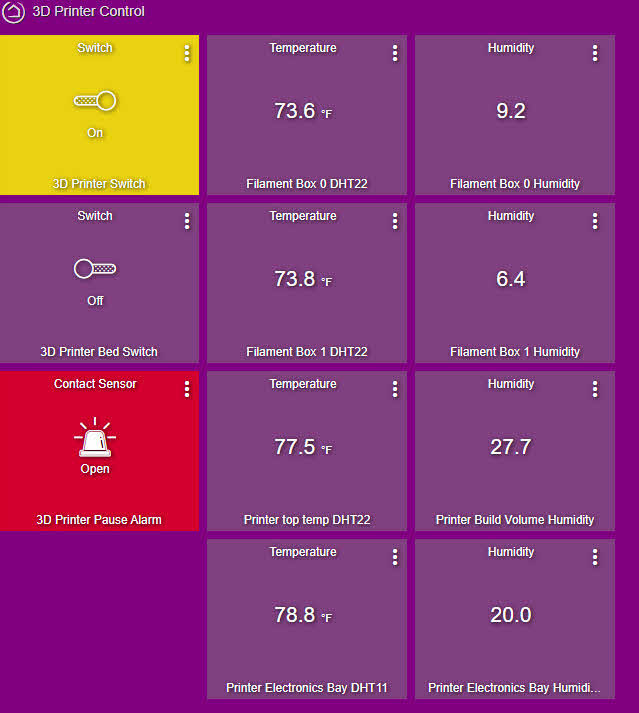
Hey there, so I am really happy with this project! I setup my own NodeMCU with 4 DHT22/11 sensors + a contact sensor (via reed relay) to sense when my large custom 3D printer pauses (sensed via a 12v LED run that turns on when the printer hits an error state or pauses for some reason - this trips the reed relay and in turn the contact sensor). The sensors are reading temps/humidity levels in the filament storage containers, and other areas of the printer.
It works great, but the next step I want to do is leverage the temp readings toward potentially controlling fans via PWM (via a fan driver that takes the PWM signal from the ESP), Adding a pot/Angle sensor (to tweak the fan trigger threshold) and a I2C LCD to display current status. From my testing I think I can get all this to work on a single NodeMCU (using virtually every pin).
I suck at writing code in Arduino... so I am going to take a while to do that it seems as nothing works as I hoped in a first attempt I need to do a lot more reading to figure out how to get the sensor data in a format that is usable for anything else and then learn all the other bits!


 Now I'll have something to link when the question comes up again. Nice job!!!