I've set up the esp8266 buttons example successfully. Trying the add a function into callback for when it detects a specific callback of "button5 pushed" to generate a random number. The idea is to push one of those randomly selected buttons, which is why I was digging for a specific command to send an event message.
I have sound effects tied to that randomly generated number, and I'm trying to tie independent lighting scenes to each button.
This was the best workaround I could come up with.
Okay - so you just want to modify the Arduino Example Sketch's 'callback()' routine to send something else to the Hubitat hub when it sees that button5 was pushed? Is that correct?
First, why not simply have a RM Rule handle that logic directly on the Hubitat hub?
Second, yes it is possible to do what I have described above, which hopefully matches your requirements.
Within the callback() routine, simply add a call like
st::Everything::sendSmartString(“button6 pushed”);
This will send a button #6 pushed command to the HubDuino Parent device, which will then generate an event on the hub.
I was wondering if anyone had done an integration with the SenseAir S8 CO2 sensor. I wasn't able to find it. I have a NodeMCU using Modbus over serial to poll the sensor and get the CO2 levels. Works well, now I need to send to Hubitat. I was debating using MQTT but this looks slicker.
It has been 10+ years since I've programmed with any degree of rigour but it looks simple enough to add a sensor that does this, albeit a bit of work if there isn't any examples polling a serial device. Any advice?
Hello my friends.
I would like for your help. I'm in one way street 
I would like to drive my led from arduino mega.
I have 3 led panels each have 300ma driver so i will order WM driver LDD-H serias.
I saw this to work in this link:
1.option.
Witch ST_Anything/hubduino driver can i use for:
ON OFF and pwm ?
I don't have so much experience so any help is gold for me 
Thanks again!
I use hubitat hub 
You’ll probably want to use the following ST_Anything device in your Arduino sketch.
//******************************************************************************************
//  File: EX_PWM_Dim.cpp
//  Authors: Dan G Ogorchock
//
//  Summary:  EX_PWM_Dim is a class which implements the SmartThings "Switch" and "Switch Level" device capabilities.
//			  It inherits from the st::Executor class.
//
//			  Create an instance of this class in your sketch's global variable section
//			  For Example:  st::EX_PWM_Dim executor1(F("dimmerSwitch1"), PIN_SWITCH, PIN_LEVEL, LOW, true);
//
//			  st::EX_PWM_Dim() constructor requires the following arguments
//				- String &name - REQUIRED - the name of the object - must match the Groovy ST_Anything DeviceType tile name
//				- byte pin - REQUIRED - the Arduino Pin to be used as a digital output
//				- byte pin_pwm - REQUIRED - the Arduino Pin to be used as a pwm output
//				- bool startingState - OPTIONAL - the value desired for the initial state of the switch.  LOW = "off", HIGH = "on"
//				- bool invertLogic - OPTIONAL - determines whether the Arduino Digital Output should use inverted logic
//
1 Like
Not that I know of.
I think you have three options:
-
Modify your existing code to simply make http calls to the Hubitat Maker API app, to update a virtual device. This is pretty simple.
-
Modify your existing code to add this project’s “SmartThings…” communications libraries. This provides a simple way to send data to the Hubitat hub to utilize the HubDuino Parent and Child drivers. These communication libraries are used by the ST_Anything libraries and example sketches.
-
Add a new ST_Anything polling sensor device class. There are many examples of Polling Sensors, like the PS_Voltage class. Obviously, instead of reading an analog input pin, your class would read serial data from your sensor. Generally , I use other libraries that have already been written to interface with specific sensor devices. I just wrapper that hardware specific library inside an ST_Anything device class.
Hope that helps get you started! Have fun with it.
Thank you! I was about to take the easier way as I know I could do some sort of HTTP call but figured I'd jump in full steam and relearn some C++.
I jumped into this and just finished a few minutes ago. I modified an existing Senseair S8 arduino project to be a library that connected via serial, then modified a ST-Anything_Multiples project to point to a polling sensor I created based on a temperature sensor. I think this should be modular enough if I want to do other types of CO2 sensors it will be easy.
Thanks for taking the time. I actually had a lot of fun! Haven't coded really in forever.
Only outstanding hting, trying to figure out why the child device shows the correct value under Current State but both the Dashboard and Rule Machine see the value as null.
Thanks again!
1 Like
What child driver are you using?
I modified the temperature sensor driver, Added the CO2 Measurement capability and then just returned the values.
metadata {
	definition (name: "Child Carbon Dioxide", namespace: "ogiewon", author: "Daniel Ogorchock", importUrl: "https://raw.githubusercontent.com/DanielOgorchock/ST_Anything/master/HubDuino/Drivers/child-CO2-sensor.gfdsaf") {
		capability "CarbonDioxideMeasurement"
		capability "Sensor"
        attribute "carbonDioxide", "number"
	}

	preferences {
		section("Prefs") {
//			input "tempOffset", "number", title: "CO2 Offset", description: "Adjust CO2 by this many ppm", range: "*..*", displayDuringSetup: false
            input name: "logEnable", type: "bool", title: "Enable debug logging", defaultValue: true
        }
	}
}

def logsOff(){
    log.warn "debug logging disabled..."
    device.updateSetting("logEnable",[value:"false",type:"bool"])
}

def parse(String description) {
    if (logEnable) log.debug "parse(${description}) called"
	def parts = description.split(" ")
    def name  = parts.length>0?parts[0].trim():null
    log.debug "${name}"
    def value = parts.length>1?parts[1].trim():null
    log.debug "${value}"
	def dispUnit = "ppm"
    /*if (name && value) {
    	// Offset the CO2 based on preference
        float tmpValue = Float.parseFloat(value)
        if (tempOffset) {
            tmpValue = tmpValue + tempOffset.toFloat()
        }
        tmpValue = tmpValue.round(1)*/
        tmpValue = value.toInteger()
        sendEvent(name: name, value: tmpValue, unit: dispUnit)
    /*}
    else {
    	log.error "Missing either name or value.  Cannot parse!"
    }*/
}

def installed() {
    updated()
}

def updated() {
    if (logEnable) runIn(1800,logsOff)
}
Thanks for help ogiewon. Is this sketch ok for arduino Mega ?
i would like to implemented in my smart house
What I posted was not a sketch. It was simply the comments section of one of the many ST_Anything devices available to use within a sketch. There are many examples sketches, including an example sketch for the Arduino Mega 2560 with the official Arduino Ethernet shield. This example sketch is to be modified by the user, to achieve whatever goals are desired.
1 Like
This is note references the Groovy Driver "child-ultrasonic-sensor.groovy"
- I believe Line 60 has an error where the calculated cylinder volume is off by 2x.
I believe the string " *2 " should be removed. Thoughts?
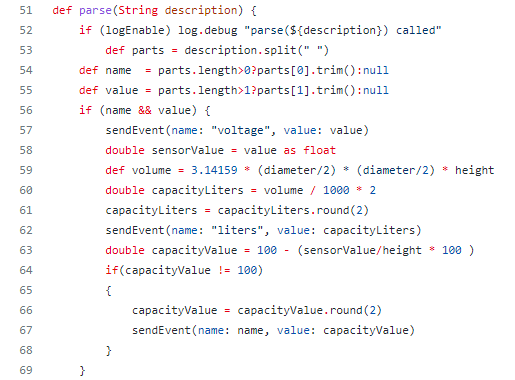
-
The Device Screen shows the Values for Liters, Ultrasonic, and Voltage.
In digging through the code it appears Voltage is the measured ultrasonic distance in
centimeters. Should the name "Voltage" be changed to "Centimeters"?
I'm curious about the reasoning for these names and values.Thanks,
Scott
This particular child driver was written by a SmartThings user many years ago for his particular requirements. I added it to my repo as an example that others could use as a starting point to measure the level of a tank using an ultrasonic sensor. Please feel free to modify the child driver as you see fit for your particular application.
Voltage Measurement is a standard Hubitat Capability. As such, it is somewhat easier to use in standard Hubitat Apps. As the years have gone by, Hubitat has made custom attributes somewhat easier to use in standard apps like Rule Machine and the Hubitat Dashboard.
So, once again, please feel free to modify this driver however you see fit. HubDuino is a set of Hubitat drivers, Arduino libraries, and example sketches for users to implement however they see fit. It is fairly mature at this point, requiring very little maintenance on core code platform. I also do not use HPM as I fear simple changes could blow away an end user's customized drivers. The only that happens today is for the end user to do so! ![]()
Hi,
A couple of questions.
-
Has any work been done to support the SW-420 (vibration sensor) and the MPU-6050 (Accelerometer)? It looks like there are no Drivers for these devices. If not, I may take a deep breath and develop the .cpp and Driver files. Suggestions / pointers welcomed.
-
Curious why the Drivers are implemented with Groovy. Was this a personal preference or for technical reasons?
Thanks,
Scott
Not that I know of. I am happy to accept pull requests for additional features such as this, s long as the overall architecture is adhered to.
All Hubitat device drivers are written in Groovy. There is no option for any other language on the Hubitat platform.
I've been working on a relatively complex control setup for a remote location, basically some complex controls of water valves and other things. I needed multiple inputs, so I decided to try an Arduino to measure all of the various sensors I have.
I bought an Arduino UNO R3 kit and have hooked up the basic sensors I wanted to and I can get everything displayed on a local LCD display, so I feel pretty good about that
But now comes the more daunting task for me. I'm not realizing that the Arduino UNO R3 doesn't have native WiFi support. I'm looking into either adding WiFi with an ESP8266 or maybe something else, but it's all pretty daunting as this is really new to me.
I'm trying to figure out if I should buy a different Arduino, and if so, which one, or simply buy an ESP8266-XXX and try to add that to the UNO R3 and get it connected up to a Hubitat that way.
A bit more info about my project:
I have power at the location, and can reach WiFi, but Zigbee and Zwave are unreliable. I also don't have ethernet, so I think WiFi is my only option to connect to Hubitat. So my plan is:
Sensors -> Arduino -> WiFi -> Hubitat -> Rules Manager (I know what to do once sensor inputs are in Hubitat)
I need to hookup about 7 digital inputs and 2 analog inputs to the Arduino. I do some calculations and logic on these locally and want to just provide about 5 different variables to my Hubitat. I then just need to control some smart WiFi wall switches that I've already installed and are already controllable on my Hubitat.
Any help would be greatly appreciated. I have a decent amount of experience with Hubitat, but very limited with Arduino, although I do know C/C++ quite well and am an Electrical Engineer, so am very comfortable with circuits and wiring.
Thanks in advance!
I would recommend using an ESP32 based microcontroller for the above requirements. With a simple HubDuino/ST_Anything sketch, you could be up and running pretty quickly.
For example, the following ESP32-DevKitC microcontroller is made by Espressif and works great in the associated breakout board to make mounting and wiring very easy.
https://www.amazon.com/Espressif-ESP32-DevKitC-32E-Development-Board/dp/B09MQJWQN2
https://www.amazon.com/Screw-Terminal-Breakout-Module-ESP32-DevKitC/dp/B08LGFRT87
It would help to understand exactly what the 7 DIs and 2 AIs are going to be monitoring. One difference between an Arduino UNO and the ESP32 above is that the Arduino uses 5V logic for its I/O, whereas the ESP32 uses 3.3V logic. One needs to be careful to not apply 5V to the ESP32's 3.3V pins.
If you detail out your requirements, I am happy to help provide feedback on how to use HubDuino. Also, I am working on a new version of the HubDuino drivers for Hubitat. The new version will greatly simplify set up and maintenance of the HubDuino driver code. You might want to start with the new version to avoid having to possibly re-do things on the Hubitat side later.
1 Like
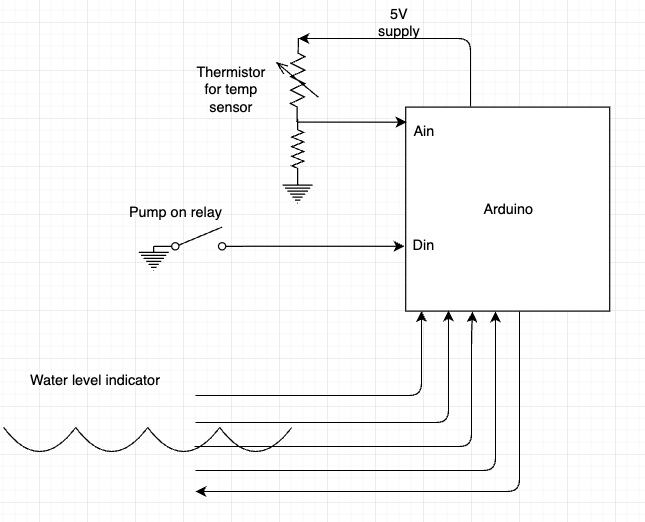
OK, here's some more detail of what I'm doing. it's a bit convoluted, so hang with me
First, I need to sense Ambient temperature. Right now I'm using a simple thermistor that came with my kit. All the math is done for me, so it's really easy to use, and decently accurate. I just need to know if it's close to freezing in my well house, indicating my heater has failed and I need to physically go there and have a look at what's going on. It's just the thermistor in series with a 10kohm resistor. Assuming the UNO uses 5V as the ADC reference and the ESP uses 3.3V as the reference, I bet it would just work without any code modifications.
Second, I need to know the level of water in a vessel that's hundreds of feet away. There is no great way I've come up with to do this except to run sprinkler control wires out there and connect each one to nails. Each nail is in a board and each nail is spaced equidistant. I sent 5V to the lowest nail and check the voltage on the other nails using PULLDOWN inputs. But finding which nails are logic 1, I can determine the water level is between 2 of the nails which is sufficient for what i need. I have no idea how reliable this will be over time, but it minimizes my number of wires that must be run such a long distance.
Lastly, I need to know if my pump is currently turned on or not. That's just a simple relay activated by the 230VAC sent to the pump while it's running. So just a simple logic pin that I pullup and connect the other side of the switch to ground.
That's about it. I just need to tell Hubitat the temp in the well house, if the pump is running and which nail inputs are a logic 1. So I don't really care about 3.3V or 5V as long as I can replicate my thermistor circuit, which I think will just work.
I like that break out board. That looks like a much better solution than soldering onto a shield.
I'd be happy to help test out your new version if that's helpful to you. I'm pretty new at this side of things, so that may or may not be what you're looking for.
One other dumb question I have is that this ESP board is not an Arduino. So do I still use Arduino's IDE and .ino files? the ESP looks like it has a lot of IO that can be configured differently and may be quite a bit tougher to get going with Python build scripts and stuff.

