Can I ask a quick question on your re-flashing of the outlets you mentioned? I am still trying to ramp up on Hubduino... when you flashed the outlet... what did that do for you? Does it have Zwave or Zigbee hardware or still just wifi? If just wifi, then what is the advantage of putting hubduino on it? I hope this question is not too stupid. Thanks!!
I got hubduino up and running and some relays working!!! now my question is I have some soil moisture sensors (Vegtronix VH400) they use just a simple analog read. I have tried to use the voltage object but they don't seem to work. If anyone could steer me in the right direction I'd appreciate it.
The outlets won't connect to Hubitat with their stock firmware.
Can you please share all of the details of the wiring you’re using? Looks like that sensor needs a 3.5 to 20vdc power supply, but outputs 0 to 3vdc.
Please share your wiring diagram and your sketch so we can assist in troubleshooting.
Before I dig too deeply on this question, I am curious if you have already found a solution? Seems to me the real trick is the fact that colors sequence, from color to color, without any feedback on what the current color is? The TimedRelay device is capable of sending out a pulse train, however it is currently a hard-coded pulse train. Perhaps you could start with that device and modify as you see fit? Or, perhaps you could create multiple copies of the TimedRelay devices, each pointing to the same digital output pin? Each with a unique pulse train hard-coded in their initialization parameters?
/******************************************************************************************
//  File: S_TimedRelay.cpp
//  Authors: Dan G Ogorchock
//
//  Summary:  S_TimedRelay is a class which implements the SmartThings "Relay" device capability.  It features
//			  an automatic-turn-off time delay for a relay to emulate a button press.
//
//			  It inherits from the st::Sensor class and clones much from the st::Executor Class
//
//			  Create an instance of this class in your sketch's global variable section
//			  For Example:  st::S_TimedRelay sensor1(F("relaySwitch1"), PIN_RELAY, LOW, true, 1000, 0, 1);
//
//			  st::S_TimedRelay() constructor requires the following arguments
//				- String &name - REQUIRED - the name of the object - must match the Groovy ST_Anything DeviceType tile name
//				- byte pinOutput - REQUIRED - the Arduino Pin to be used as a digital output
//				- bool startingState - REQUIRED - the value desired for the initial state of the switch.  LOW = "off", HIGH = "on"
//				- bool invertLogic - REQUIRED - determines whether the Arduino Digital Ouput should use inverted logic
//				- long onTime - REQUIRED - the number of milliseconds to keep the output on, DEFGAULTS to 1000 milliseconds
//				- long offTime - OPTIONAL - the number of milliseconds to keep the output off, DEFAULTS to 0
//				- intnumCycles - OPTIONAL - the number of times to repeat the on/off cycle, DEFAULTS to 1
HubDuino already has built-in support for Arduino OTA updates on the ESP8266 platform.
Have not found a solution but was going to start working on something I think your idea of having multiple instances of the pulse is likely the best option. I’ll give it a shot tomorrow and report back.
Can you send me docs for the built-in OTA?
Thank you again!!
1 Like
Here's a tutorial... but you really only need to install Python 2.7 on the PC running the Arduino IDE. Then (after restarting the Arduino IDE) you should see your ESP8266 based HubDuino boards appear in the list of available "Ports" (instead of just COM ports).
2 Likes
Thanks. The other issue I think I’ll run into if I make several pulse relays is that I need to be able to reset the state back to zero (ie turn off for 5 seconds to reset the LEDs back to 0). I could make one switch using the same pins and other pulse relays and force turn off the switch in between color changes but that seems silly. Or modify the pulse driver to turn device off first maybe? Thanks for any other thoughts you might have. I did start another thread if you want to move this there vs your Hubduino thread. Driver to accomplish color changes on pool lights (hubduino relays)
Brian
Hey @ogiewon
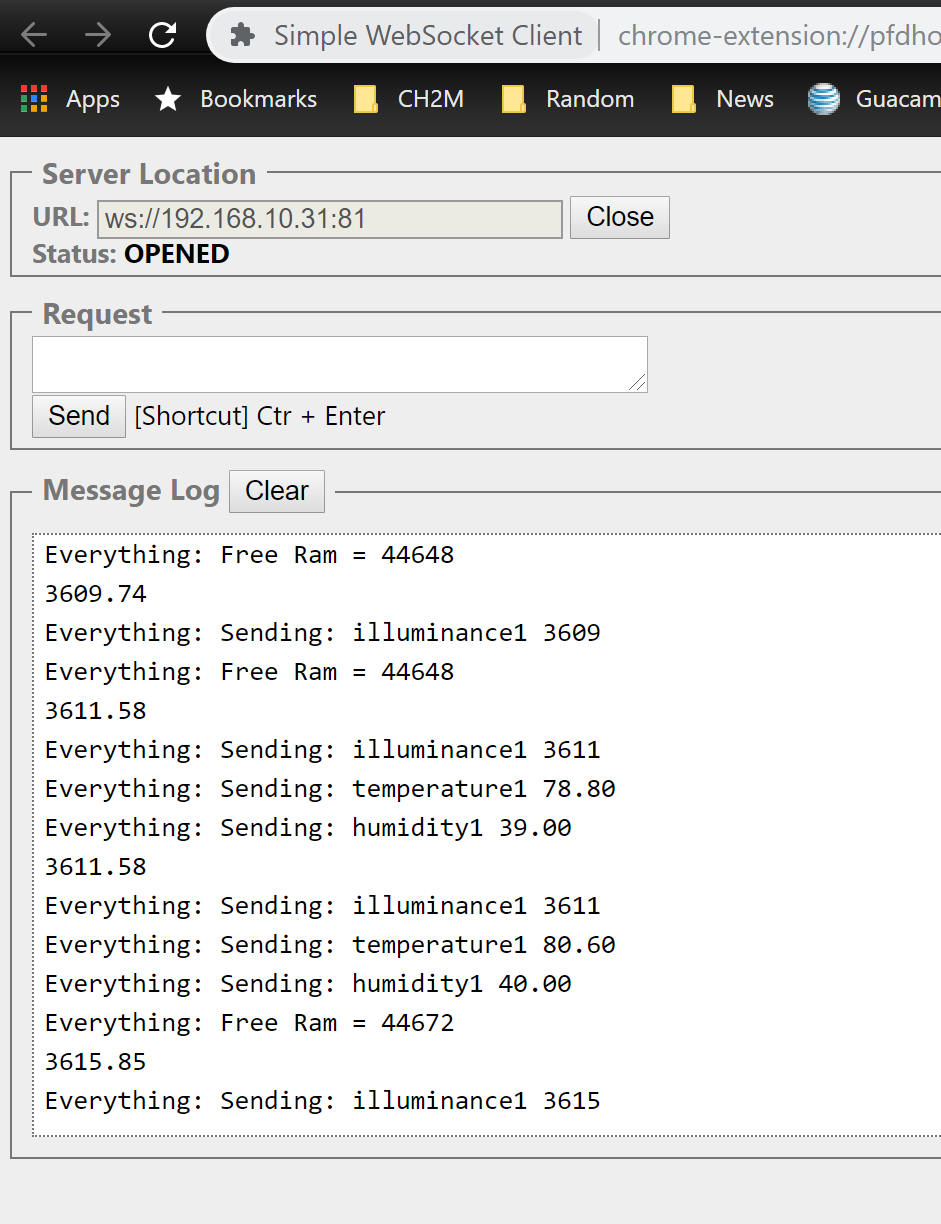
Have you ever thought about adding a Websocket server to the Ethernet modules to retrieve the Hubduino output remotely? As in OTA debugging... Right now, you use Serial.print and Serial.println to show some debugging messages. Works great if your module can be connected to a PC, not so much for remote units. As a user, you could just connect to the Websocket and see what is going on...
Happy to make a fork and make a suggestion back to you via a pull unless you are looking for something to do ![]()
1 Like
I like the idea of using webSockets in general. I wonder if all communications between HubDuino and Hubitat could be accomplished via webSockets instead of the current design (which is admittedly fairly crude, having been grown out of my old ThingShield design from many years ago!)
One concern I have with such a major change is whether or not all of the microcontrollers can handle running more complex network designs. Although, at this point the Arduino UNO R3 is really not even too useful at all with its limited 2K of RAM. The MEGA 2560 is still very useful with its plethora of GPIO pins.
I would welcome any assistance!
Per default, I would recommend to implement it via Serial.print and that can be overloaded if the module actually support websockets. E.g. ThingShield modules would never support it. This way you have both.
Let me see what I can do with that...
1 Like
Please try to implement this as an option, selectable in CONSTANTS.H. That is where most of the options are defined.
I think this is going to work. I added another flag to the end TimedRelay for "finalState". 1 for leaving on, 0 for off. Let me know if you'd like the diff's to include in your version. This is what I've ended up with, but I haven't connected it.
static st::EX_Switch executor1(F("switch1"), PIN_S1, LOW, false); //Non-Inverted logic for "Active High" Relay Board
static st::EX_Switch executor2(F("switch2"), PIN_S2, LOW, false); //Non-Inverted logic for "Active High" Relay Board
static st::EX_Switch executor3(F("switch3"), PIN_S3, LOW, false); //Non-Inverted logic for "Active High" Relay Board
static st::EX_Switch executor4(F("switch4"), PIN_S4, LOW, false); //Non-Inverted logic for "Active High" Relay Board
static st::EX_Switch executor5(F("switch5"), PIN_S5, LOW, false); //Non-Inverted logic for "Active High" Relay Board
static st::EX_Switch executor6(F("switch6"), PIN_S6, LOW, false); //Non-Inverted logic for "Active High" Relay Board
static st::EX_Switch executor7(F("switch7"), PIN_S7, LOW, false); //Non-Inverted logic for "Active High" Relay Board
static st::EX_Switch executor8(F("switch8"), PIN_S8, LOW, false); //Non-Inverted logic for "Active High" Relay Board
static st::S_TimedRelay executor9(F("relaySwitch1"), PIN_S8, LOW, false, 800, 0, 1, 1); // soft white,
static st::S_TimedRelay executor10(F("relaySwitch2"), PIN_S8, LOW, false, 800, 800, 2, 1); // slow change
static st::S_TimedRelay executor11(F("relaySwitch3"), PIN_S8, LOW, false, 800, 800, 3, 1); // blue.
static st::S_TimedRelay executor12(F("relaySwitch4"), PIN_S8, LOW, false, 800, 800, 4, 1); // green.
static st::S_TimedRelay executor13(F("relaySwitch5"), PIN_S8, LOW, false, 800, 800, 5, 1); // red.
static st::S_TimedRelay executor14(F("relaySwitch6"), PIN_S8, LOW, false, 800, 800, 6, 1); // amber.
static st::S_TimedRelay executor15(F("relaySwitch7"), PIN_S8, LOW, false, 800, 800, 7, 1); // magenta
static st::S_TimedRelay executor16(F("relaySwitch8"), PIN_S8, LOW, false, 800, 800, 8, 1); // flash color fast change
1 Like
Sure, I’d like to see the changes you made... you could also issue a pull request.
1 Like
Done. Thanks again (feel free to reject/change how I did it; I sort of thought this should be an earlier option and it can probably be done in a better manner).
Brian
1 Like
That looks really nice!
Hey @dan.t, are you using the arduinoWebSockets library by Links2004? This has sparked an idea for a redo of one of my WemosD1 custom sketches. If not please share what library you are using for the websocket as I'm interested in doing something similar.
1 Like
That is the library I am working with right now
1 Like
All,
Just a head's up... I have been doing some testing with Arduino IDE v1.8.9 and ESP8266 v2.5.2. So far, after over 24 hours, my test system is running fine with no signs of any memory leaks. I am also running a second test system using an Arduino MKR-1010 board which was provided to me by a generous user in order to add support for it within HubDuino. So far, it is also running very well, with no signs of WiFi droputs which seemed to plague the MKR-1000 board.
1 Like

