You will probably also need to adjust the pulseWidth parameters to be able to get the full range of your 270 degree servo. The Arduino Servo library only accepts angles of 0 to 180, per the Arduino documentation. So...by changing the pulseWidth parameters, you may be able to map the 0 to 180 degree commanded values to the 0 to 270 degrees of your servo.
//******************************************************************************************
//  File: EX_Servo.cpp
//  Authors: Dan G Ogorchock
//
//  Summary:  EX_Servo is a class which implements the SmartThings/Hubitat "Switch Level" device capability.
//			  It inherits from the st::Executor class.
//
//			  Create an instance of this class in your sketch's global variable section
//			  For Example:  st::EX_Servo executor1(F("servo1"), PIN_SERVO, 90, true, 1000, 0, 180, 2000, 544, 2400);
//
//			  st::EX_Servo() constructor requires the following arguments
//				- String &name - REQUIRED - the name of the object - must match the Groovy ST_Anything DeviceType tile name
//				- byte pin_pwm - REQUIRED - the Arduino Pin to be used as a pwm output
//				- int startingAngle - OPTIONAL - the value desired for the initial angle of the servo motor (0 to 180, defaults to 90)
//              - bool detachAfterMove - OPTIONAL - determines if servo motor is powered down after move (defaults to false)
//              - int servoDetachTime - OPTIONAL - determines how long after the servo is moved that the servo is powered down if detachAfterMove is true (defaults to 1000ms)
//				- int minLevelAngle - OPTIONAL - servo angle in degrees to map to level 0 (defaults to 0 degrees)
//				- int maxLevelAngle - OPTIONAL - servo angle in degrees to map to level 100 (defaults to 180 degrees)
//              - int servoRate - OPTIONAL - initial servo rate in ms/degree (defaults to 2000, used to ensure a gentle move during startup, afterwards comes from SmartThings/Hubitat with each move request)
//              - int minPulseWidth - OPTIONAL - minimum pulse width in milliseconds, defaults to 544 (see Arduino servo attach() function)
//              - int maxPulseWidth - OPTIONAL - maximum pulse width in milliseconds, defaults to 2400 (see Arduino servo attach() function)
I actually already have a full 270 degree actual rotation on the servo from 0% to 100%. It also resets to the 135 degrees I have set as a midpoint. The only issue is that the commanded percentage does not change linearly with the actual servo angle. 0% gets me to 0 degrees on the servo and 100% gets me 270 degrees on the servo. But to get an actual 135 degrees, I have to enter about 35% in the Set Level box which then shows as 94 degrees in the device in Hubitat. I will "play" with the pulseWidth parameters and see what I end up with. Thank you!
Edit: Looking again, I actually was not quite getting the full 270 swing but it wasn't far off. Just needing to change the upper limit of the pulseWidth. The percentages still are not linear but I can live with it. Once I know a couple positions, they will never change. Thanks Again!
A board can only be connected to one hub at a time because you have to specify in the Arduino sketch, the IP of the hub you are sending information to. However, you could use Hub Connect or HubLink to send the status of the device from one hub to the other.
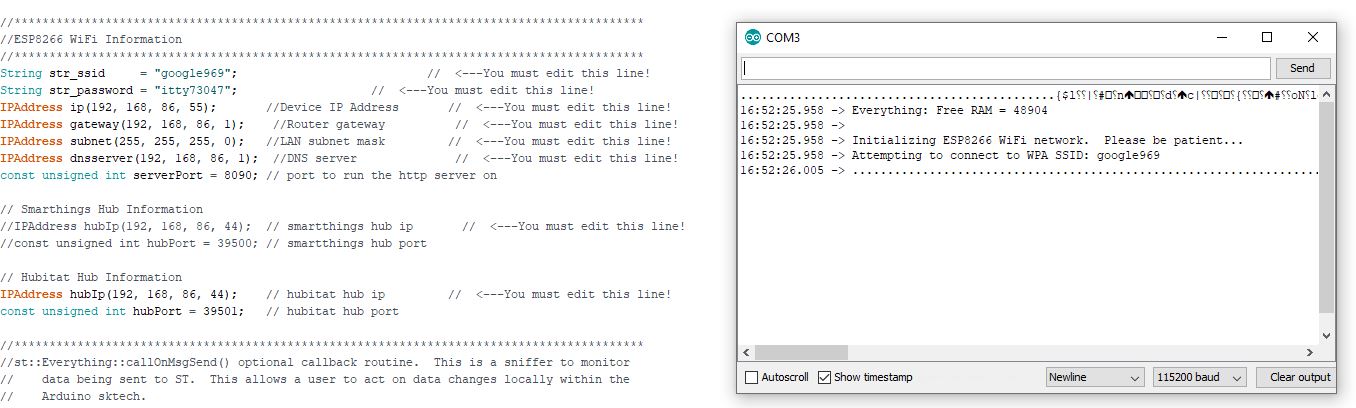
I'm having difficulty getting to 1st base with HubDuino. The configuration is HiLetgo ESP8266 NodeMCU LUA CP2102 ESP-12E development board and ST_Anything_Multiples_ESP8266WiFi.ino file. The sketch compiles without error but doesn't complete connection to network.
The initial dialogue is sent to serial monitor but then hangs, printing ..... endlessly.
The network is Google WiFi mesh. The Hubitat is connected to the mesh via an ethernet cable to primary wifi point ( there are 3 wifi points in mesh). The mesh is connected to DSL router via ethernet cable( My isp locks this router down and I have no access). Google wifi does allow setting static ip addresses and the hub and nodemcu are both assigned static addresses. One point of confusion in instructions was to assign microcontroller an ip address outside of router range of addresses. Google wifi reports range of 192.168.86.20 to 192.168.86.250. Does this mean that nodemcu should be assigned a static ip such as 192.168.86.15 ? When this is done, it will not respond to ping.
This same nodemcu works flawlessly with 3 ds18b20 sensors connected and logging temperature data to google spreadsheet in cloud via pushingbox using same google wifi mesh network.
Any troubleshooting advice would be greatly appreciated.
Thanks
ogiewon is the expert but perhaps I can help a little.
Normally I would suggest you setup a DHCP reservation for the IP the ESP will use. Look here WiFi Res . However you say it is already working with the one wire sensors so I'm likley missing something.
BTW you should change your password immediately, that is unless you edited in a fake.
The problem is between your board and your wifi access point. Can you confirm the SSID name and password you entered in the sketch are correctly? What sketch did you use as an example to begin building yours?
Thanks guys for the input. Password indicated is a fake, SSID and Pwd used in ST_Anything_Multiples_ESP8266WiFi.ino arduino sketch while testing are correct. Problem may have something to do with the fact I am using a mesh wifi network although the nodemcu has no problem connecting in another arduino sketch used for the ds18b20 sensors using the same mesh network. Since the ST_Anything_Multiples_ESP8266WiFi.ino sketch does compile and connect to serial monitor, maybe someone could suggest an edit to insert some commands at that point outputting to serial monitor to aid in troubleshooting what the problem may be.
Hubduino is a fantastic creation and I can see a lot of potential. Kudos to Ogiewon for his effort.
As for your WiFi connectivity issue... I really don't know what to tell you. I know I struggled last night with another NodeMCU ESP8266 device (not running HubDuino) trying to conenct it to my WiFi. I am using an Asus AI-Mesh setup. I tried a ton of things...what seemed to finally kick it into working was pressing the small reset button next to the USB connector. No clue why that fixed it...but it did!
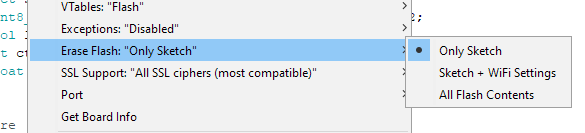
Try setting the Arduino IDE to erase everything instead of just the sketch. It might have some old wifi credentials stored that it isn't clearing. It's in the tools menu. I've seen before when I want to change the SSID that I have to clear all sometimes in order for it to take the new SSID.
Just a shot in the dark but if it works, you'll all think I am a genius.
Ok, I am embarrassed. No one could have helped with my wifi connection problem but myself. Turns out SSID is case sensitive, should have been Google969 rather than google 969. Computers are so picky
Once this error was corrected Hubduino worked perfectly. I now have 3 remote temperature sensors in attic that can be monitored and alarmed for high temperature and temperature rate of rise by Hubitat. Only other alternative was hi temperature switch with fixed hi alarm setting at $20 each.
I will now be researching how it might be possible to attach one of the cheap ultrasonic distance devices to nodemcu and send water level data to hubitat for control of sump pump.
Like with anything else, there's a library for that!
Take a look at the PS_Ultrasonic library. This combined with the the ultrasonic driver can be used to automatically calculate the occupied volume of a cylinder shaped vessel. If you don't have a cylinder I'm sure it would still be a good approximation. I've seen a few people use that for the same purpose. You might also want to look at straight level detection though. For example this sensor.
Might be a little more consistent than ultrasonic. There's a library for these too, under the PS-Water library. Or if you REALLY want to go crazy, do both!
You can add buttons to your board also. They are under the IS_Button Library. They are exposed under the parent device to Hubitat and can be used just like any button controller. Only have the pushed and held capability though, not the released.
Hmmmm... that shouldn’t be too hard to add... have to think about how to implement it though. As I think through it, the logic of whether it is a pushed or held event may need to move into the Driver code instead of the Arduino code...
As @Ryan780 mentioned, you could used the IS_Button built-in functionality. Look at the ST_Anything_Multiples_ESP8266WiFi.ino sketch to see how to declare IS_Button devices. You could add two of these to your sketch, and then use the Pushed and Held events via Rule Machine to adjust the blinds. For example, Button1 Pushed could adjust the blinds by +25%, Button1 Held could set the blinds to 100%. Button2 Pushed could adjust the blinds by -25%, Button2 Held could set the blinds to 0%.
This would be the quickest method that I can think of.
Note: the Button devices do not create their own Child devices. Button events as simply generated by the HubDuino Parent Device. You must set the number of buttons in the parent’s settings and click save on the Parent device. This sets the NumberOfButtons attribute which apps use to know how many buttons to allow you to choose from.
really? is it going to be able to distinguish that timing? The pico works since it's an always open telnet connection. I'm worried that moving that to the driver might lose some accuracy.