[Release] HubDuino v1.1.9 - Hubitat to Arduino / ESP8266 / ESP32 / ThingShield Integration (ST_Anything)

Announcing the release of HubDuino v1.1.7 (aka ST_Anything for former ST users)

[UPDATE 1.1.9] This is a minor release to improve support for the latest ESP8266 and ESP32 Arduino IDE Board Support Packages.

[UPDATE 1.1.7] This is a significant update to the Parent Drivers. Changes include:

  1. MAC Address no longer required when setting up a Parent Device. Only the IP Address/Port is required to help simplify initial startup. This also means that the micro-controller can be replaced with different hardware, as long as it runs the same sketch and uses the same IP address. This ability to swap boards is only possible with freshly installed HubDuino boards, due to changes in the Child Device Network IDs. These are now based on the parent's device.Id, instead of the parent's device.deviceNetworkId.
  2. Number of Buttons no longer required when setting up a Parent Device. This will be automatically determined and configured. Please be sure to update your Arduino library's IS_Button.cpp file, and rebuild/reload the sketch for this to work on new installations.
  3. New setting for Device Timeout - number of seconds before marking the micro-controller 'not present'. In the event that your Arduino/ESP8266 boards decides to go offline, the Parent Device now implements the Presence Capability. This will indicate whether or not the micro-controller has sent data to the hub within the user defined timeout setting (defaults to 900 seconds.) You can use this as a trigger in RM, for example, to send a notification that something may be wrong.

[UPDATE 1.1.6] Adds support for Arduino NANO 33 IoT
[UPDATE 1.1.5] Adds support for Arduino MKR1010 (thanks @jrau272!), support for MKR THERM thermocouple shield, Arduino IDE 1.8.9, ESP8266 v2.5.2, updated numerous libraries, etc…
[UPDATE 1.1.4 Adds support for SHT31 Temperature and Humidity I2C Sensor
[UPDATE 1.1.3] This version brings significant enhancements to the EX_Servo class to allow asynchronous and simultaneous motion by multiple servos. Also, the speed of each servo, as well as min and max endpoint angles are now user selectable. Special thanks to @VooDooFiveTwo Jeff Albers for his contributions!
[UPDATE 1.1.2] I have added I2C sensor support for the MAX44009(lux), TSL2561(lux), BH1750(lux), AM2320(temp and humid), BME280(temp, humid, pressure), BMP280(temp and pressure), and updates for the TCS34725(color lux). A new example sketch to demonstrate these is included as well.

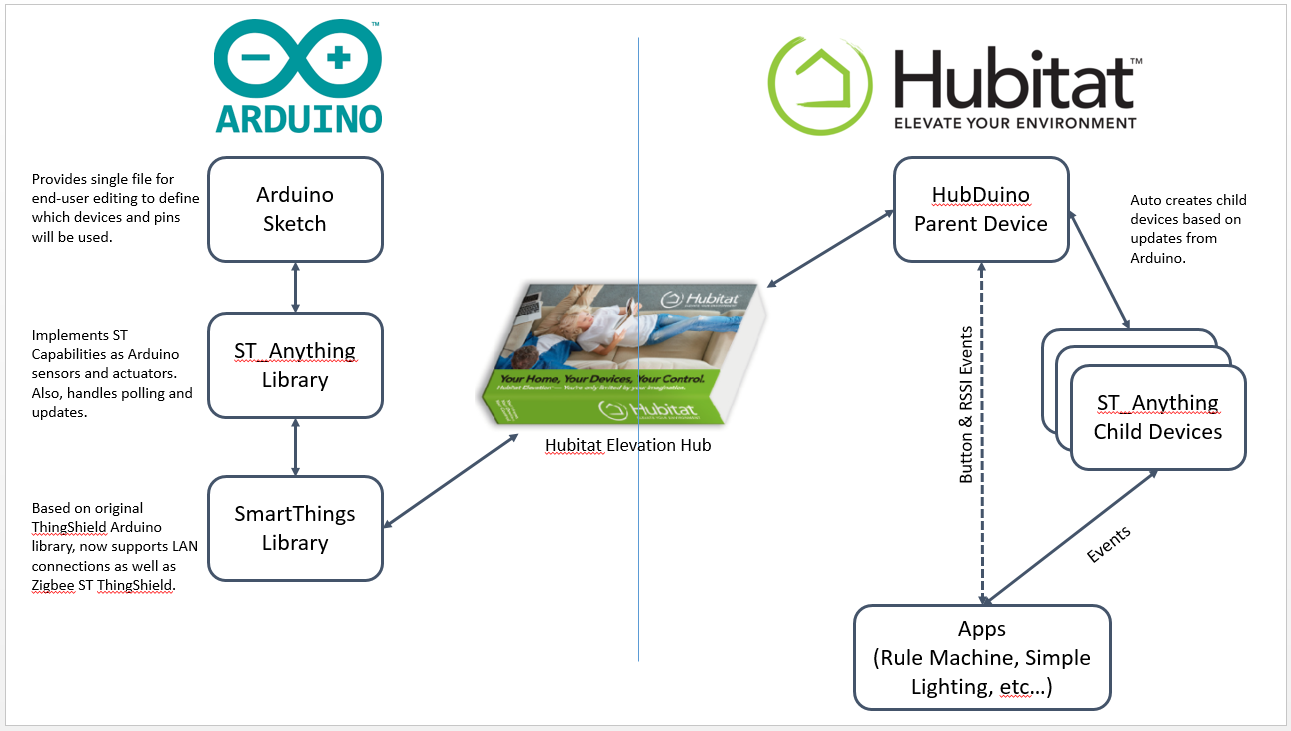
HubDuino allows you to integrate a custom Arduino / ESP8266 / ESP32 device with Hubitat by editing only one Arduino sketch file! No groovy programming skills are required! You simply decide what devices are attached to each pin of your microcontoller and HubDuino/ST_Anything handles the rest for you! Numerous example sketches are included to help get you started.

Please provide some feedback on your experience so the documentation and code can be improved.

Note: This release has support for LAN-connected devices AND for the ThingShield.

Note: Former ST_Anything users will need to update all of their Arduino Library code from my GitHub repository. Some minor changes were required to the Ethernet/WiFi libraries. Also, the Hubitat Hub listens on port 39501, not 39500. You will need to update your sketches accordingly while changing the IP address of the hub as well.

HubDuino Architecture

Please follow the guide in the ReadMe below and feel free to issue a pull request to improve this document.

NOTE: Hubuino for ESP8266 has built in OTA (Over the Air) support. For this to work you must install Python v2.7 on your computer. You must initially install your ESP8266-based ST_Anything sketch via usb/serial port, Once up and running, the ESP8266 will broadcast an OTA device which looks like ESP8266-xxxxxxxxxxxx at yy.yy.yy.yy (e.g. ESP8266-4417931186E6 at 192.168.1.144) which is visible in the Arduino IDE in the Tools->Ports menu. If you select that device in the ports menu, you can then upload to the device over the air. If you'd prefer a more descriptive host name, you can add the desired host name as the last parameter on the SmartThingsESP8266WiFi constructor. In the example below Fireplace_ESP will be the host name and under ports you will then see
Fireplace_ESP at 192.168.1.144.

st::Everything::SmartThing = new st::SmartThingsESP8266WiFi(str_ssid, str_password, ip, gateway, subnet, dnsserver, serverPort, hubIp, hubPort, st::receiveSmartString,"Fireplace_ESP");
32 Likes

I was able to replicate the setup from ST very easily on a separate nodemcu much easier than anticipated. I now have a “hubduino” set up communicating motion status locally and real time to my brand new Hubitat hub. Thank you!

UPDATE:
While motion sensor works excellently, I haven’t been able to get any switches to operate. I have tried a relay as well as RF24 transmitter (works in ST). I do see in the hubduino logs that it receives the commands but the power state on the nodemcu doesn’t appear to trigger and nothing is updated in the Hubitat portal.

Everything: Received: switch5%20on
Everything: Received: switch5%20off

Did I miss a step in configuring to make it respond to the commands?

UPDATE2:
Please disregard - I did not update the libraries - the necessary change was to add this to line in the wifi lib:
tempString.replace("%20", " "); //Clean up for Hubitat

Apologies for the confusion - thank you!

1 Like

Glad to hear you’ve got it up and running. Please let me know if you have any feedback, especially in the documentation.

All,

I have added support for the ThingShield. If you give it a try, please post your results back in this thread.

Enjoy!

1 Like

I assume the tile layout for devices is different in Hubitat? I don’t see the option to enter a temperature offset in my child temp devices.

That’s a very good point! Let me take a look and see why those options are not showing up!

First, thank you very much for the feedback! Please give this version a try and let me know if it resolves the missing preferences issue.

/**
 *  Child Temperature Sensor
 *
 *  Copyright 2017 Daniel Ogorchock
 *
 *  Licensed under the Apache License, Version 2.0 (the "License"); you may not use this file except
 *  in compliance with the License. You may obtain a copy of the License at:
 *
 *      http://www.apache.org/licenses/LICENSE-2.0
 *
 *  Unless required by applicable law or agreed to in writing, software distributed under the License is distributed
 *  on an "AS IS" BASIS, WITHOUT WARRANTIES OR CONDITIONS OF ANY KIND, either express or implied. See the License
 *  for the specific language governing permissions and limitations under the License.
 *
 *  Change History:
 *
 *    Date        Who            What
 *    ----        ---            ----
 *    2017-04-10  Dan Ogorchock  Original Creation
 *    2017-08-23  Allan (vseven) Added a generateEvent routine that gets info from the parent device.  This routine runs each time the value is updated which can lead to other modifications of the device.
 *    2017-11-04  Dan Ogorchock  Added preference for Temperature Unit Conversion: Fahrenheit to Celsius, Celsius to Fahrenheit, or none 
 *    2018-02-16  Dan OGorchock  Fixed preferences to work with Hubitat.
 * 
 */
metadata {
	definition (name: "Child Temperature Sensor", namespace: "ogiewon", author: "Daniel Ogorchock") {
		capability "Temperature Measurement"
		capability "Sensor"

		attribute "lastUpdated", "String"

		command "generateEvent", ["string", "string"]
	}

	simulator {

	}
    
	preferences {
		section("Prefs") {
			//input title: "Temperature Offset", description: "This feature allows you to correct any temperature variations by selecting an offset. Ex: If your sensor consistently reports a temp that's 5 degrees too warm, you'd enter \"-5\". If 3 degrees too cold, enter \"+3\".", displayDuringSetup: false, type: "paragraph", element: "paragraph"
			input "tempOffset", "number", title: "Temperature Offset", description: "Adjust temperature by this many degrees", range: "*..*", displayDuringSetup: false
			//input title: "Temperature Unit Conversion", description: "This feature allows you to select F to C, C to F, or no conversion", displayDuringSetup: false, type: "paragraph", element: "paragraph"
			input "tempUnitConversion", "enum", title: "Temperature Unit Conversion - select F to C, C to F, or no conversion", description: "", defaultValue: "1", required: true, multiple: false, options:[["1":"none"], ["2":"Fahrenheit to Celsius"], ["3":"Celsius to Fahrenheit"]], displayDuringSetup: false
		}
	}
    
	tiles(scale: 2) {
		multiAttributeTile(name: "temperature", type: "generic", width: 6, height: 4, canChangeIcon: true) {
			tileAttribute("device.temperature", key: "PRIMARY_CONTROL") {
				attributeState("temperature", label: '${currentValue}°', unit:"F", defaultState: true, 
						backgroundColors: [
                                // Celsius
                                [value: 0, color: "#153591"],
                                [value: 7, color: "#1e9cbb"],
                                [value: 15, color: "#90d2a7"],
                                [value: 23, color: "#44b621"],
                                [value: 28, color: "#f1d801"],
                                [value: 35, color: "#d04e00"],
                                [value: 37, color: "#bc2323"],
                                // Fahrenheit
                                [value: 40, color: "#153591"],
                                [value: 44, color: "#1e9cbb"],
                                [value: 59, color: "#90d2a7"],
                                [value: 74, color: "#44b621"],
                                [value: 84, color: "#f1d801"],
                                [value: 95, color: "#d04e00"],
                                [value: 96, color: "#bc2323"]
						])
			}
 			tileAttribute("device.lastUpdated", key: "SECONDARY_CONTROL") {
    				attributeState("default", label:'    Last updated ${currentValue}',icon: "st.Health & Wellness.health9")
            }
		}
	}
}

def generateEvent(String name, String value) {
	//log.debug("Passed values to routine generateEvent in device named $device: Name - $name  -  Value - $value")
	// Offset the temperature based on preference
    def offsetValue = Math.round((Float.parseFloat(value))*100.0)/100.0d
    if (tempOffset) {
    	offsetValue = offsetValue + tempOffset
    }
    
    if (tempUnitConversion == "2") {
    	//log.debug "tempUnitConversion = ${tempUnitConversion}"
        double tempC = fahrenheitToCelsius(offsetValue.toFloat())  //convert from Fahrenheit to Celsius
        offsetValue = tempC.round(2)
	}
    
    if (tempUnitConversion == "3") {
    	//log.debug "tempUnitConversion = ${tempUnitConversion}"
        double tempC = celsiusToFahrenheit(offsetValue.toFloat())  //convert from Celsius to Fahrenheit
        offsetValue = tempC.round(2)
	}
    
    // Update device
	sendEvent(name: name, value: (String)offsetValue)
    // Update lastUpdated date and time
    def nowDay = new Date().format("MMM dd", location.timeZone)
    def nowTime = new Date().format("h:mm a", location.timeZone)
    sendEvent(name: "lastUpdated", value: nowDay + " at " + nowTime, displayed: false)
}


def installed() {
}

Thanks, Dan! That was fast. And it seems to work :slight_smile:

1 Like

Thanks for the feedback. I tested it on ST as well and all appears to be fine. I have updated my GitHub repository.

I noticed today that HubDuino was throwing some errors in the Live Log regarding a function called ‘sendEthernet()’. This is a function that is internal to the “HubDuino Ethernet Bridge” and “HubDuino ThingShield Bridge” Drivers. It is called by the HubDuino Service Manager whenever data needs to be sent to the Arduino processor. So data was coming into Hubitat, but could not be sent to the Arduino.

I believe a recent Hubitat hub firmware change may have changed the behavior for how an App can call into a Device. I had to declare ‘sendEthernet’ as a custom “command” in my Bridge Drivers. Then the problem was resolved.

So, heads up to anybody using HubDuino. You may want to update your Hubitat-side groovy code. I have been continuing to add to ST_Anything for both SmartThings and Hubitat, so there are some additional features that have been added over the past few weeks.

1 Like

Appreciate the heads-up Dan!
I was about to add a NodeMCU to my Hubitat tonight . I already did the ST_Anything with one a couple weeks ago and was meaning to send you a thanks for that. The ST_Anthing was only my 2nd Arduino project ever. Up to that point I did everything with Rasp-Pi’s since they 1st came out.

Thank you for your codes and keeping us updated.
Jeff

1 Like

I’m stuck,
Installed everything as per instructions but in section “Verify you Child Devices are automagically created” I do not see the child devices in the devices list. Yes, Bridge is but no children. Went back and double checked everything that I did and what I think I did right but here I am at this point.
Any ideas for me to look?

Double check the MAC address that you entered into the Bridge device (assuming you’re not using a ThingShield.) All uppercase and no delimiters.

Also, you did install the HubDuino Service Manager app and configure it, right?

Check the Live Logs for both the Bridge a Device and HDM App to see if any data is showing up.

Rebooted Esp8266 and they started to show up. Could be my learning curve and patience (or lack of) kicking in.
Will this need a watchdog to prevent falling asleep? I didn’t do anything like that with the ESP8266 I have on my ST hub. Why I ask is that before I restarted the Hubitat ESP8266 it disappeared from my network. I will wait and see if that happens again.

Thank you again. (Hope you never get tired of all the people thanking you).
Jeff

1 Like

I have never had an ESP8266 go to sleep running ST_Anything’s example sketches.

Seems ok now, probably just the reboot of the Arduino.

1 Like

@ogiewon do you happen to have a spare ThingShield? I am working with a @Matthew to move his alarm panel integration over to Hubitat and he cannot pair his ThingShield to Hubitat. I have a spare Arduino and ThingShield and I tried pairing it this morning with no success. I am on the latest firmware and discover never finds it. Last weekend my ThingShield was found immediately so not sure if something changed in the latest firmware but I am hoping someone else can validate this. Thanks in advance!

I just removed/unpaired my ThingShield from Hubitat, performed the reset of the ThingShield by holding down the SWITCH button for 6 seconds, then put Hubitat in device discovery mode, and then pressed the SWITCH button one time on the ThingShield. It was discovered almost immediately as a “SmartSense Multi Sensor” (or similar). I then changed the Driver to my HubDuino ThingShield Bridge and it seems fine.

I am on 704 firmware.

OK thanks for validating. I seem to be having troubles discovering ST branded devices lately. I paired a smart power outlet today and it took over 2 minutes to show up. My water leak sensors were super frustrating last weekend. But Iris contacts pair almost immediately.