Excited to get this working, but technically challenged ! When I'm GCP and creating a OAuth client ID, it asks me for an Application Type. What should I be using?
HI- I know the process is a little confusing, and it seems like there are multiple ways to accomplish this, but I think the simplest way is after you register for device access, go back to Get Started | Device Access | Google Developers and click on the blue "Enable the API and get an OAuth 2.0 Client ID" and follow the directions immediately above that blue button... Get Started | Device Access | Google Developers
Access to the SDM API is provided through GCP. To enable the API and authorize a Google account with a supported Nest device, you'll need a GCP project.
Use the Enable the API and get an OAuth 2.0 Client ID button below to enable the Smart Device Management API and get an OAuth 2.0 Client ID:
If you have an existing GCP project that you would like to use for Device Access, make sure you are logged into the admin account for that project first. Then select the existing project from the list of available projects after clicking the button. Otherwise, create a new project.
Select Web Server when it asks "Where are you calling from?".
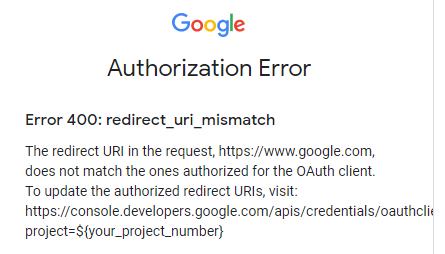
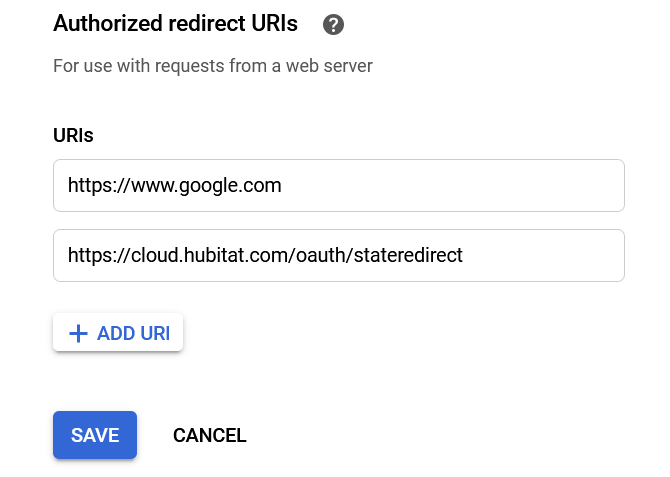
Enter https://www.google.com as the value for Authorized redirect URIs . A redirect URI is required to obtain an Authorization Code using Partner Connections Manager (PCM).
Once setup is complete, copy the OAuth 2.0 Client ID and Client Secret values, and download the Credentials JSON to your local machine .
Got a Bad Request (400) on the token request -- I'm guessing one or more characters got missed in the copy/paste of the authorization code from the google redirect url.
I'm still thinking on how to make this more seamless -- e.g. link from App to Google, allow access, then redirect back to App (providing the code directly) - but haven't found the right sequence/set of attributes to make that work yet.
@jonathan.lorber Thanks a lot this worked out. You were right, this indeed is the easy way of doing it. @dkilgore90 It would be nice to add the above instruction to your first post for folks like me.
Heads up -- tonight's changes re-worked the Oauth2 workflow to reduce the copy/paste, and manual link construction is no longer required. The README has been updated to document the new workflow.
I don't think this should break any existing installations -- but no warranty or refunds!
Just had to play with it a little to test it out. FWIW, you have to go back and add Hubitat to the allowed Redirect URI's in order for the authorization to work from the app.
The specific site URI you need is: https://cloud.hubitat.com/oauth/stateredirect
Click on the credentials in your Google Project then the edit pencil under Oauth 2 Client ID's
Before I did that, I was getting a 400 error. Afterwards, it discovered my devices.
Another quirk, I had to click done after entering the Project ID and Json. Then I was able to come back into the app and click authorize. So, it was not showing the authorize button until after I clicked done (even though I had filled out the fields. I tried to tab out and clicking on white space. Neither worked)
Forcing the user to click done was intentional -- since we redirect away from HE to do the auth, I wanted to ensure that both the app installation and settings were saved before moving on.
I sort of got that from the read me. (Maybe the wording in the app needs to match the read me? Thinking of users for an app that I had install links with a big red circle around the link and "click here" - but I still had some miss it LOL - Not kidding, I had a call where the guy asked, "It says click here, what should I do??? I literally asked him if he tried clicking there.... )
With the new update, I was able to get it working just fine. I really love the newer flow you created, it's so much simpler than before. The instructions I think is good, at least it was pretty easy for me to follow.
I just have the Nest Thermostat which is the only Nest device I have currently. Obviously this is very early I know into developing this integration, suggestions I came up with so far:
Setting 1 or 2 decimal points for temperatures or having option for it
Option to set Home and Away mode on Thermostat (not sure if API supports this yet or not).
So far it seems to work as intended when testing it out so really great job on this integration. This was the final device I didn't have integrated to Hubitat since Google pulled "Works with Nest" dev program.
Is there any way of having the Nest Thermostat update it's heating or cooling setpoint automatically, from within HE devices? if the temperature is changed from within the following platforms; Nest app, HE Dashboard, Sharptools,io etc. The thermostat doesn't update within HE - Devices, you have to hit the refresh button every time for the changes to be reflected.
I am using Thermostat scheduler to set the temperature using modes (day, away etc) which works perfectly. It will reflect the changes in the Nest app but not Sharptools, or HE. Since Sharptools pulls the device directly from HE via API. Once you hit the refresh button, the changes appear within Sharptools and HE dashboards.


 )
)
