That's what I thought on the sensors. So move from red/white to relay. Then add 2 wires from relay back to opener
On mine I just added 2 wires from the relay to the red/white wires on the opener and it works fine.
Just figured I would add to this thread. The LiftMaster 8900W LJ8900W (jackshaft style), so far has been a great opener for me, it has MyQ, but also supports dry contacts instead of the special keypads. Not really an option unless you are replacing your opener, but it is really nice to have the garage ceiling freed up. I have mine paired with a tailwind and the setup works quite well. I have typical-looking wall light switches for control as well since I doest need the security keypads.
1 Like
Can anyone with a myq 2.0 opener post a picture of how they wired a zooz relay zen16/zen17 and the button opener such as LiftMaster 883LM Security+ 2.0 MyQ Door Control Push Button
Unless you are willing to dig inside your wall control (to the physical momentary contact button) or a spare remote, it isn't a simple matter of wiring the relay connecting to wires from the GDO.
The easiest path is to purchase a compatible remote control or wall button with wires already soldered in place from Garadget, as should be mentioned several times in this thread.
See also Search results for garage door opener - Zooz Support Center (getzooz.com)
1 Like
I purchased this to connect to the opener as I read here it's necessary LiftMaster 883LM Security+ 2.0 MyQ Door Control Push Button
Is it possible to use this in addition to the main switch on the wall? The relay connects to LiftMaster 883LM Security+ 2.0 MyQ Door Control Push Button
only? That's where I get confused.
You'll have to remove the PCB and find the contacts for the physical momentary contact switch. Solder two wires there and you'll end up with something like this:
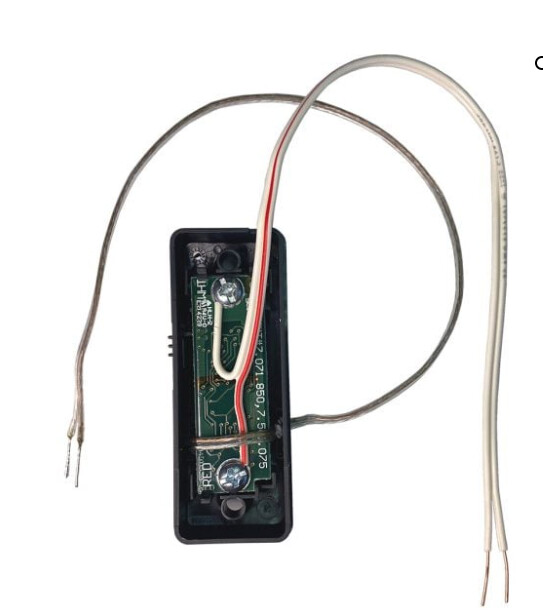
Security+ 2.0 Wired Dry Contact Adapter – Garadget
and then follow the Zooz instructions. Alternatively, buy the door control pushbutton with the wires already soldered in place from Garadget for $21.
2 Likes
What's the cable on the left doing? It's just being looped over the right wire?
Can this be used in addition to the main wall switch? I saw on a separate thread It may not be possible?
Also any special soldering gear needed I have never soldered before.
The red and white wire connects to your GDO in parallel with the existing wall switch. It's the other two wires that are connected to the physical button, and your relay is going to simulate pushing the button. Those two little wires go to the relay.
You can mount your new pushbutton anywhere you'd like, so if you need another wall control, yes, you can use it for that.
If you've never soldered before, perhaps easiest route is to buy the button with the wires already soldered. Return the one you bought if possible.
3 Likes
@Dan29482 - this is what I would recommend you do.
To purchase one, use the link that @HAL9000 posted in the post above yours. It is ~$20 from Garadget and ready to use.
2 Likes
Thank you that was very helpful. I decided to just purchase the one you linked.
On the Zen17 I would just connect the 2 non red/white wires to NOR1 and C? That's what the zooz site shows (I can't post links/pictures yet as I have a new account).
1 Like
Yes, you'll connect the little wires (non red/white) to a relay position on the ZEN17 .. normally open and C. If I recall correctly, the Garadget comes with very clear instructions that covers all this, so you'll be fine.
Once you connect the red and white wires to the GDO, briefly (for just a second) touch the little wires (non red/white) together and verify that your opener operates. Also, push the button on the Garadget to make sure that your opener operates. If these things work, proceed to connecting to the ZEN17.
2 Likes
And I also have to do the pairing process with the button? Is that what I need to do first for it to open/close? Before trying to use the button to test?
The garage door opener button is not a smart device. The ZEN17 is and it creates component devices one for each relay. [UPDATE: Per @ritchierich comment below, I was in error when I thought you were talking about pairing with Hubitat. Yes, you'd pair the button with the GDO, Sorry about that.]
If this seems overwhelming, break the project up into two pieces - installing/pairing/configuring the ZEN17 and making sure (by going to the relay device page) that you can do on/off on that relay and it closes and opens accordingly. Don't think about the garage door application until you've got this working.
As a second piece, get the Garadget installed and verify it works as a pushbutton, and also that "closing" the contacts by touching the little wires together briefly works as expected.
Once each of these is working perfectly, just connect the little wires to the relay C/NO connection. Verify that if on the device page you turn the relay on briefly, then off, the door operates.
3 Likes
Yes there is a process to pair the button to the GDO and instructions are included with the button.
I have my button and relay on top of my GDO. Originally I just shoved the button wires into the same hole as my wall button and sometimes my wall button would lose power and reset the time. Ended up using an additional short piece of wire and have a single wire now into the GDO and then use Wago (or you can use wire nuts) to connect this wire with the wall and button wires for a better connection.
3 Likes
I'm using a zen17 already with a humidifier. I actually use home assistant but saw this discussion and figured I should ask here about setting this up.
This topic was automatically closed 365 days after the last reply. New replies are no longer allowed.

