If you figure out how to do it, can you please post how you did it, so that we can learn how to do that sort of stuff?
You could go that route (should the device you are trying to control supports it), but you'll still need to go the Groovy route to use it. AFAIK, the MQTT client that HE built in is in code only and there is no UI interface for it.
1 Like
I solved it with some dirty hard coded stuff (I'm not a programmer)
Check this pastebin out and search for HARD CODED
1 Like
I bet you're going to become one though... ![]() LOL
LOL
Nicely done, BTW (hard coded or not).
1 Like
I friend helped me a bit to change the code from a momentary switch to a normal one. He is not a Hubitat owner and we coded over facebook messenger, so don't expect quality code  I just post it here as a reference if someone wants to build a "real" driver.
Headers and the data part that switch my bulb on and off are hard coded.
https://pastebin.com/hyWG9Nd0
/**
- QUICK AND DIRTY FORK OF THE HTTP Momentary Switch to a normal switch
- with hard coded headers. Maybe someone with skills can do a neat version
- HTTP Momentary Switch
- Copyright 2018 Daniel Ogorchock
- Licensed under the Apache License, Version 2.0 (the "License"); you may not use this file except
- in compliance with the License. You may obtain a copy of the License at:
-
http://www.apache.org/licenses/LICENSE-2.0 - Unless required by applicable law or agreed to in writing, software distributed under the License is distributed
- on an "AS IS" BASIS, WITHOUT WARRANTIES OR CONDITIONS OF ANY KIND, either express or implied. See the License
- for the specific language governing permissions and limitations under the License.
- Change History:
- Date Who What
-
- 2018-02-18 Dan Ogorchock Original Creation
*/
metadata {
definition (name: "HTTP Switch Hard coded", namespace: "ogiewon", author: "Dan Ogorchock") {
capability "Switch"
capability "Momentary"
}
preferences {
    input(name: "deviceIP", type: "string", title:"Device IP Address", description: "Enter IP Address of your HTTP server", required: true, displayDuringSetup: true)
    input(name: "devicePort", type: "string", title:"Device Port", description: "Enter Port of your HTTP server (defaults to 80)", defaultValue: "80", required: false, displayDuringSetup: true)
    input(name: "devicePath", type: "string", title:"URL Path", description: "Rest of the URL, include forward slash.", displayDuringSetup: true)
    input(name: "deviceMethod", type: "enum", title: "POST, GET, or PUT", options: ["POST","GET","PUT"], defaultValue: "POST", required: true, displayDuringSetup: true)
}
}
def parse(String description) {
log.debug(description)
}
def push() {
//toggle the switch to generate events for anything that is subscribed
sendEvent(name: "switch", value: "on", isStateChange: true)
runIn(1, toggleOff)
runCmd(devicePath, deviceMethod, "")
}
def toggleOff() {
sendEvent(name: "switch", value: "off", isStateChange: true)
}
// hard coded data for on and off command to my lightbulb
def on() {
sendEvent(name: "switch", value: "on", isStateChange: true)
runCmd(devicePath, deviceMethod, '{"brightness": 100, "state": "ON"}')
}
def off() {
sendEvent(name: "switch", value: "off", isStateChange: true)
runCmd(devicePath, deviceMethod, '{"brightness": 100, "state": "OFF"}')
}
//Added body as input
def runCmd(String varCommand, String method, String the_body) {
def localDevicePort = (devicePort==null) ? "80" : devicePort
def path = varCommand
def headers = [:]
headers.put("HOST", "${deviceIP}:${localDevicePort}")

//Hard coded headers. Adjust for your needs
headers.put("API-Key", "password")
headers.put("Content-Type", "application/json")


try {
    def hubAction = new hubitat.device.HubAction(
        method: method,
        path: path,

        //NYTT: Body från function call
        body: the_body,
        headers: headers
        )
    log.debug hubAction
    return hubAction
}
catch (Exception e) {
    log.debug "runCmd hit exception ${e} on ${hubAction}"
}
}
Hi @duelago, @daniel.john.edge
Can you share the Rule on how to trigger hubitat with Linktap?
I created a virtual switch and set it as trigger and in action added a send http post. I am unsure how to enter the syntax. Should it be on the
'Enter body for POST' or
'Enter URL to send request to under Send http POST' in Rule Machine?
I set this up via node red and my node red flow triggers the actions
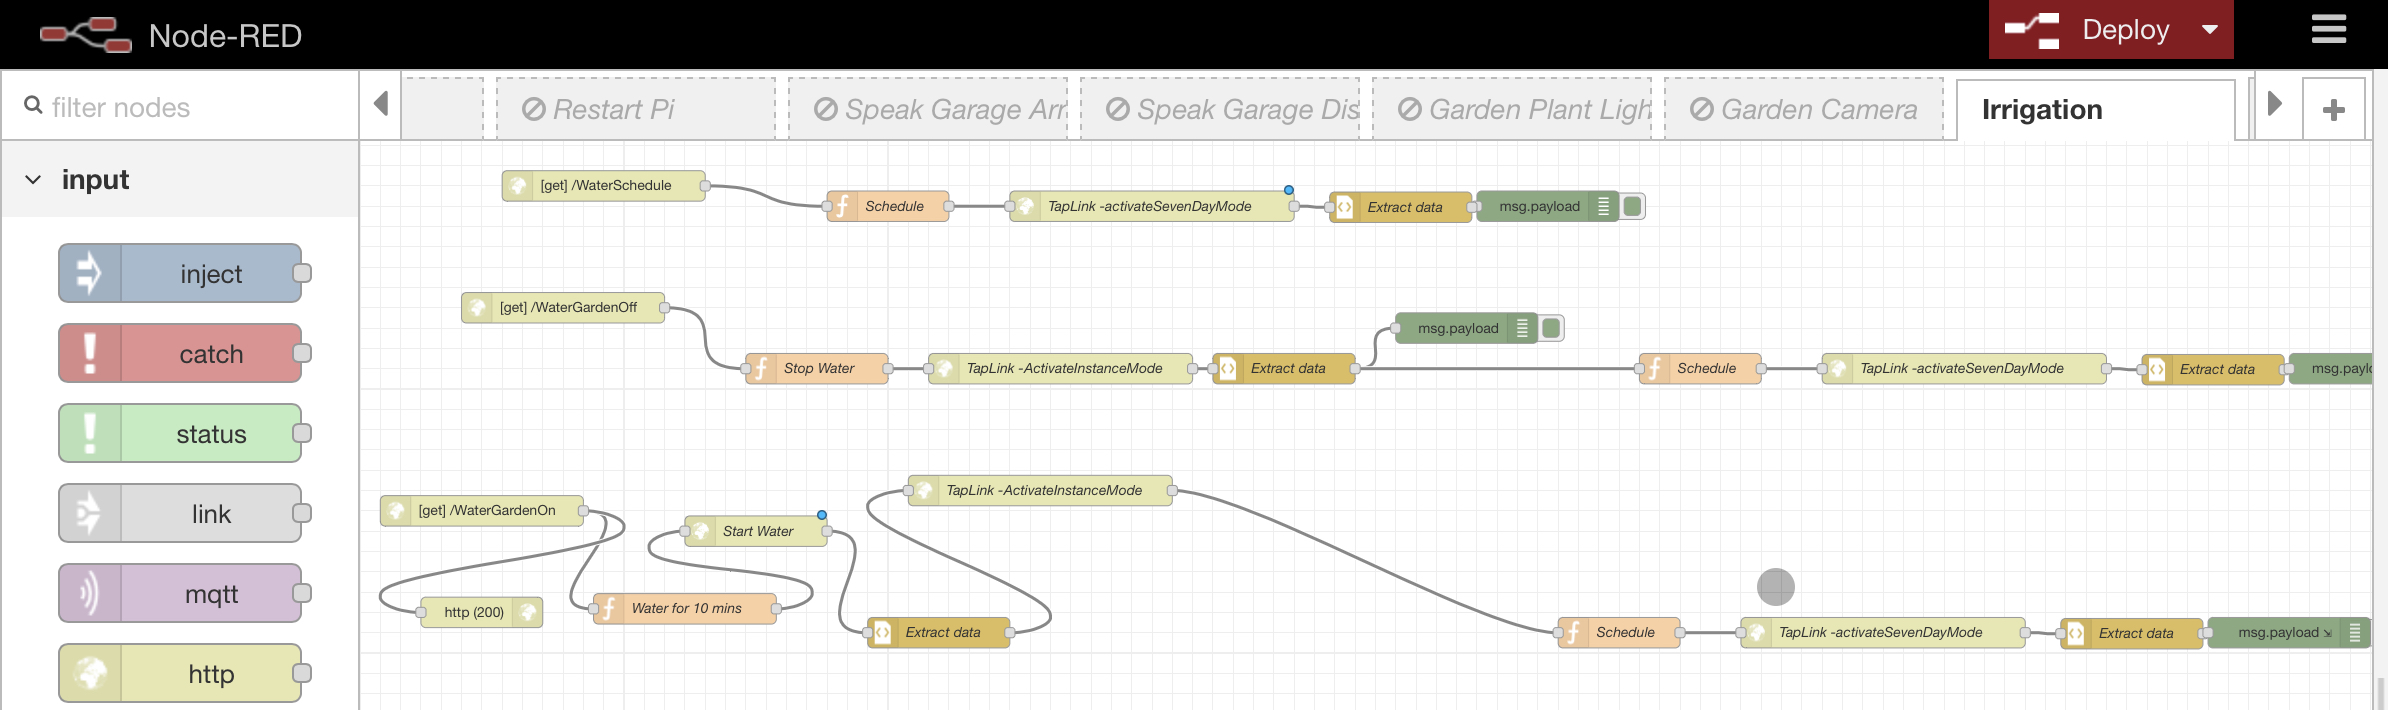
If you look at the bottom workflow, this triggers a 10 min watering cycle its called from hubitat using a virtual http switch (search the forums for that) but basically when switched on hits http://mynoderedserver/WaterGardenOn
This starts the workflow..
The first function authenticates:
return {payload: "username=YOURUSERNAME&apiKey=YOURAPI&gatewayId=YOURGATEWAYID&taplinkerId=YOURTAPLINKID&action=true&duration=1", headers: {"Content-Type":"application/x-www-form-urlencoded"}};
Next step:
Put it in to instance mode, which kicks off the default 10 min watering cycle
https://www.link-tap.com/api/activateInstantMode
I then put it back in to the default 7 day mode <- if you don’t do this then I found that it would just stay in the instant mode and not reset back to the scheduled mode again
Below is a quick driver for the Link Tap device. You will need your API key from Link Tap Wireless Water Timer - LinkTap (link-tap.com) as well as you username (not email)
/**
*
*   File: Taplink_Driver.groovy
*   Platform: Hubitat
*   Modification History:
*       Date       Who                   What
*
*
*  Licensed under the Apache License, Version 2.0 (the "License"); you may not use this file except
*  in compliance with the License. You may obtain a copy of the License at:
*
*      http://www.apache.org/licenses/LICENSE-2.0
*
*  Unless required by applicable law or agreed to in writing, software distributed under the License is distributed
*  on an "AS IS" BASIS, WITHOUT WARRANTIES OR CONDITIONS OF ANY KIND, either express or implied. See the License
*  for the specific language governing permissions and limitations under the License.
*
*
*/
def version() {"v1.0"}

metadata {
    definition (name: "Linktap Driver", namespace: "comrad", author: "Lamar Dykes") {
        capability "Valve"
        attribute "valve", "enum", [ "open", "closed" ]
    }

    preferences {
        input("apiKey", "text", title: "API Key:", description: "Linktap API Key")
        input("userKey", "text", title: "User Key:", description: "Linktap User Key")
        input("gatewayID", "text", title: "Gateway ID:", description: "Linktap Gateway ID")
        input("taplinkerID", "text", title: "taplinkerID:", description: "Linktap Taplinker ID")
    }
}

def open() {
    sendEvent(name: "valve", value: "open", isStateChange: true)
    log.debug 'Turning on LinkTapper'
    tapLinker("true",20)
}

def close() {
    sendEvent(name: "valve", value: "closed", isStateChange: true)
    log.debug 'Turning Off LinkTapper'
    tapLinker("false",0)
}

def tapLinker(action,time){
    def postBody = [
        username: "$userKey",
        apiKey: "$apiKey",
        gatewayId: "$gatewayID",
        taplinkerId: "$taplinkerID",
        action: action,
        duration: time,
        eco: false,
        ecoOn: 1,
        ecoOff: 2,
    ]

    def params = [
        uri: "https://www.link-tap.com/api/activateInstantMode",
        contentType: "application/json",
        body: postBody,
        textParser: true
    ]

        try{
            httpPost(params){response ->
                if(response.status != 200) {
                    sendPush("ERROR: 'Linktap' received HTTP error ${response.status}. Check your keys!")
                    log.error "Received HTTP error ${response.status}. Check your keys!"
                }
                else {
                    log.debug "LinkTapper Activated Successfully ${response.status}"
                        success = true
                }
            }
        }
        catch (Exception e) {
            log.error "An invalid key was probably entered. Taplinker Server Returned: ${e}"
        }

    return success

}Thanks for the driver @comrad. I've just started poking around with the Link-tap API and came across this thread.
I noticed that when the "instant mode" is activated or de-activated it disables my watering schedule. I think that a POST to https://www.link-tap.com/api/activateIntervalMode will reactivate the schedule (in my case anyways). Do you think you could add this to the driver for after the instant-mode is started or stopped? Also it would be a nice feature to be able to define the amount of time in minutes for the instant mode watering to happen.
Thanks for your time! I appreciate you writing this driver.
Jamie
I had to change the code to use switch instead of valve to get it working. I dont know how to make it go back to your programming.
 /**
*
*   File: Taplink_Driver.groovy
*   Platform: Hubitat
*   Modification History:
*       Date       Who                   What
*
*
*  Licensed under the Apache License, Version 2.0 (the "License"); you may not use this file except
*  in compliance with the License. You may obtain a copy of the License at:
*
*      http://www.apache.org/licenses/LICENSE-2.0
*
*  Unless required by applicable law or agreed to in writing, software distributed under the License is distributed
*  on an "AS IS" BASIS, WITHOUT WARRANTIES OR CONDITIONS OF ANY KIND, either express or implied. See the License
*  for the specific language governing permissions and limitations under the License.
*
*
*/
def version() {"v1.0"}

metadata {
    definition (name: "Linktap Driver", namespace: "comrad", author: "Lamar Dykes") {
        capability "Valve"
        capability "Switch"
        attribute "valve", "enum", [ "open", "closed" ]
    }

    preferences {
        input("apiKey", "text", title: "API Key:", description: "Linktap API Key")
        input("userKey", "text", title: "User Key:", description: "Linktap User Key")
        input("gatewayID", "text", title: "Gateway ID:", description: "Linktap Gateway ID")
        input("taplinkerID", "text", title: "taplinkerID:", description: "Linktap Taplinker ID")
    }
}

def on() {
    open()
}

def off() {
    close()
}

def open() {
    sendEvent(name: "valve", value: "open", isStateChange: true)
    log.debug 'Turning on LinkTapper'
    tapLinker("true",6)
    sendEvent(name: "valve", value: "closed", isStateChange: true)
}

def close() {
    sendEvent(name: "valve", value: "closed", isStateChange: true)
    log.debug 'Turning Off LinkTapper'
    tapLinker("false",0)
}


def tapLinker(action,time){
    def postBody = [
        username: "$userKey",
        apiKey: "$apiKey",
        gatewayId: "$gatewayID",
        taplinkerId: "$taplinkerID",
        action: action,
        duration: time,
        eco: false,
        ecoOn: 1,
        ecoOff: 2,
    ]

    def params = [
        uri: "https://www.link-tap.com/api/activateInstantMode",
        contentType: "application/json",
        body: postBody,
        textParser: true
    ]

        try{
            httpPost(params){response ->
                if(response.status != 200) {
                    sendPush("ERROR: 'Linktap' received HTTP error ${response.status}. Check your keys!")
                    log.error "Received HTTP error ${response.status}. Check your keys!"
                }
                else {
                    log.debug "LinkTapper Activated Successfully ${response.status}"
                        success = true
                }
            }
        }
        catch (Exception e) {
            log.error "An invalid key was probably entered. Taplinker Server Returned: ${e}"
        }

    return success

}Thanks @comrad, I'll give this a try. I'm not going to have access to my Hubitat for a couple weeks, but as soon as I do I'll give it a shot.
Cheers!
For Linktap owners, I did my own driver for the Tap Linker product, should you want to try. It includes the ability to receive events/data from Linktap, apart from start/stop watering. More info here
Cheerse
1 Like