Yeah
That would probably be the best choice for the switch, that or Inovelli,, but it does not give you local control. Local control means the automations run even if your Internet is out. Using the bond hub does require a cloud connection.
Yeah
That would probably be the best choice for the switch, that or Inovelli,, but it does not give you local control. Local control means the automations run even if your Internet is out. Using the bond hub does require a cloud connection.
I also think that would just allow you to know on/off state, and not speed of the fan.
I have two Hunter Symphony fans with Hunter Simple Connect technology. They have remotes to control the fans and lights, but they also connect to WiFi and to the Simple Connect app using cloud control. The fans and lights can be controlled by Alexa.
I plan to use virtual devices to communicate fan and light status between Alexa and Hubitat so Hubitat can indicate the status of the fans and lights in Alexa and Hubitat can send a command to Alexa to turn the devices on or off as desired.
I won't claim that is the "best" system by any means, but the Hunter fans are good and the control does work. I would rather not have to go through the cloud to do it, but the controller are built-in and cannot be replaced easily with controllers such as the Hampton Bay controller.
Yes, this can be done. You CAN throw away that proprietary remote. To quote "Doc Brown" from "Back to the Future", "Roads? Where we're going, we don't need roads!"
This assumes familiarity with circuits in general, soldering wires, and reading wiring diagrams.
A teenager may be required in some households. (Do you change your own oil? Have you used a soldering iron this fiscal quarter? If not, this task may not be for you.)
If there are only two wires running from the control board to the fan motor, that unit is stuck with the control board, and needs to be returned, as it has a DC motor, and it requires a solid-state controller of some sort. If there are more than 2 wires (sometimes 3, often 5), then you have an AC motor. If you see large black rectangular objects in the wiring between control board and motor, those are capacitors and you have an AC fan.
If you clamp the motor in a vice (I would not try this without the motor clamped, as the motor may violently spin itself rather than the shaft if sitting un-anchored!!!) you can use a volt meter to verify that the wires to the motor have 120Vac on them, which would be smart before hacking into an otherwise returnable consumer product. Just about any fan can be returned for a refund based upon the complaint that the motor hum is too loud, many brands do this, Hunter seems one of the few that makes an effort to make an actually silent fan.
If you also have a "manual" reverse switch on the fan, with two wires that go direct to the motor, that's even a more clear signal of an AC motor. Don't mess with that, leave that reverse switch in place, as that switch is a "double-pole, double-throw" switch, wired "criss-cross" and would be very costly to automate a change most often only made in spring/fall.
Focusing on the 3 wires that control the speed, each of them is SINGLY either 120Vac or not. You have some form of 4-position speed switch - Off, Low, Medium, High. We can work with this, and yes you CAN have "manual" local control. You need 3 of the cheap SonOff relays, loaded up with Tasmota, and something like an Ikea Tradfri "hockey puck" switch, with multiple contacts. The light (if one is fitted) would have to be a kludge, so make it a simple "smart bulb", with its own switch and dimmer.
Turn on the clamped fan, see what speed it is spinning, and see which wires have 120 Volts across them. You should have 120 volts between one wire from the reverse switch, and one wire from the control board. The same wire from the reverse switch will be your "neutral", but the "hot" wire will change as you change speeds with the remote.
If there is no separate fan capacitor, but you see a large (most often black) rectangular object on the control board, the job just got much harder - you have to wire in a capacitor to replace that one, so look (with the power off) at how many solder leads it has, and the rating (farads and volts) and order one with the same values or solder wires to the leads and use the existing one you remove from the control board. Look at multiple AC Fan schematics and the capacitor schematic to work out how that capacitor is to be wired into your fan. This is merely matching wire colors, as the components (a few coils and the starting capacitor module) are ALL THE SAME. There is nothing new under the sun here, so look at your capacitor wiring diagram (vendor website) and match it to a diagram you find with the Google. Yes you CAN do this, as this is not engineering, it is merely bookkeeping. Make a nice chart of "my wire colors" and what each wire does (low, medium, high) and match it to the wires in the diagram you find. Triple check it.
The Tradfri switch is a intuitively obvious as a fan control, the center button turns the fan "on", and the left and right buttons step through the speed settings, while the up and down buttons step through various light levels. The darn thing is even already labeled appropriately for all this.
The hardest part here is going to be getting the light physically placed so that it looks non-wonky, you may have to fabricate a bracket and a reflector.
There are lots of wiring diagrams for AC ceiling fans out there, they all show the same thing:
Three inner coils, each connected to a wire running to the 4-position switch. These are the "hot wires" for the speed. So the switch has three wires that run from the switch to the motor. The other two wires to the switch are the hot and neutral feed of 120Vac.
An outer coil (which is not a "loop", but a "broken loop") connected to the reverse switch. (I'll say it again - don't mess with this, you cannot automate something like this easily or cheaply, and you WILL screw it up unless you are very very careful.)
Between the switches and the motor, there sometimes a 5-wire and sometimes 2-wire capacitors out there, and you want to leave them in the circuit exactly as they were. These are "starting capacitors" , and they are crucial. They are often cubical, black, and marked something like "3 uF 250V" (3 microfarads, 250 Volts max). You must leave them in place.
I have a fan with light that has Bond built-in. I took the switch from the old fan (which did not have a light) out, hard-wired the fan where the switch was, and installed a blank switchplate. I then attached the remote "holster" to that switchplate cover for local control, but that never gets used...simple and effective. Seems you could do the same with the Bond hub
Do you have rules set up to control the fan? If so, could you please show what your rule looks like? Appreciate any help in advance
I just installed dumb fans without light kits since I installed recessed lighting in all my rooms. The entire house has Lutron Caseta switches so I have a dual switch in each room. One to control the lights and one to control the fan. With the Lutron integration it’s easy to control the fans through voice or rules in hubitat.
What are you trying to achieve with your fans? Turn on by temp? Turn on by time? Both?
Set speeds of 25%, 50%, 75%, 100% based on temp and presence
Turn off after a certain time when no presence detected
Are they 4 speed fans by the pull chain or 3?
It's going to be a wifi capable hunter fan with SimpleConnect. And homekit capable
I have a rule in RM that does this but my fan controller is a Inovelli fan controller on Zwave. At this point the question is does your fan have a integration for hubitat or can you link into hibitat via other means.
You may need to figure that out before asking how to make hubitat do something specific with it.
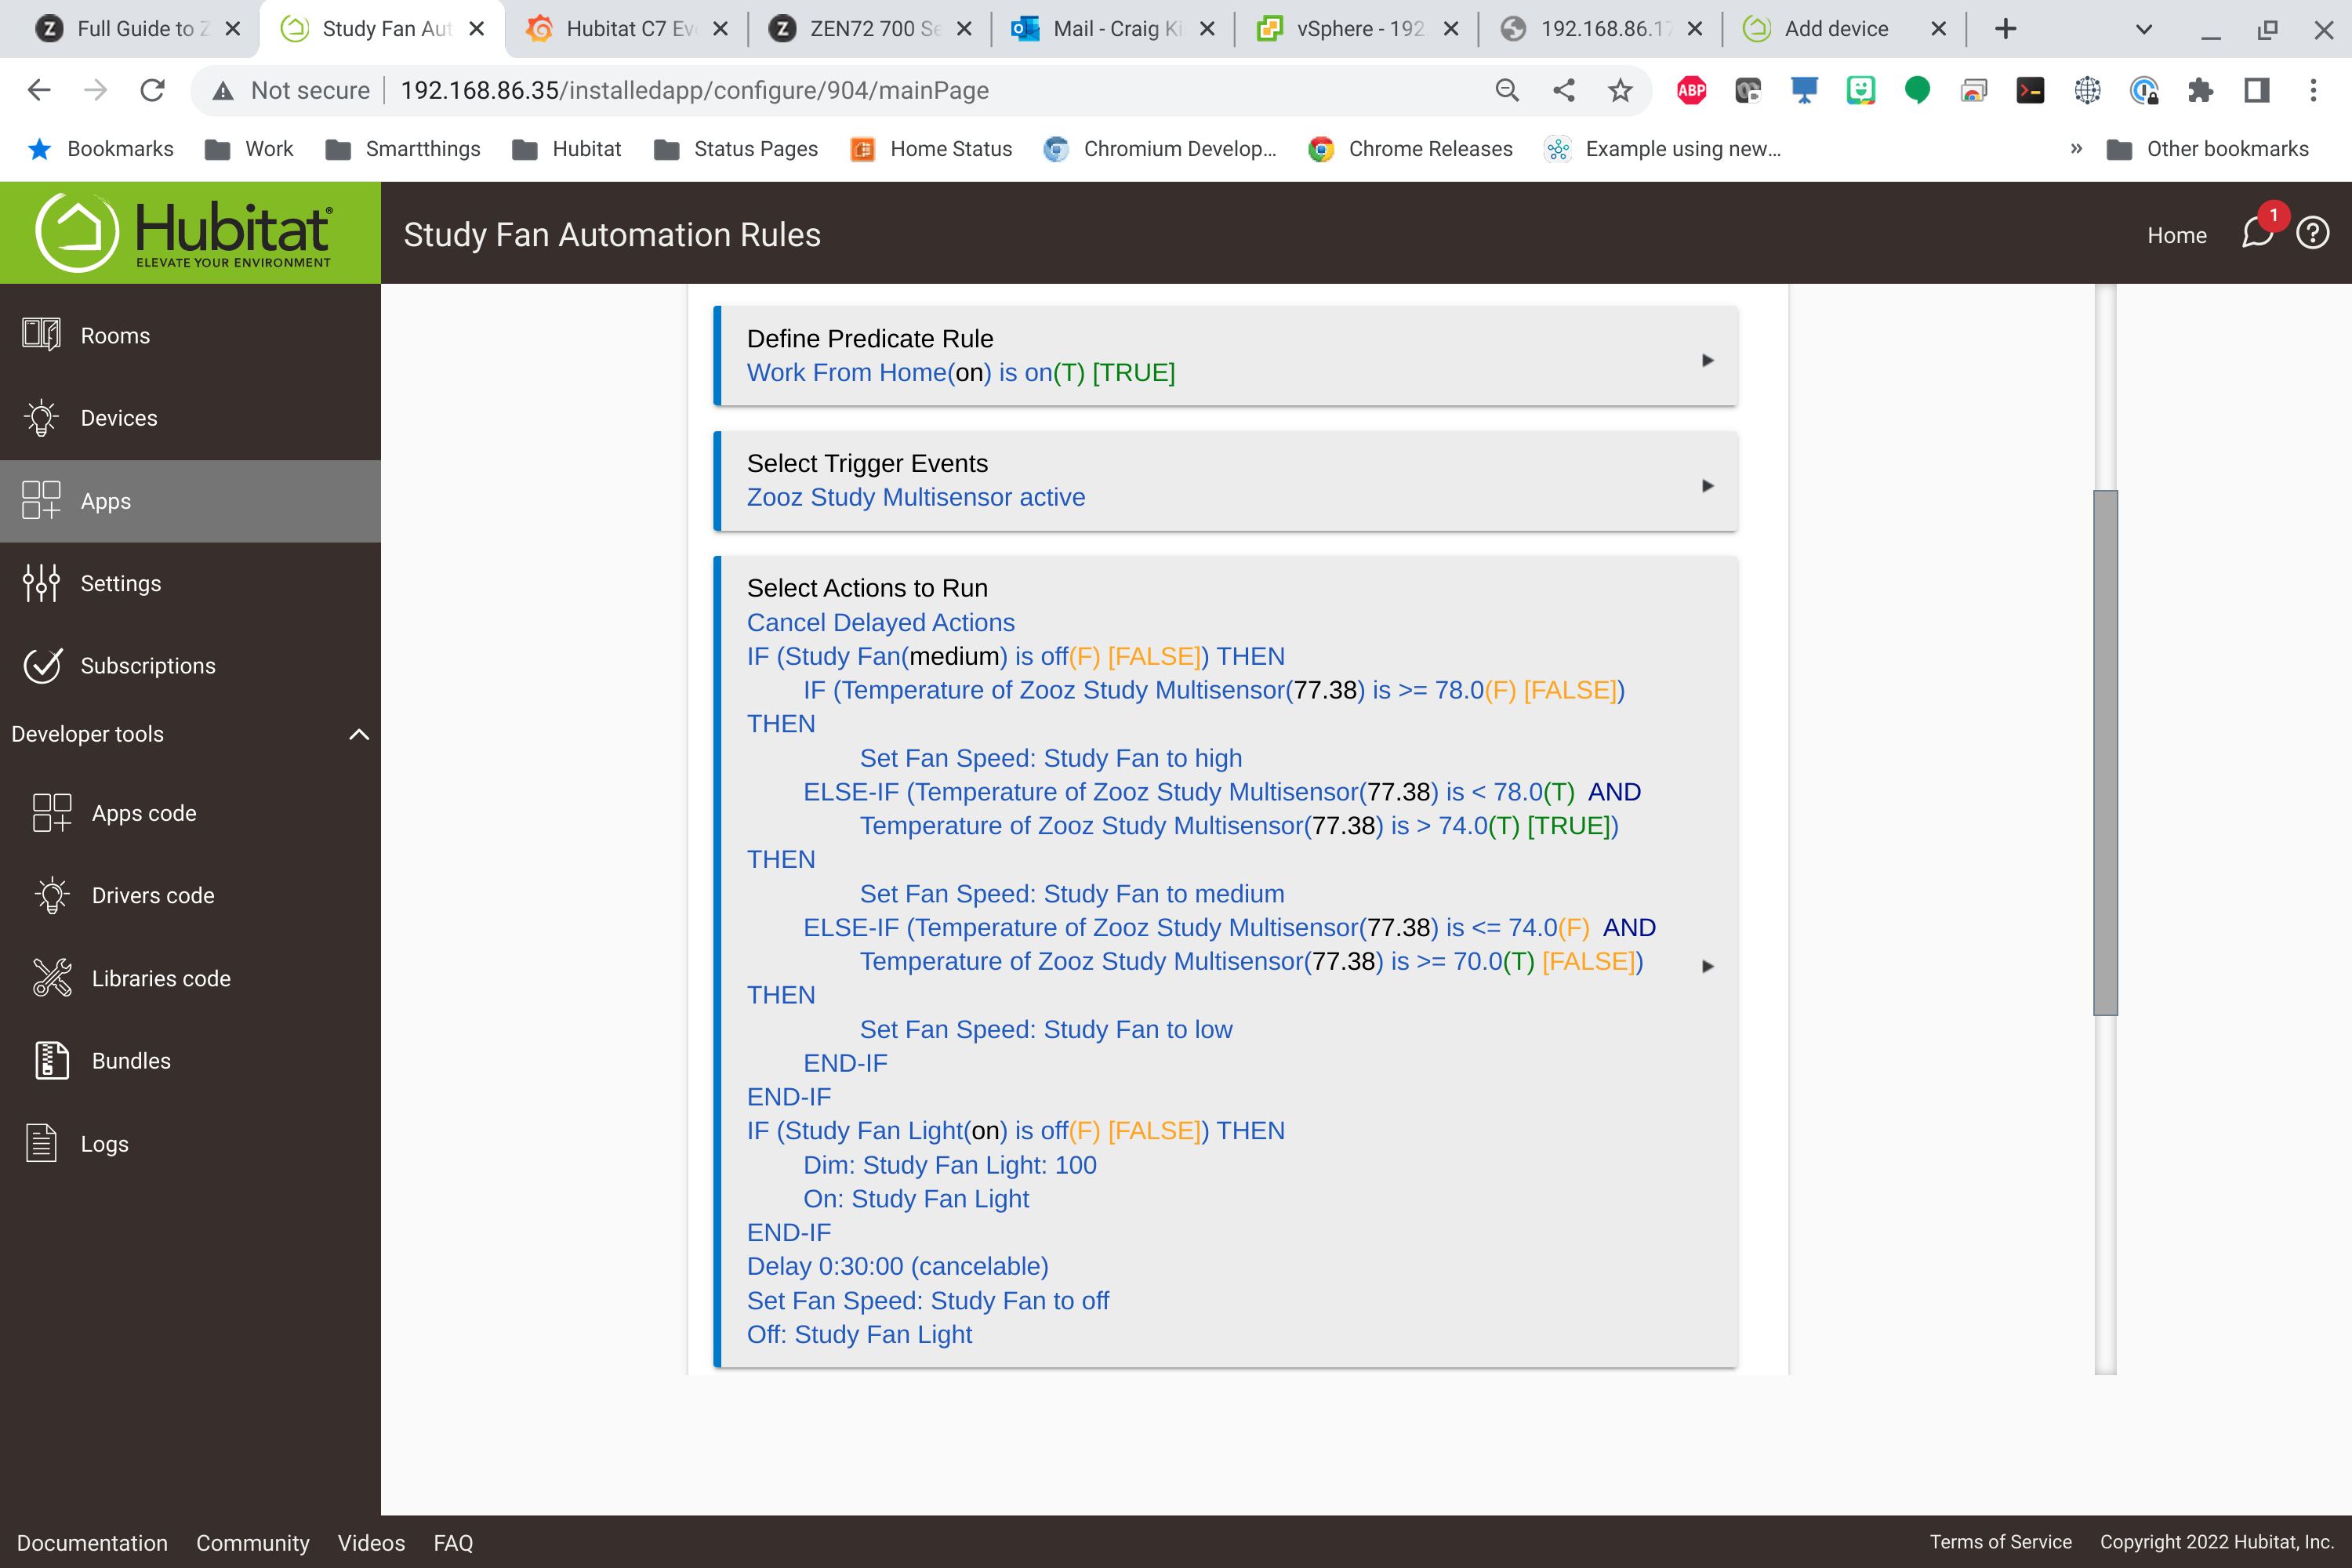
Here is the rule
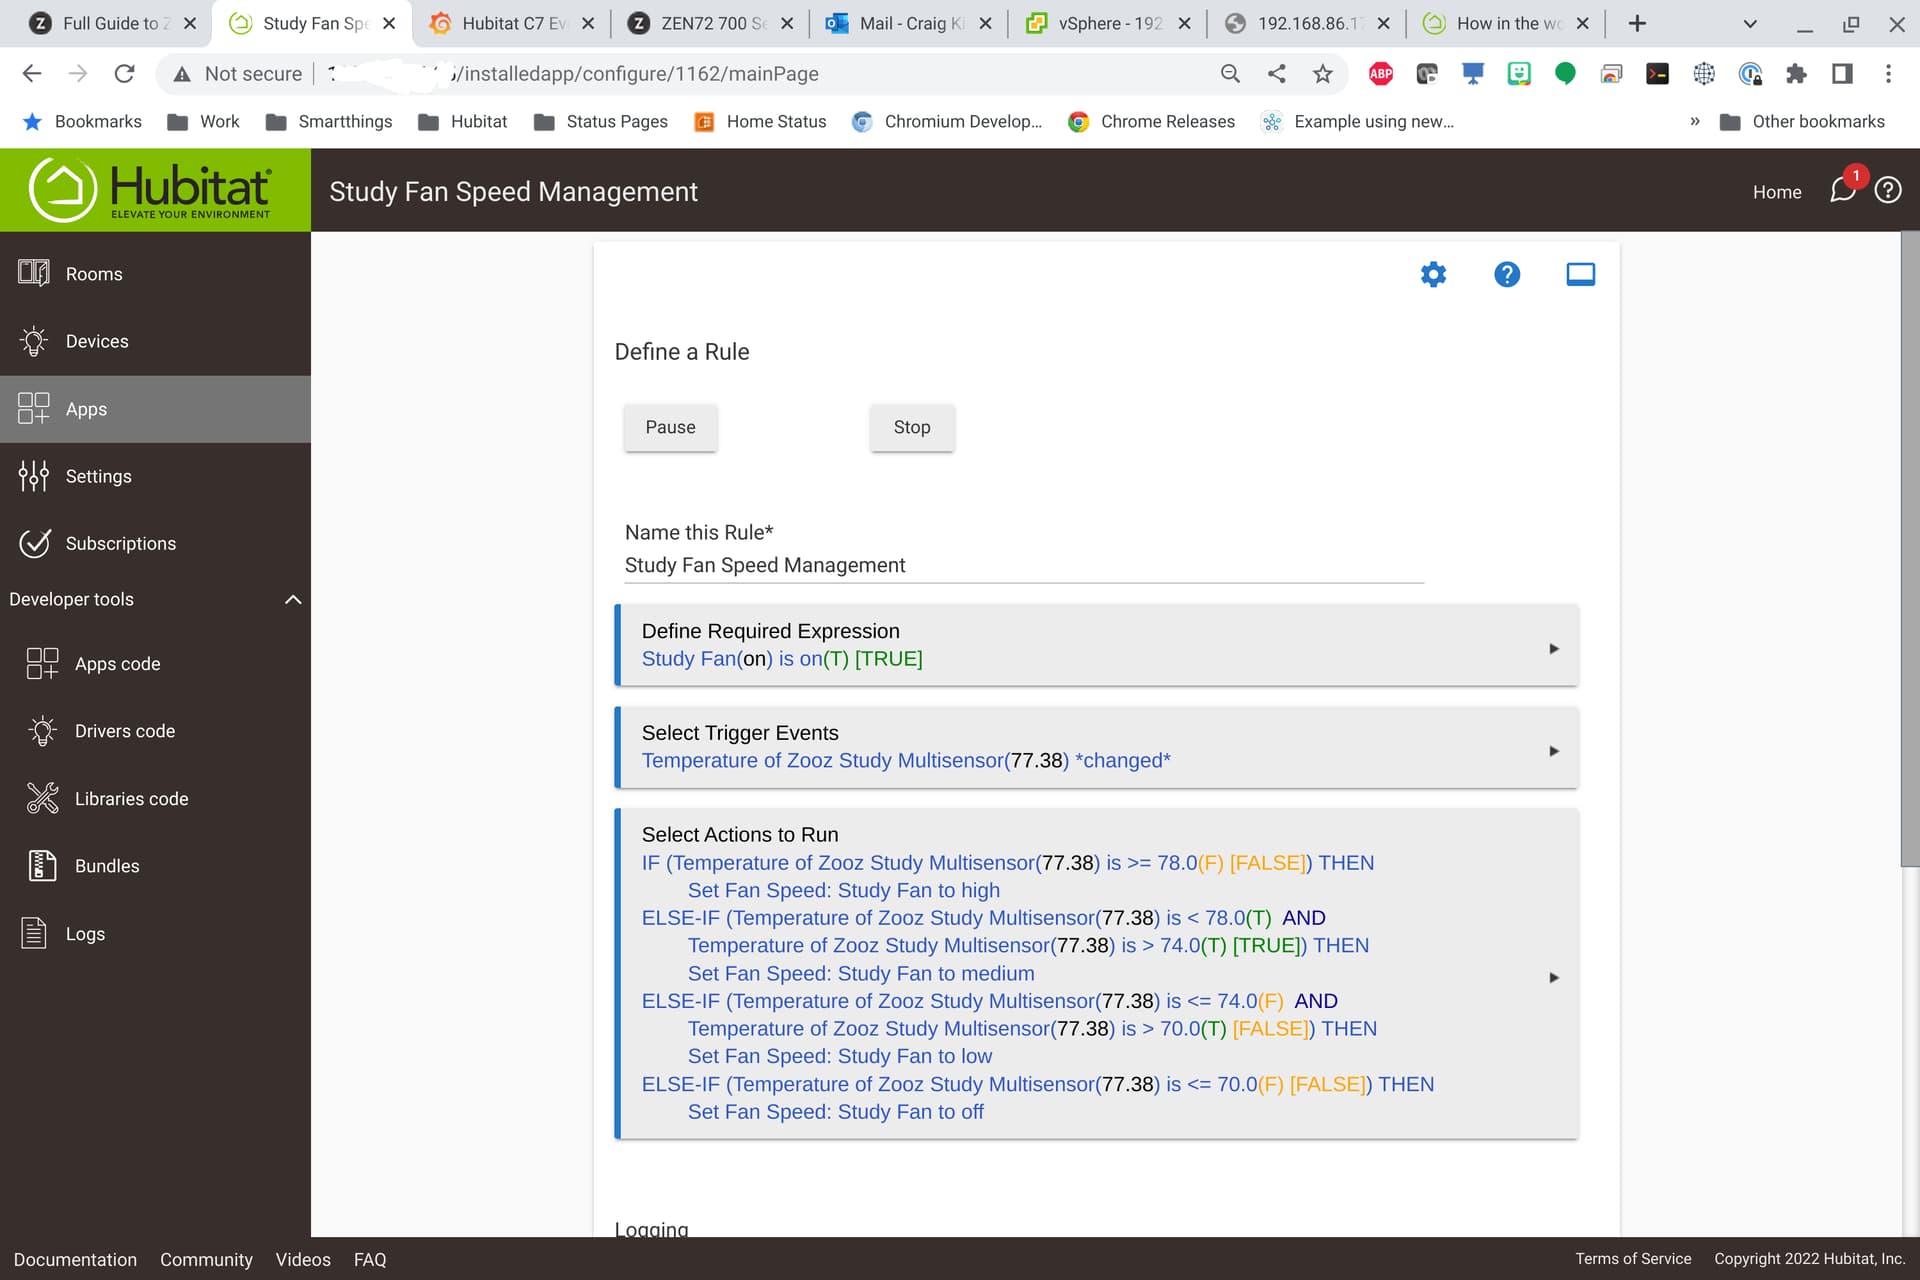
Then there is this rule to control the speed while it is running
Don't believe there is a Hubitat integration for that fan. Since the fan is homekit capable, was thinking it can be controlled via virtual devices
You will likely need to use one of the integrations to get take it from homekit into HE. I am haven't done anything with that myself.
Maybe Node-Red is a option to integrate it as well.
That will work. I did something similar with an RM4 Pro because the integration I chose to use with it was for Homebridge.
We bought a new ceiling fan that allows RF control only of its DC motor, so I couldn't use my Inovelli LZW36 canopy module. Had to be the module included with the fan.
The solution for me was to wire the fan load and the hot together and tap off that for the LZW36 switch-only power, and don’t use their canopy module. The LZW36 was then configured as a button device to trigger virtual switches, which then trigger a HomeKit automation, which then sends the appropriate HEX via a Homebridge-Broadlink plugin to a Broadlink RM 4 Pro that sends the captured RF signal to the fan 
In your case, you would just need Homebridge and virtual switches shared with HomeKit (assuming you already have an Apple TV 4 or later, or HomePod mini to act as the HomeKit hub for the HomeKit automations).
I have a couple of the Hunter Simple Connect fans with lights.
Unfortunately, their is nothing "simple" about them unless they improved the process since I got mine a few years ago.
I use Alexa to control my fans. You can set up a link between Hubitat and Alexa using virtual devices to allow Hubitat to control the fan through Alexa, but I have not found any way to control them directly. In the end, it was too much work. I control the fans using Alexa voice commands.
How I get my Simpleconnect devices into Hubitat.
I use the HA Apple Controller to pair the Simpleconnect devices into Home Assistant.
With Home Assistant use the HomeKit bridge to push the devices to Apple Home.
With Hubitat use the Home Assistant Device Bridge to query devices in HA.
Download the Hubitat app