CONGRATULATIONS I am so glad for you. I have wired several of my 3-ways and, as I said earlier, love these GE/Jasco switch/dimmers. KUDOS to this team here walking you through and providing such great resources to guide you. And to you as well for seeing help and having the confidence to tackle this job. ENJOY your success!
1 Like
Nice one!
Take your time and anything is possible. 
Maybe update your thread title (include 3-way) for future users with the same issue.
2 Likes
Title updated.
3 Likes
Hello.
I need help with exactly (or very close to exactly) the same situation.
I'm going to phrase my question in exactly the same way that @saurabh9 phrased it, so I would greatly appreciate any assistance that you could give me , to help me wire the switch.
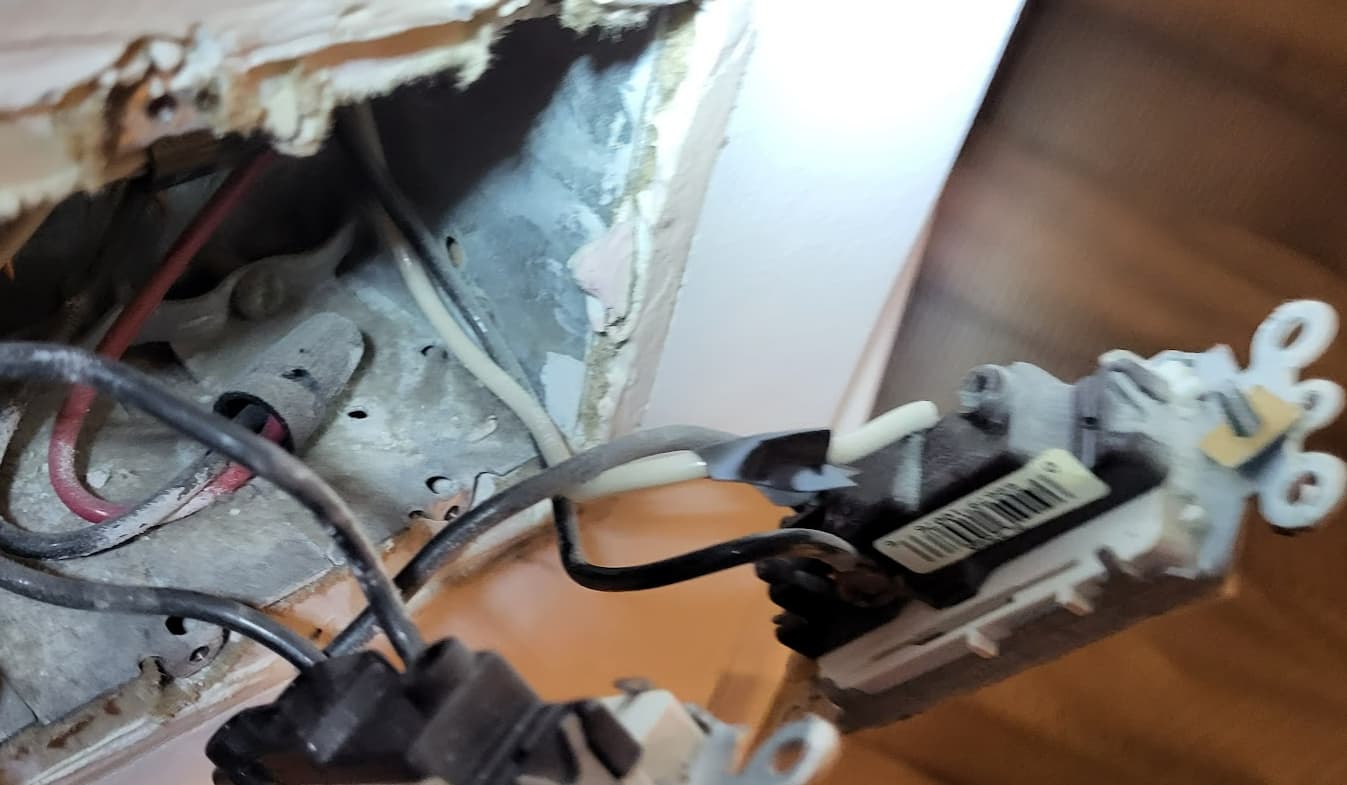
A. Switch #1 - the master, where I'm going to put the GE/Jasco Zwave (46203). This is a picture of the way the original switch was wired:
or
In case it's not evident, there are 3 input wires into the back of the switch:
- white wire (it has a black piece of tape on it); no power
- 2 black wires (both with power)
Also, please note that the Romex wire feeding that switch has a red wire (traveler?) that was caped in the box with a black wire.
As well, there is a bundle of white wires (neutral) at the back of the box (not in the picture).
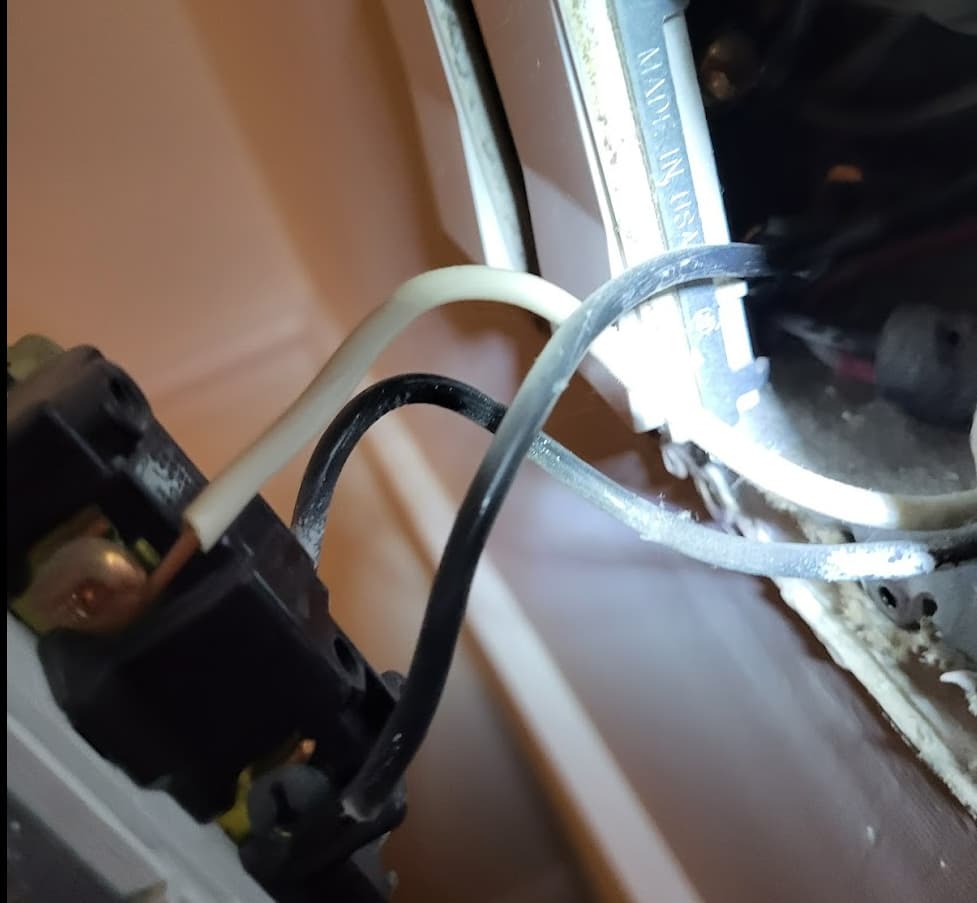
B. Switch #2, where I hope to put in the GE/Jasco 46199 add-on switch (already purchased).
I believe that this looks like a typical add-on, but I just can't figure it out:
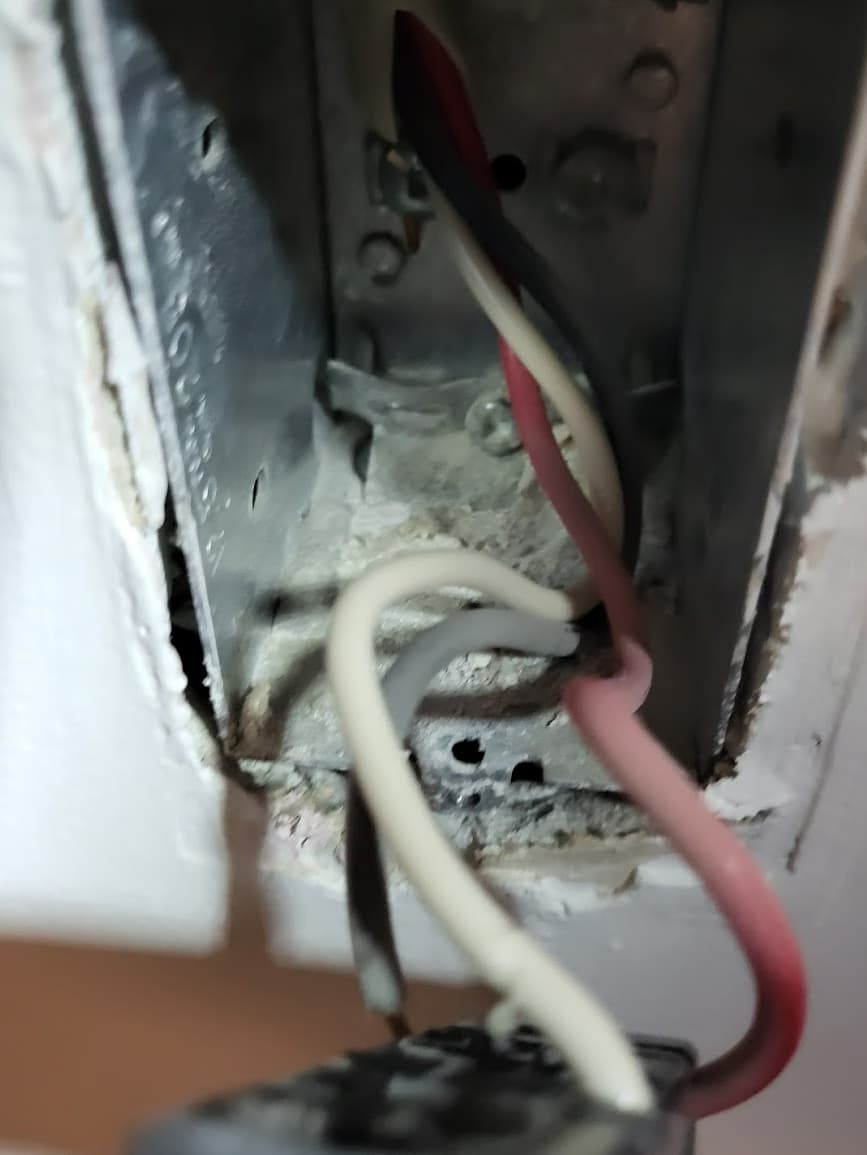
So, I put on the master switch, and got it to control the light, but I can't figure out what to do with the add-on switch. It only has a neutral and a traveler port.
Since you gave @saurabh9 such good advice, can somebody give me the same?
Sure happy to help
Please see my edits below...
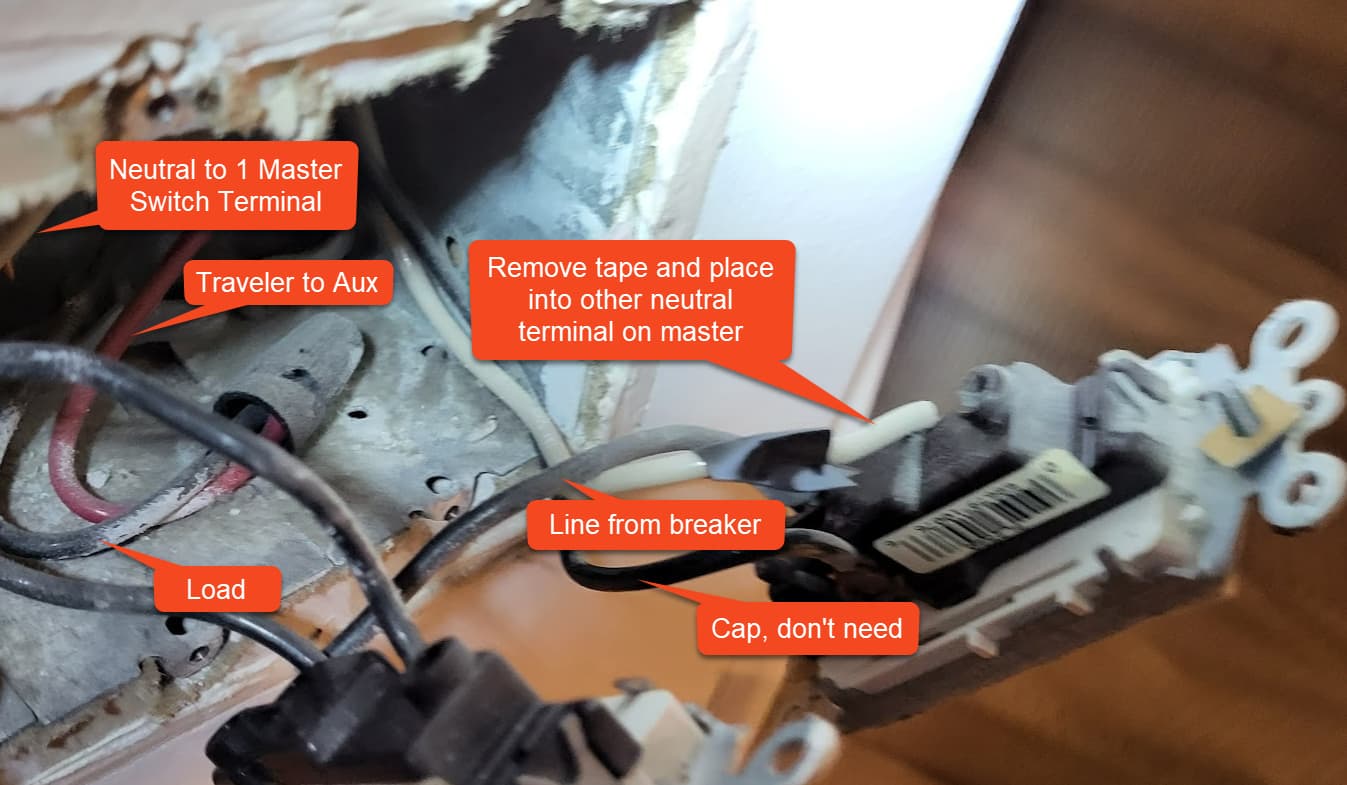
Believe I see the neutral in the upper left corner that you mention is in there that I note in my edit.
- The master switch comes with a short pigtail so add it to that bundle and place into one of the holes on the neutral terminal of the master switch
- Remove the tape from the white wire currently in your dumb switch and place it into the other hole on the neutral terminal
- Unbundle the red and black wires and place black wire into Load terminal on the master switch and red wire into the traveler terminal
- Remove the highlighted black wire and place a cap on it as you don't need it
- Place highlighted line wire and place into Line terminal on master switch
Then in your Aux switch
- Place a cap on the black wire as you no longer need it
- Red to traveler terminal
- White to neutral
4 Likes
Thank you!
I will try and do this on Tuesday... and I will let you know.
Much appreciated.
2 Likes
@jtmpush18 curious if you got your switch installed successfully?
1 Like
My apologies for not letting you know earlier!
Your instructions were perfectly on the mark!
It was a bit surprising to me, but it worked perfectly.
Just to recap, the switch at the top of the stairs was the auxiliary, and the one at the bottom of the stairs was the master.
I assume that the Ge/Jasco add-on switch is not a zwave switch, and therefore Hubitat doesn't know when it has been turned on/off. (Except maybe I can query the master, and see if there has been a "physical" press. Unfortunately though, I won't know if he pressed the aux switch at the top of the stairs, or the master switch at the bottom.)
Let me describe to you why that is significant.
The client told me (after I wired everything up) that he wanted to click (or double click) the switch at the top of the stairs, and thereby wanted to turn on/off not only the lights on the stairs (which that switch controls), but also some other lights downstairs. That way, he wouldn't have to physically go down the stairs and turn off the lights.
So, the next time I have such a situation, I'm going to forget putting in an aux switch at the top of the stairs, and wire it up so that it's "always on". I'm going to put on top that switch box a "physical control" (maybe a pico switch if I have Lutron there, or maybe Sengled (E39-G8C), or Adurosmart Eria control). That way the client will have the capability not just to turn on/off that particular set of lights, but also other stuff as well.
https://www.amazon.com/Sengled-E39-G8C-Compatible-SmartThings-Brightness/dp/B07QHDV5S4/ref=sr_1_30?crid=1DE8LFQX6Y2Z6&keywords=Sengled%2Bzigbee&qid=1655222509&sprefix=sengled%2Bzigbee%2Caps%2C89&sr=8-30&th=1
1 Like
Awesome glad you got it working
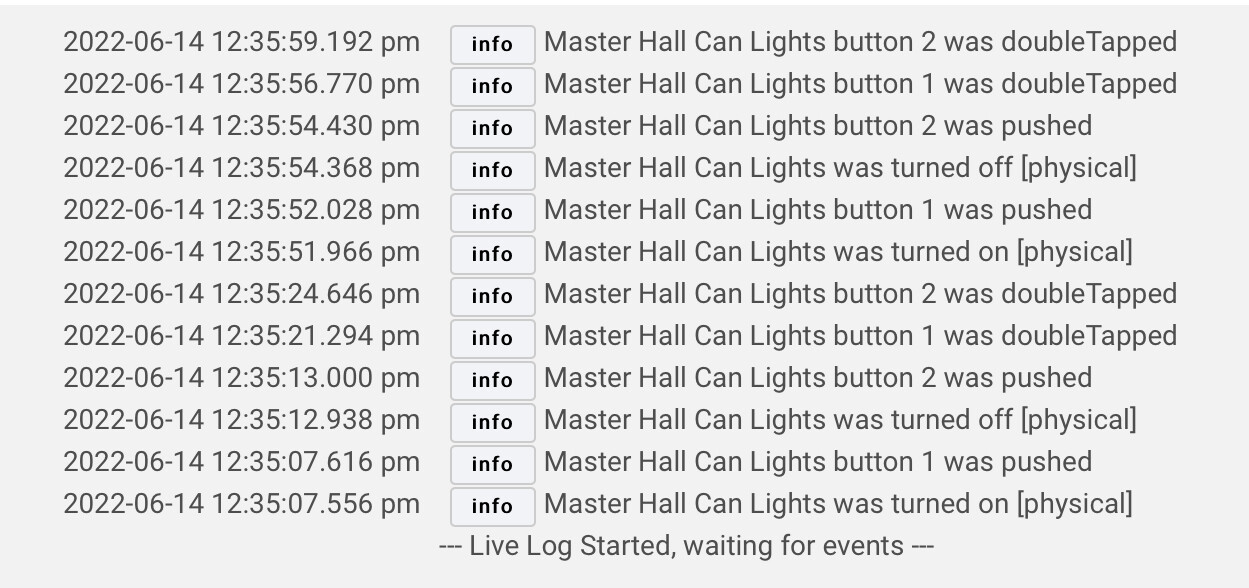
This isn’t correct. Aux switches communicate back to the master switch and emulate the same actions as if you were touching the master. As a test I have a 4 way setup on lights in my master suite. I toggled the switch and doubled tapped from the Aux’s plus the master and as can see they are all logged as events that you can build rules from
As shown by my test above you should be able to implement this for your client.
1 Like
Thanks for letting me know that I can "trap" a double-tap on an aux. switch.
2 Likes
I can attest to the fact this works as well. Double tapping the Aux is the same as double tapping the Master switch.
1 Like
AN INTERESTING POSTSCRIPT:
First of all, I would like to thank @terminal3 and @ritchierich (amongst others) who help me sort out my electrical issues with 3 ways.
However, my client came back to me recently, and said that she wanted 4 more switches (of which all of them were 3 way). They were all of slightly different configuration, as well.
On the first of these, I tried and tried and tried to apply the learnings that I got from this forum. After a while I realized "there has to be a better way!"
My idea: I capped all the wires at the auxiliary end, and put in a Zen 34 Remote switch. I put in the appropriate button controller, and "Bob's your uncle!" Done in 10 minutes, after futzing around for over an hour trying to figure out how to put in the GE/Jasco auxiliary switch with the master.
So, if anyone is reading this in the future, and you don't have to use the auxiliary switch - don't!
Use the Zen34 Remote instead! (no wiring required!)
1 Like