AlertMe on Hubitat

Starting this new thread as I get the feeling, what with the new C-7 hub having CE approval, that there may be a few more UK users appearing over the next year or so. No doubt there are bucket loads of AlertMe devices in people's homes and garages just waiting to be added!

If there are any people from my old AlertMe Users' Forum, feel free to grab any useful info from there and paste it over here. I'll probably close that forum down and let the domain expire in November.

What I'm going to write here assumes that you'd like to rebuild your AlertMe system replacing the original hub (Mini or Nano) with the Hubitat Elevation hub. We'll cover new Zigbee devices later on. It'll be based on my own experience as a new Hubitat user myself, but I have over 10 years experience with the AlertMe platform at this stage, as a user and third-party developer.

A lot of what ends up here may also be relevant to Iris V1 users, as that system was based on the AlertMe platform. It is also likely to be relevant to Hive users in the UK as British Gas, who operate Hive, bought AlertMe back in 2015 and based their platform on the technology.

If you were a British Gas Safe & Secure customer, boy did you get a rough deal. But no more! Your devices should also be usable on Hubitat.

Where We're At

For UK users with AlertMe devices, Hubitat is mostly ready to go with built-in drivers, though I have made some specific feature-enhanced AlertMe Device Drivers which can also be used.

Adding the Smart Plug

Pick a location for your Hubitat Hub and stick with that location. Follow the Getting Started guide and when you get to Discovering Devices, you will use Iris V1 Zigbee pairing.

Start with the SPG100 smart plug closest to the Hub. You will probably need to reset it to get it back into pairing mode:

  1. Power up your SPG100 outlet in a mains socket.
  2. Press and hold the power button on top for 10 seconds.
  3. Release the button, then press it repeatedly, about once a second.
  4. After about 6-10 presses the orange AlertMe logo will begin double-flashing.

Remember to "pair in place" and work your way from closest to farthest from the Hub. Don't take your smart plugs to the Hub and then move them to their final location - this will make the stabilisation of your network take longer.

If you plan to set your system up for security use I'd recommend replacing the batteries in these outlets and definitely getting your router and hub on UPS battery backup.

Adding AlertMe Devices

While adding devices you can check in your Logs (left panel) to see what's happening.

Ideally you would put the Hub into pairing mode then reset the Device, but on the first few tries it can be a little tricky to do within 60 second timeout. It gets easier with practice!

If you have Devices which don't appear, reset them and try again. Sometimes pairing is nearly instantaneous, but occasionally it takes a few goes.

Alarm Detector

The Alarm Detector works perfectly, but is identified as a Motion Sensor.

To reset and pair:

  1. Remove the battery if present and wait for at least 10 seconds.
  2. Locate the 'tamper' button in the centre of the device.
  3. Insert the battery and immediately begin pressing the tamper button, once per second.
  4. When the orange LED ring begins double-flashing, the device is in pairing mode.

Button

The Button is automatically recognised and works perfectly. To reset and pair:

  1. Remove the battery if present and wait for at least 10 seconds.
  2. Locate the 'tamper' button in the centre of the device.
  3. Insert the battery and immediately begin pressing the tamper button, once per second.
  4. When the orange LED ring begins double-flashing, the device is in pairing mode.

Keyfob

The Keyfob is automatically recognised and works perfectly. To reset and pair:

  1. Remove the battery if present and wait for at least 10 seconds.
  2. Locate the 'Away' button. It's usually the smaller one and shows a little figure outside of a house.
  3. Insert the battery and immediately begin pressing the 'Away' button, once per second.
  4. When the green LEDs begin double-flashing, the device is in pairing mode.

Motion Sensor

The Motion Sensor is automatically recognised and works perfectly. To reset and pair:

  1. Remove the battery if present and wait for at least 10 seconds.
  2. Locate the 'tamper' button.
    a. On v1 sensors it is in the upper-right corner.
    b. On v2 sensors it is in the middle of the circuit board.
  3. Insert the battery and immediately begin pressing the 'Away' button, once per second.
  4. When the green LED in the corner begins double-flashing, the device is in pairing mode.

If possible I'll move join instructions to the documentation wiki alongside the others.

Adding Non-AlertMe Devices

And some about this as well, mostly as I learn it!

3 Likes

I just got my SAR through from Hive and saw that there was loads of data being sent to Alertme.

I did some digging, but not being an expert I was going to reach out to plenty on here if they can intergrate HIVE. Liikes like @andydvsn you are the man

No problem, @Shaneb!

I have a few Hive devices around here somewhere which I will try pairing at some point, but I've decided to rebuild my system AlertMe-style and experiment as I go, because that's the stuff I know best.

I've also been messing a lot with Xiaomi devices with @markus's help and will do a little of that here as well, but I've decided to approach this from where most of my knowledge comes from and build up from there. :slight_smile:

Any questions, just shout!

Having never used Alertme or the system, how would I get my Hive heating working with Hubitat? is it a driver/app or will we need to use something like a PI to run?

I know there are API details laying around on othersites, but i'm far from knowledgeable in that domain

Being a long-time Iris user from version 1 up through the end, I look forward to seeing what will develop from your experience. There are some Iris V1 devices such as the V1 keypad that I have that do not yet work with Hubitat. Hopefully, your experience will help get devices like this working. I don't know if @mike.maxwell is still working on getting Iris V1 devices working, but your experience will likely be helpful if he is.

1 Like

If you need it "today" then I think your best bet would be to use HOOBS to integrate all of your platforms onto a single user interface. I can't remember which ones Hive supports, but I do know they recently added official Apple HomeKit integration.

With HOOBS I believe you can integrate your Hubitat system with HomeKit as well, which would give you a single interface to multiple platforms.

As for Hubitat doing everything, I don't know if they support the heating controller yet (but that should be easy if they can get hold of one, it's either on or off). The tricky one is the thermostat; there's almost certainly no support for the fancy Hive one.

I would tinker, but as a set-and-forget system it's never really let me down, so I am loathe to touch it. Especially as my household popularity would sink to new lows if I were to leave the family shivering when winter comes around. :wink:

1 Like

Sadly the Iris V1 keypad was never released in the UK, so I am likely not much use in this regard. Plus, I am a rank amateur at driver development.

AlertMe was designed as a security system primarily, which is why every repeating device has in-built battery backup. But the user experience was to operate by presence detection and keyfobs, rather than a PIN panel.

Ah ok, makes sense. I have a "working' hack anyway. I use Hubitat to trigger on and off a virtual device based on presence of our phones and use IFTTT to trigger hive temps based on if we are present or not. It would just be cool to have if all on HE

Ah, that’s a neat solution, I might do that myself!

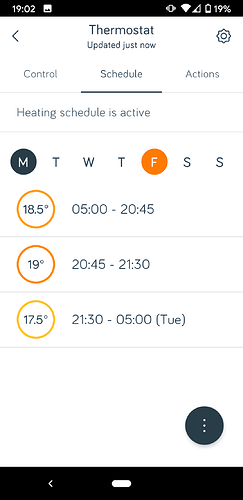
@andydvsn I found what worked well for me was to have a simple schedule as below

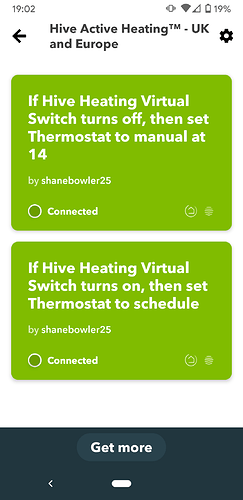
Then the two rules one for away that out heating on a low setting and then another for when either of us are in to set to schedule

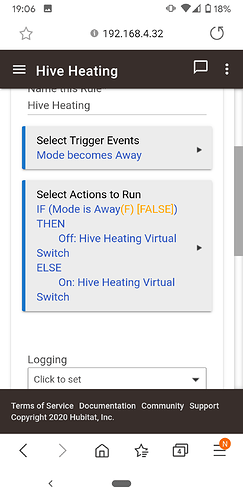
Then I set up a simple rule

Away mode is when both phones are out of range.

1 Like

That heating solution works really well, thanks @Shaneb. My first virtual device too. :slight_smile:

So, for the past couple of days the network has been:

2x AlertMe Buttons
1x AlertMe Keyfob
1x AlertMe Lamp (Repeater)
1x AlertMe Power Clamp
3x AlertMe Smart Plugs (Repeaters)

All completely stable and VERY FAST to respond, even after hours left unused.

Oh, and one other device:

1x Xiaomi Mijia GZCGQ01LM Zigbee 3.0 Light Sensor using @markus's driver.

This is the second 'rogue' device I added to the AlertMe-only network for testing. It's been perfect. It only reports changes in level, so it's not chatty all the time, but I've just noticed it perform its check-in. I'm impressed with this one.

I mentioned it was the second interloper. The first had to be a Xiaomi Aqara WXKG03LM Wireless Switch, again on @markus's driver. This one dropped from the mesh within 90 minutes, eventually just doing this.

Because IKEA Trådfri devices are such good citizens I'm tempted to throw a single lamp onto the mesh, see how that behaves, but also pair the WXKG03LM again and observe how long its almost inevitable demise takes. :wink:

Erm, I have no reasonable explanation, but the wireless switch is still working.

I tried it 5 times before adding the Trådfri lamp and it always died within 90 minutes. Added lamp, it’s been 17 hours all fine. It’s not even routing through the lamp, it’s still going via an SPG100.

After more testing, I can confirm that the mere presence of a Trådfri device on the AlertMe mesh makes the WXKG03LM wireless switches work with @markus’s driver.

I removed the lamp and tried the switch again after 90 minutes. It was gone from the network, flashing its LEDs as shown in the video. Added the lamp back, then re-paired the switch and another 12 hours have passed without any problems with it. At no point has it routed through the lamp; it always attaches to the nearest SPG100 smart plug.

During that time I added additional SPG100s and another ‘3LM switch, all of which are behaving just fine. There was definitely at least one occasion where all routes were dropped while adding another outlet, but all devices found new routes pretty much immediately. Also, the Trådfri lamp has worked perfectly, so I’m pretty impressed right now!

Well, impressed and confused. I’d love to know what the Trådfri lamp is bringing to the mesh that isn’t already present.

Well, it's been quite a week!

The AlertMe-based mesh has grown a fair bit and with the help of @markus and some serious documentation and code reading I've actually managed to develop a couple of AlertMe Device Drivers, one for the Power Clamp and one for the SPG100 Smart Plug.

The SPG100 is officially supported with the Iris V1 driver now, which is great; my driver adds in reading the summary consumption report, backup battery information, temperature, mains power presence, state mismatch flag (demand on but supply off) and ranging mode. The temperature reading is skewed due to internal heat but it may be handy to someone.

The Power Clamp is only fully supported with my driver, with battery, temperature, instant and summary consumption. Ranging mode to be added.

The mesh now looks like this:

3x AlertMe Buttons
1x AlertMe Keyfob
1x AlertMe Lamp (Repeater)
2x AlertMe Power Clamps
10x AlertMe Smart Plugs (Repeaters)

Plus the following non-AM gear:

1x Hive "Active Light Colour Changing Light Bulb" - Generic ZigBee RGBW Light Driver
1x Ikea Trådfri E1746 Repeater - Generic Repeater (with Presence) Driver
3x Ikea Trådfri 400lm E14 Lamps - Generic Zigbee Bulb Driver
1x Xiaomi Aqara Cube MFKZQ01LM - Aqara Cube Driver
2x Xiaomi Aqara Buttons WXKG11LM - Xiaomi/Aqara/Opple Button/Switch/Remote Driver
2x Xiaomi Aqara Wireless Switches WXKG03LM - Xiaomi/Aqara/Opple Button/Switch/Remote Driver
1x Xiaomi Mijia Light Sensor GZCGQ01LM - Xiaomi Mijia Smart Light Sensor (Zigbee 3.0) Driver

All of the AlertMe devices have stayed stable on the mesh with absolutely no problems throughout all of my tinkering, as have the Ikea E14 lamps and the faultless Xiaomi light sensor.

One of the Xiaomi buttons didn't like staying attached at first and fell off once while adding outlets, but the other has been perfectly fine. Same story with the wireless switches; one has been flawless, the other "a bit droppy" while the mesh was altered. Re-pairing (without deleting) when things have stabilised brings it back just fine.

Turns out that the Hive lamp with the overly long name is in fact manufactured by Aurora and may well be their A1GSZ9RGBW. It's identified as an "RGBBulb01UK" and it would be interesting to see if their own-brand model paired with the Hive hub.

For the curious, here's the getChildAndRouteInfo.

Parent child parameters
EzspGetParentChildParametersResponse [childCount=0, parentEui64=0000000000000000, parentNodeId=65535]

Child Data

Neighbor Table Entry
[Kitchenframe, 1FF3], LQI:255, age:4, inCost:1, outCost:1
[Study Lamp 2, 20FC], LQI:254, age:4, inCost:1, outCost:5
[Loft Lights, 43C5], LQI:241, age:4, inCost:5, outCost:1
[Study LED Lamp, 57FE], LQI:140, age:6, inCost:7, outCost:7
[Hive Lamp, 7F0C], LQI:254, age:4, inCost:1, outCost:1
[Behind You Test Outlet, 93CA], LQI:255, age:4, inCost:1, outCost:1
[Living Room Lamp, 9723], LQI:252, age:5, inCost:3, outCost:1
[Main Repeater, 9DA9], LQI:255, age:4, inCost:1, outCost:1
[Study Lamp 1, 9F50], LQI:242, age:5, inCost:5, outCost:7
[Strobe, A0F1], LQI:255, age:3, inCost:1, outCost:1
[Study Workbench Outlet, AA07], LQI:255, age:4, inCost:1, outCost:1
[Study Lamp 3, C957], LQI:254, age:4, inCost:1, outCost:7
[Test Outlet, E025], LQI:234, age:4, inCost:5, outCost:3

Route Table Entry
status:Active, age:64, routeRecordState:0, concentratorType:None, [Wall Twinklies, 0435] via [Behind You Test Outlet, 93CA]
status:Active, age:32, routeRecordState:0, concentratorType:None, [Power Clamp 1, B893] via [Strobe, A0F1]
status:In Discovery, age:0, routeRecordState:2, concentratorType:High Ram, [null, 0000] via [Behind You Test Outlet, 93CA]
status:Active, age:64, routeRecordState:0, concentratorType:None, [Kitchenframe, 1FF3] via [Kitchenframe, 1FF3]
status:Unused
status:Active, age:64, routeRecordState:0, concentratorType:None, [Living Room Lamp, 9723] via [Living Room Lamp, 9723]
status:Active, age:64, routeRecordState:0, concentratorType:None, [Test Fob, B12C] via [Behind You Test Outlet, 93CA]
status:Active, age:64, routeRecordState:0, concentratorType:None, [Test Wireless Switch, D83E] via [Behind You Test Outlet, 93CA]
status:Active, age:64, routeRecordState:0, concentratorType:None, [Light Thing, FFD5] via [Behind You Test Outlet, 93CA]
status:Active, age:64, routeRecordState:0, concentratorType:None, [Hallway Wireless Switch, E595] via [Main Repeater, 9DA9]
status:Active, age:64, routeRecordState:0, concentratorType:None, [Xiaomi Button 2, BF20] via [Behind You Test Outlet, 93CA]
status:Active, age:64, routeRecordState:0, concentratorType:None, [Xiaomi Button 1, 377E] via [Hive Lamp, 7F0C]
status:Active, age:64, routeRecordState:0, concentratorType:None, [Test Button, D657] via [Behind You Test Outlet, 93CA]
status:Active, age:0, routeRecordState:0, concentratorType:None, [Power Clamp 2, E2DA] via [Behind You Test Outlet, 93CA]
status:Active, age:64, routeRecordState:0, concentratorType:None, [Loft Button, 3B3D] via [Kitchenframe, 1FF3]
status:Active, age:64, routeRecordState:0, concentratorType:None, [Loft Lights, 43C5] via [Strobe, A0F1]
1 Like

My C-7 turned up the other day, so I've now been able to build two meshes. :star_struck:

The C-7 will run any battery-backed security gear based on the AlertMe devices (and be battery backed itself) while the C-5 will primarily handle the Xiaomi wired wall switches and anything else which can't report or be controlled during a power outage. Anything that proves resilient enough to stay on the same network as those wired switches anyway.

I'm seriously impressed with the Hub Link feature. Being able to link and control devices from two (or more) hubs from a primary hub with no noticeable delay is awesome. The Xiaomi gear is a bit laggy anyway, so any further slowdown would be unacceptable. I'm happy to say it works brilliantly!

I'm now taking full advantage of @markus's wall switch driver and its ability to disconnect the button action from the internal relay. Using this you can completely change the behaviour of any wall switch, with added hold and double-tap.

The next trick is to see which devices can survive alongside the wall switches. I'm very hopeful for Trådfri kit, seeing as the repeaters work perfectly, so I'm trying to some lamps. Also, I'm trying a Salus SP600 as I've got a bunch of those hanging around.

1 Like

Really? That is not my experience, my Xiaomi motion sensors make my lights turn on so fast that when I put my first foot down inside a room the lights are on. The lights are however WiFi based running Tasmota.

Hehe, I should probably qualify "laggy". :grinning:

With all of the Xiaomi gear I get about a half second to one second lag between pressing the button or wall switch (wired or wireless) and an action taking place, longer (it would seem) if the button has not been pressed in a while. It's enough time to remove your finger from the button, then the action happens.

With the old AlertMe kit on Hubitat my finger does not get chance to move away from the button before the action happens. It's pretty much instantaneous, which it wasn't even on the original system.

So I'm basically nitpicking between "very fast" and "very very fast". :wink:

Ah, you're talking about the Aqara Wall Switches, yes, those might not be the fastest. I only have the new Aqara D1 Wall Switch and that is for testing and writing drivers only, so have never used it "live". There is probably not much that can be done to improve the speed of the wall switches, but it might be worth adding a ping-feature to tht driver that could run once every 30 minutes or so. Could improve their routing. If you want to try it I can add it during the week when I find some time?

Absolutely, happy to try anything out! :+1:

Not seen any of the D1 kit available here yet, I must keep a watch out.

It's in the development branch of my drivers (Beta-releases) . Set the ping type to Read Attribute in Preferences and press Save :slight_smile:

1 Like